Backup NGINX logs with JuiceFS
NGINX is often used as a reverse proxy in production, and multiple servers are configured to interface with various application services behind. There are two main types of logs, the access log (access.log) and the error log (error.log).
The logs are scattered across the disks of each NGINX node, each machine's own disk is insecure, and the scattered logs are difficult to maintain and use. Therefore, we will gather the logs in a more reliable storage system. On the one hand, long-term storage is safe and reliable, and on the other hand, it is convenient for analysis purpose.
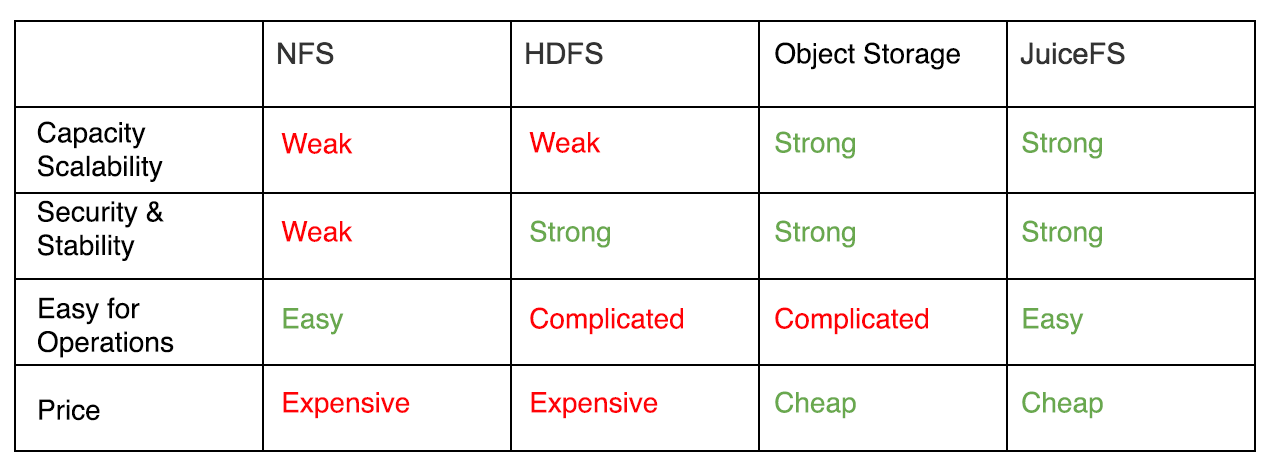
When talking about the requirements of logs storage, the primary demands are capacity scalability, security, affordable, and stability, easy for operations. It's better to have a pay as you go rates. In contrast, the performance is a minor factor to consider. Currently, common solutions are NFS, HDFS, object storage, etc., let's compare these solutions with JuiceFS:
When talking about the way to collect logs, there are two methods: Timed Collection and Real-Time Collection, which we will explain separately below. Since JuiceFS uses the customer's own object storage to store file data, therefore it inherits the benefits of object storage naturally. Besides, we provide high-performance metadata services and full POSIX compatibility, which is more convenient to use than object storage.
Timed Collection
Use logrotate as an example, to copy NGINX logs to JuiceFS on a daily basis, edit /etc/logrotate.d/nginx as follows:
# assume JuiceFS is mounted on /jfs
/var/log/nginx/*.log {
    daily    # scroll daily
    compress
    dateext # add date to file name
    sharedscripts
    postrotate
        [ -f /var/run/nginx.pid ] && kill -USR1 `cat /var/run/nginx.pid` # reload log file
    endscript
    lastaction
        rsync -au *.gz /jfs/nginx-logs/`hostname -s`/ # synchronize compressed logs to JuiceFS
    endscript
}
At this point, the NGINX log can rotate and saved to JuiceFS every day. When adding an NGINX node, you only need to do the same configuration on the newly added node.
If using NFS, the configuration in logrotate is basically the same. But NFS has several disadvantages:
Most NFS has a single point of failure, and JuiceFS is highly available (Professional plan promises 99.95% SLA). The NFS protocol transmission is not encrypted, so you need to ensure that NFS and NGINX are in the same VPC. If there are other services to be backed up, it will be very troublesome to deploy. JuiceFS transports have SSL encryption and are not subject to VPC restrictions. NFS requires prior capacity planning, and JuiceFS is elastically scalable, pay as you go for capacity, and is more worry-free and cheaper. If using HDFS or object storage, it is more troublesome to access backup data in the future. JuiceFS is much simpler, for example, you can query directly with zgrep.
A few more Tips:
- Execute
logrotate -f /etc/logrotate.d/nginxto immediately verify the logrotate configuration. You can also use -d for debugging. - Logrotate runs based on cron service. Regardless of whether you set weekly, daily or hourly, the specific execution time can be modified in /etc/crontab.
- If you think there are too many log files, we also provide the
juicefs mergecommand to quickly merge gzip compressed log files.
After the timed collection, let's talk about the real-time collection of logs in the next section.
Real-Time Collection
There are many open source tools for real-time collection of logs. Commonly used are Logstash、Flume、Scribe、Kafka etc.
When the cluster is not very large, there has a one-stop solution named ELK for the log collection, analysis, indexing, and display, which uses Logstash for log collection and analysis.
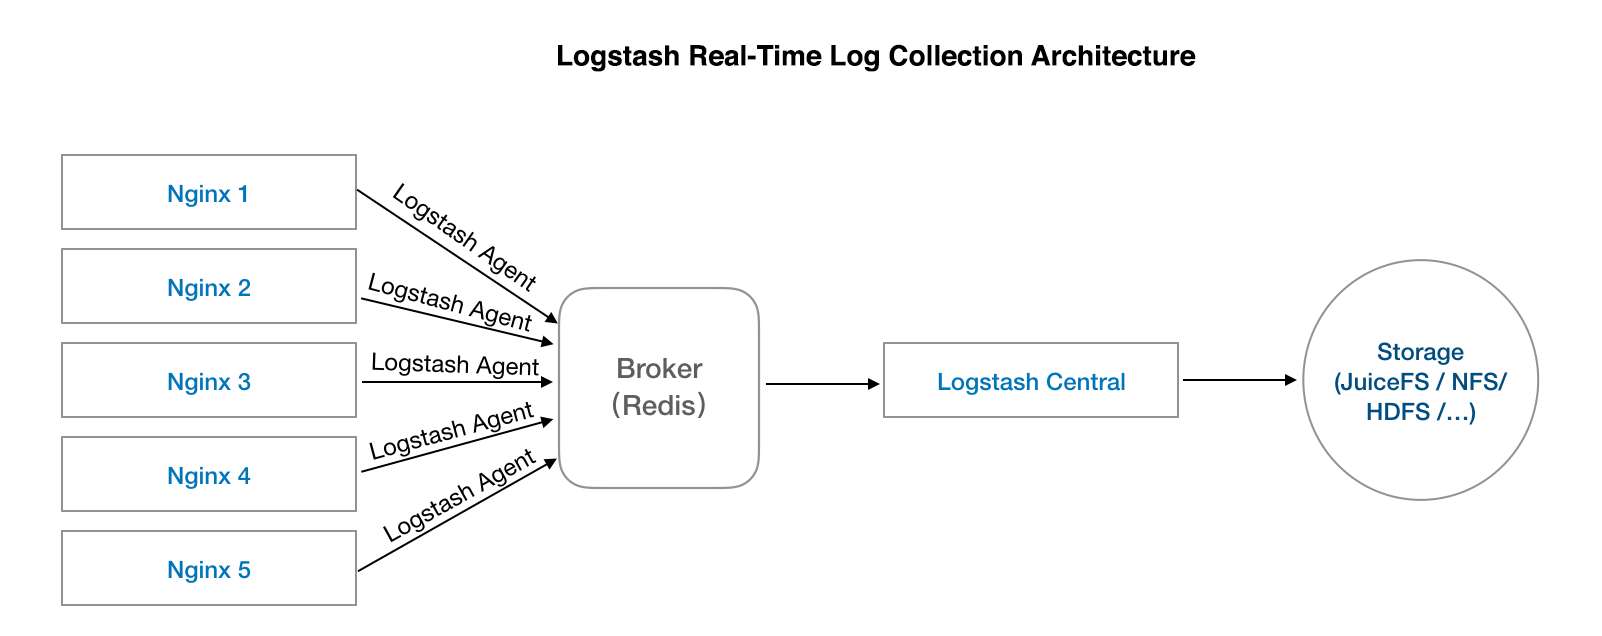
The deployment details are:
- Deploy a Logstash Agent on each machine (other tools like Flume are the same);
- Deploy a Logstash Central for log aggregation;
- Deploy a Redis as a broker for the entire service, the purpose is to make a buffer between log collection and write, to avoid the log loss caused by Central down;
- Then configure Central's drop-off mode to store logs to JuiceFS / NFS / Object Storage / HDFS.
Take a look at the architecture diagram:
Since there are many articles about the configuration of Logstash in the collection, analysis, and filtering, we skip talking about this and discuss the output.
To save the Logstash collected logs to JuiceFS only need to change the output part on the configuration:
output {
    file {
        path => "/jfs/nginx-logs/%{host}-%{+yyyy/MM/dd/HH}.log.gz"
        message_format => "%{message}"
        gzip => true
    }
}
Store to NFS can also use the above configuration, disadvantages are the same as mentioned in the timed collection section above.
If you want to save to object storage, HDFS, you need to configure Logstash third-party plug-ins, most of which are unofficial. With the upgrade of Logstash version, you may need to do some re-configuration.
The simplest real-time collection method
In fact, there is a simpler way to collect real-time logs, which is to let NGINX directly output the logs to JuiceFS, eliminating the need to maintain and deploy the log collection system. Using this solution may worry that JuiceFS will affect the normal operation of NGINX when service unavailable. There are two aspects that can help you mitigate some concerns:
- JuiceFS itself is a highly available service, and the Professional plan promises 99.95% availability, which should be the same availability level with your services like database;
- NGINX's log output is implemented using asynchronous I/O, and even if JuiceFS has temporary jitter, it does not affect the normal operation of NGINX (restart or reload may be affected).
If you don't like the sophisticated log collection system, this solution is worth a try.
Add a remote backup for the NGINX logs
We have done the timed collection and real-time collection. But how to make a remote backup for the NGINX logs stored in super-backup?
Just two steps:
I. Go to the JuiceFS website console, access the settings menu of your file system, check "Enable replication", then select the object storage you want to copy to and click save. II. Remount the super-backup on all machines that mounted the super-backup. The newly written data will then quickly synchronized to the Bucket to be copied, and the old data will also be synchronized on the client's scheduled scan (by default once a week).
This way will automatically synchronize a copy of data to another object storage, effectively preventing a single object storage failure or a disaster in the area.