Quick Start
This is a quick start guide for JuiceFS Enterprise Edition. If you are using the JuiceFS Community Edition, please visit Community Edition Documentation.
If you are using JuiceFS Enterprise on-premises, note that all the web console links points to our cloud service console, you should change the address and access your on-premises console instead. On-premises deployment use the same set of software as JuiceFS Cloud Service, thus this documentation applies to both.
Check the following before getting started with JuiceFS:
- Software architecture: Skim through our architecture to get a grasp on the basic role of each component.
- Storage: With JuiceFS, all data will be stored in your own object storage, you can create the object storage bucket manually in the cloud platform in advance, or you can let JuiceFS client automatically create the bucket for you. either way, you need to prepare the secret key to access the API of object storage.
- Python: Make sure you have Python installed, Python >= 3.5 is needed for graceful upgrade, Python >= 2.7 is supported as a minimum.
- FUSE: JuiceFS achieves POSIX compatibility via FUSE, make sure you have FUSE installed:
- Most Linux distributions already have FUSE built-in as a kernel module, use
fusermount -Vto verify. - Install macFUSE if you are using macOS. With Apple silicon you might also need to refer to Startup Disk security policy control for a Mac with Apple silicon.
- Most Linux distributions already have FUSE built-in as a kernel module, use
Creating a file system
You can create any number of file systems, each associated with an object storage bucket. Open the web console, click the "Create File System" button.
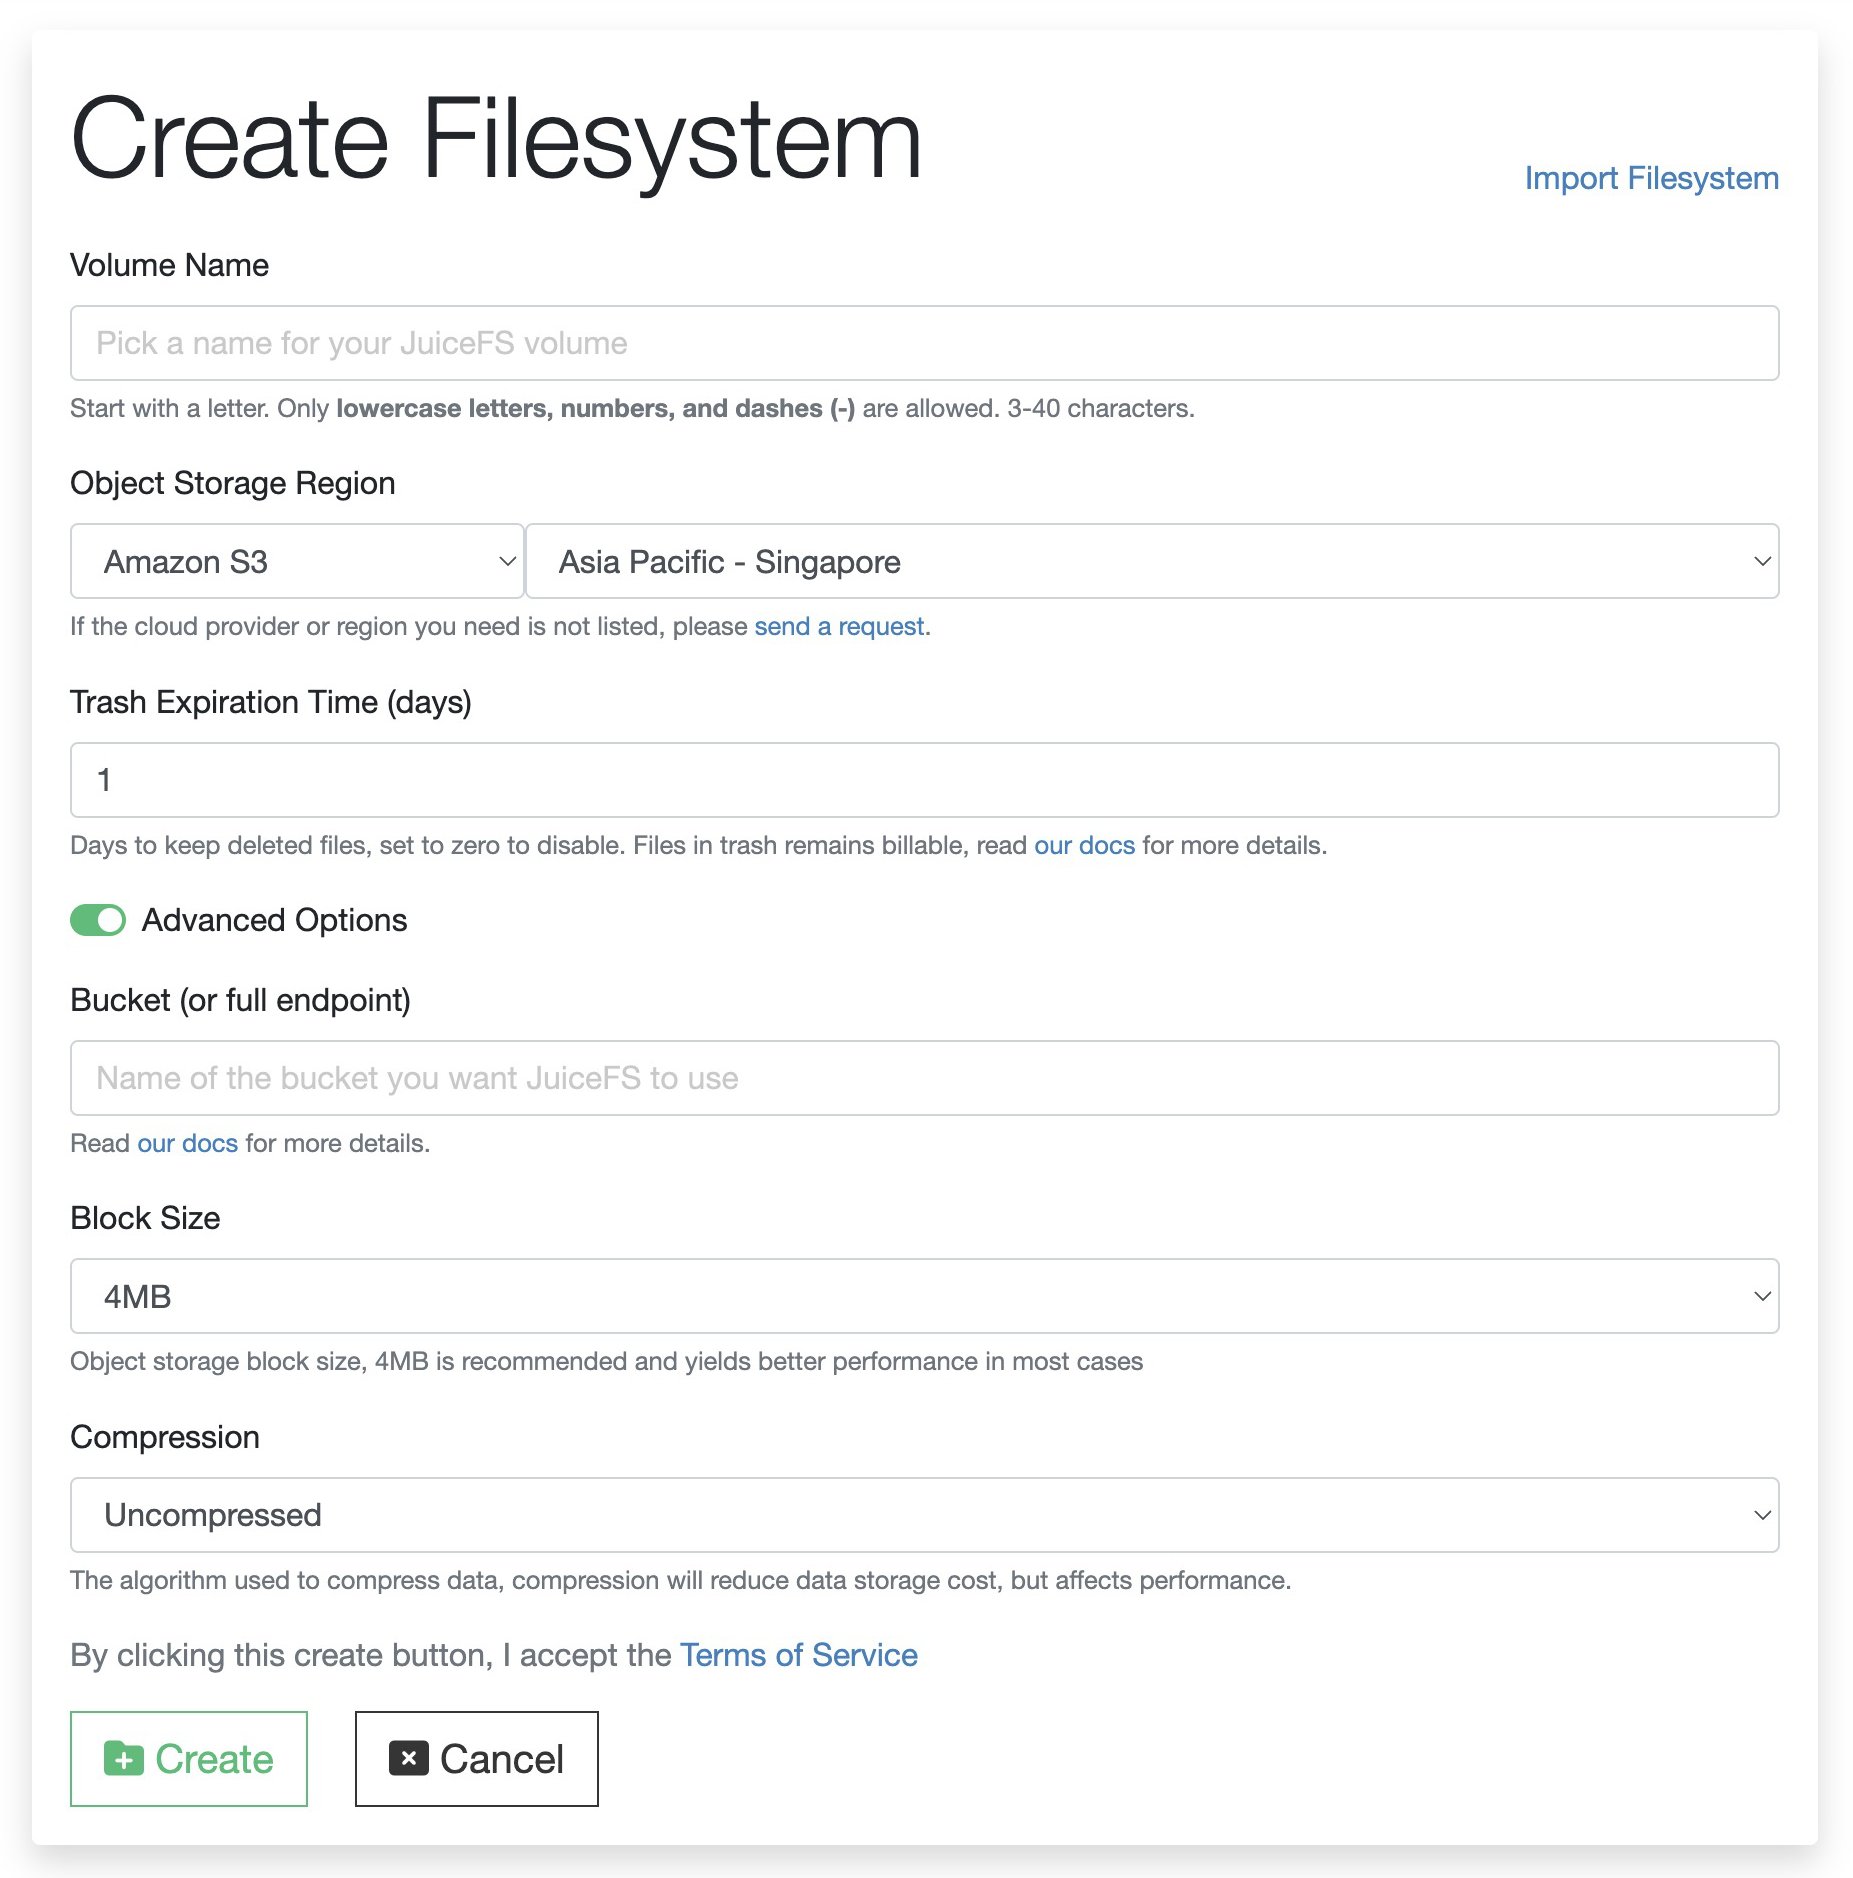
In the above form:
-
Volume Name: A unique name for your file system, must be provided when mounting the file system.
-
Object Storage Region: The service provider / region of your object storage, select the one closest to your application hosts to get the best latency.
If the desired object storage isn't listed as one of the supported providers (e.g. Cloudflare R2,) choose S3 instead, and then fill in the full endpoint in the bucket field. Using this method, you can make any S3-compatible service work with JuiceFS.
-
Trash Expiration Time: Days to keep deleted files, set to zero to disable. Files in trash remains billable, read trash for more.
-
Advanced Options Bucket (or full endpoint): The object storage bucket used by the file system, use an existing bucket or JuiceFS will try to create for you upon the first mount (Access Key/Secret Key must be associated with bucket create permission).
If you wish to use other S3-compatible services, fill in a full endpoint instead. Take R2 for example:
https://<accountid>.r2.cloudflarestorage.com/mybucket. -
Advanced Options Block Size: The object storage block size, 4M is usually a better default value because many object storage services use 4M as their internal block size, thus using the same block size in JuiceFS usually yields better performance. Learn how JuiceFS split and store files in "How JuiceFS Stores Files".
-
Advanced Options Compression: The compression algorithm used by the file system. Compression reduces object storage usage but affects performance. If you were to store data that's already compressed (like Parquet, ORC), disable compression to avoid read amplification.
-
On-prem Single Zone Limited: If you're already using a multi-zone cluster, but among all the file systems, some maybe smaller and doesn't really need multi-zone level performance. Enable this option to limit file system metadata to a single zone (zone 0, to be specific). Such tuning allows easier management for these minor file systems.
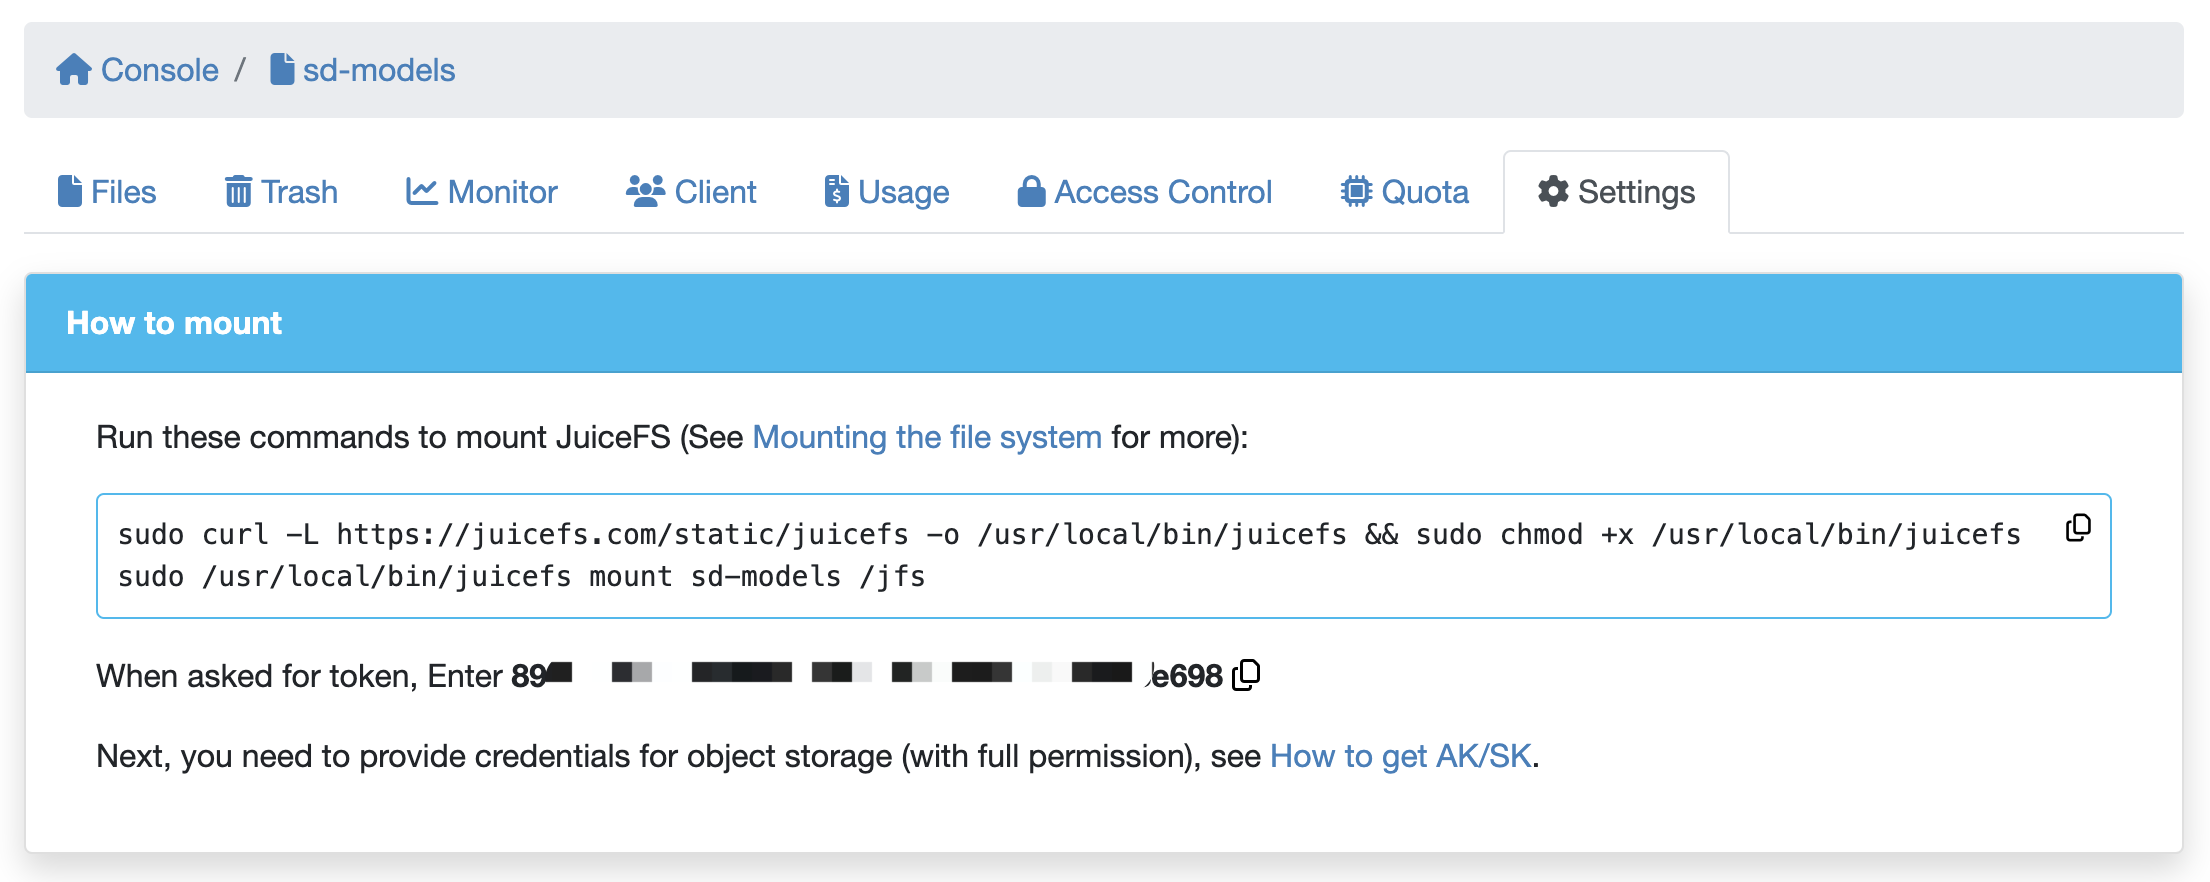
Upon creation, you will be redirected to the settings page, follow the instructions to mount the newly created file system. Note the Token in the settings page, this is used by clients to authenticate against the web console and fetch relevant configs, when you mount a JuiceFS file system.
Mounting the file system
In order to mount JuiceFS, node is required to have access to the metadata service and the corresponding object storage. For a production environment, mount points should be located in the same region as the file system's object storage, in order to achieve the best performance.
Linux, macOS
Linux and macOS users can run the below command to install JuiceFS to /usr/local/bin (you can modify it according to the actual situation).
- curl
- wget
curl -L https://juicefs.com/static/juicefs -o /usr/local/bin/juicefs && chmod +x /usr/local/bin/juicefs
wget https://juicefs.com/static/juicefs -O /usr/local/bin/juicefs && chmod +x /usr/local/bin/juicefs
If you encounter a Permission denied error during the execution of the above command, use sudo or switch to the root user to execute.
In the terminal, run juicefs --help and expect a help message printed, indicating that the client was installed successfully. If you see command not found, check your environment variables and ensure /usr/local/bin is in PATH.
To mount the file system that you just created, run:
sudo juicefs mount $VOL_NAME $MOUNTPOINT
Replace $VOL_NAME with the file system name set during "Creating a file system", and replace $MOUNTPOINT with the desired path, like /jfs.
The client will interactively ask for credentials. You'll be needing the token of the file system, and the Access Key ID / Access Key Secret required to access the object storage (must have full access to the underlying bucket).
$ sudo juicefs mount myjfs /jfs
Token for myjfs: xxxxx
Access key ID for oss://juicefs-myjfs: xxxxx
Access key secret for oss://juicefs-myjfs: xxxxx
OK, myjfs is ready at /jfs.
About the interactive input process, do notice that:
- Credentials are only required when mounting for the first time, upon a successful mount, client configuration will be stored in
$HOME/.juicefs/$VOL_NAME.conf, so you won't need to provide them again on the next mount. - Interactive input is intrinsically not suitable for automation, thus if you were to mount via script, you need to run
juicefs authin advance to fetch the client config. Read more about this in Automation. - Using 5.1.6 or newer versions, users can actually manage object storage credentials (Access Keys, Secret Keys) directly on our Web Console, in the file system settings, and then during client authentication, users no longer need to provide object credentials. Centralized key management is useful when there's many users at your team that will use JuiceFS.
Now that JuiceFS has been mounted on the system, the client will run as a daemon in the background, logs will be written to /var/log/juicefs.log, refer to "Troubleshooting Methods" for more.
Windows
Since 5.2, JuiceFS Windows version is available for evaluation, if you do not wish to use a beta version, you may choose to use JuiceFS Client in WSL 2, installation steps are just the same as Linux. But note that WSL 2 requires Hyper-V which is usually not available on cloud service VMs, proceed with caution.
Click here to download the Windows Client, and also remember to install WinFsp for FUSE support.
After installation, run CMD or PowerShell with administrative privilege, and check if the client works.
PS C:\> ./juicefs.exe -V
juicefs version 5.2.1 (2025-05-28 6ebc8e9)
Run the auth subcommand to fetch client config file, the default config location is C:\Users\<username>\.juicefs.
PS C:\> .\juicefs.exe auth juicefs --token xxx --access-key xxx --secret-key xxx
If you are using JuiceFS on-prem deployment, then you need to specify the Web Console URL in addition.
PS C:\> .\juicefs.exe auth juicefs --token xxx --access-key xxx --secret-key xxx --console-url http://<onprem-console-ip>
Upon a successful authentication, mount JuiceFS using the following command:
PS C:\> ./juicefs.exe mount juicefs J:
2025/05/29 12:34:48.254250 juicefs[36668] <INFO>: Running as Windows system service. [[email protected]:839]
2025/05/29 12:34:50.341701 juicefs[36668] <INFO>: Juicefs system service started successfully. [[email protected]:933]
The default client log location is C:\Users\<username>\AppData\Local\juicefs.log, check this file to determine if the mount point is working correctly.
Common pitfalls
If you're new to JuiceFS, it could be quite different from other storage systems you've dealt with before, read this section to learn about the common causes for confusion.
Billing
- JuiceFS Cloud Service / JuiceFS Enterprise Edition provides metadata service and that's what we charge for, which doesn't include object storage costs. If you use object storage services from a public cloud, pay attention to its costs as well;
- JuiceFS generates invoices every month, but they are calculated with hourly granularity, meaning if you create and quickly delete temporary files between the recording interval, they won't be counted as billable.
Use and management
- Do not use the
ducommand on JuiceFS directories, as directory size is already a recursive sum of all its content, simply runls -alhor view directly from the web console to see the total size of directories. If you were to runduagainst a JuiceFS directory, the result will be a erroneous duplicated sum. For details, please refer to "Capacity and Quota"; - Trash is enabled by default, deleted files enter trash and stay there for specified retention time, that's why the data are not deleted from object storage;
- Even if trash is emptied, the data blocks won't necessarily be immediately deleted from object storage, instead, they are asynchronously deleted via background jobs, so you need at least one active JuiceFS client for deletion to function.
Shipping
Read this section to correctly put your brand new file system into production use.
Verify the file system
After the file system is mounted, you can use the juicefs bench command to perform basic performance tests and functional verification of the file system to ensure that the JuiceFS file system can be accessed normally and its performance meets expectations:
juicefs bench /jfs
After running the juicefs bench command, N large files (1 by default) and N small files (100 by default) will be written to and read from the JuiceFS file system according to the specified concurrency (1 by default), and statistics the throughput of read and write and the latency of a single operation, as well as the latency of accessing the metadata engine.
If all is well, output is represented with green texts, while yellow or red indicates possible performance issues. You should run juicefs stats or juicefs profile to further troubleshoot, read "Troubleshooting Methods" for more.
Import data
If you have a lot of files in an existing object storage, you can import them into JuiceFS in a read-only fashion, the imported files can utilize JuiceFS' cache capabilities to accelerate read, but does not support modification (if objects are modified, they'll have to be imported again for changes to take effect). If this caters to your scenario, read "Import existing object storage files" for full introduction.
If the existing files are to be modified in the future, it's best that you migrate completely to JuiceFS, this can be achieved using tools like cp or rsync, but when faced with a large amount of data, it's recommended to use juicefs sync to further improve import speed.
Important caveats when pouring large files into a FUSE mount point:
- When object storage bandwidth is limited, slow sequential writes could generate excessive slices, causing fragmentation, using
--flush-wait=60sis recommended, read data sync and compaction for more; - Things can go wrong during data import, like the one introduced in the above point, or human mistakes which require the whole import be carried out again. When this happens, deleted (or overwritten) data are kept in trash, and improper trash settings can increase your object storage costs. Do remember to temporarily shorten or disable trash if this poses problem for your team.
Auto-mount on boot
After confirming that the mount is successful and can be used normally, you can refer to this section to set the automatic mount on boot.
Linux
Add an entry in file system table (/etc/fstab) so that JuiceFS is automatically mounted on boot. JuiceFS Client supports --update-fstab to make this easier:
# Needs root permission to modify /etc/fstab
$ sudo juicefs mount --update-fstab $VOL_NAME $MOUNTPONT
$ grep $VOL_NAME /etc/fstab
<VOL_NAME> <MOUNTPONT> juicefs _netdev 0 0
CentOS 6 does not automatically mount the network file system at boot time by default, you need to run the following command to enable automatic mounting.
sudo chkconfig --add netfs
If you'd like to control this process by hand, note that:
-
A soft link needs to be created from
/sbin/mount.juicefsto thejuicefsexecutable, the/sbin/mount.juicefscommand is called when the operating system parses the fstab. -
All parameters provided in your
juicefs mountcommand must also be included in the fstab options to take effect. Remember to remove the prefixing hyphen(s), and add their values with=, for example:$ sudo juicefs mount --update-fstab $VOL_NAME $MOUNTPONT -b --max-uploads=1 --prefetch 2 --writeback myjfs /jfs -o max_read=3
# -o stands for FUSE options, and is handled differently
$ grep $VOL_NAME /etc/fstab
<VOL_NAME> <MOUNTPONT> juicefs _netdev,background,max-uploads=1,max_read=3,prefetch=2,writeback 0 0
If services depending on JuiceFS have also been configured to start automatically on boot, you may need to adjust the startup order. Using Docker as an example, set up JuiceFS dependency by the following systemd unit file:
[Unit]
# systemd unit for JuiceFS mount is usually called jfs.mount
# find out using: systemctl list-units | grep mount
After=network-online.target firewalld.service containerd.service jfs.mount
macOS
-
Create
~/Library/LaunchAgents/com.juicefs.VOL_NAME.plistas follows, replace capitalized words to their true values.<?xml version="1.0" encoding="UTF-8"?>
<!DOCTYPE plist PUBLIC "-//Apple Computer//DTD PLIST 1.0//EN" "http://www.apple.com/DTDs/PropertyList-1.0.dtd">
<plist version="1.0">
<dict>
<key>Label</key>
<string>com.juicefs.VOL_NAME</string>
<key>ProgramArguments</key>
<array>
<string>/usr/local/bin/juicefs</string>
<string>mount</string>
<string>VOL_NAME</string>
<string>MOUNTPOINT</string>
</array>
<key>RunAtLoad</key>
<true/>
</dict>
</plist> -
Run the following command and see if mount succeeds.
launchctl load ~/Library/LaunchAgents/com.juicefs.VOL_NAME.plist
launchctl start ~/Library/LaunchAgents/com.juicefs.VOL_NAME
ls $MOUNTPOINT -
If the mount is not successful, add this piece to the above plist file:
<key>StandardErrorPath</key>
<string>/tmp/mycommand.err</string>
<key>StandardOutPath</key>
<string>/tmp/mycommand.out</string>
Reload to check JuiceFS logs:
launchctl unload ~/Library/LaunchAgents/com.juicefs.VOL_NAME.plist
launchctl load ~/Library/LaunchAgents/com.juicefs.VOL_NAME.plist
cat /tmp/mycommand.out
cat /tmp/mycommand.err
Unmounting the file system
Use the umount command to unmount the file system.
umount /jfs
If the command returns the target is busy error, it means that the file system is in use, use lsof MOUNTPOINT to find and kill the process of the relevant application, and try again.
For Linux, you can use the -l option to perform a delayed unmount (file system is unmounted immediately, but mount processes will exit when file descriptors are released).
umount -l /jfs
If you run into problems trying to unmount, refer to unmount error for troubleshooting.

