Installation
Prerequisites
- Network condition requirements:
- For JuiceFS Cloud Service, Hadoop SDK needs to access metadata service and console through public internet, you'll probably need to deploy a NAT to provide public internet access to the Hadoop cluster.
- For JuiceFS on-premise deployment, metadata service and console are already deployed within the VPC, so Hadoop nodes need to have network access to metadata service and console.
- JuiceFS Hadoop Java SDK does not create object storage bucket automatically, you should create them in advance.
- Download the latest
juicefs-hadoop.jar. This package will be used in the upcoming installation steps.
There are several things to note about the Hadoop SDK downloaded from the above link:
- Only supports Linux distributions with x86 architecture. If you need to download the Hadoop SDK for other environments, please contact the Juicedata team.
- If you wish to use Ceph as a data store for JuiceFS, please contact the Juicedata team to obtain a specific version of the Hadoop SDK.
- Due to the lag in document updates, the downloaded version may not be the latest version. Please refer to "Release Notes" to view the latest version number.
Hadoop distribution
Cloudera Distribution Hadoop (CDH)
Install Using Parcel
-
On Cloudera Manager node, download Parcel and CSD, put CSD into
/opt/cloudera/csd, and extract Parcel into/opt/cloudera/parcel-repo. -
Restart Cloudera Manager
service cloudera-scm-server restart -
Activate Parcel
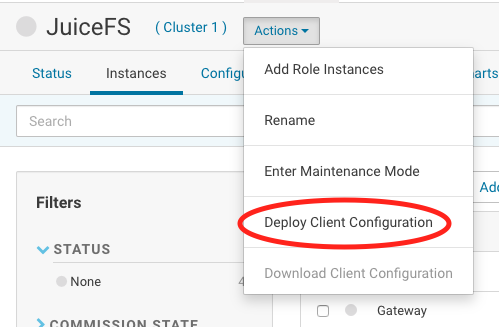
Open Cloudera Manager Admin Console → Hosts → Check for New Parcels → JuiceFS → Distribute → Active
-
Add Service
Open Cloudera Manager Admin Console → Cluster → Add Service → JuiceFS → Choose node
-
Deploy JAR File
-
Upgrade
To upgrade, download the latest version of the Parcel file using above steps, and then activate using step 3.
Configure in Cloudera Manager
-
Hadoop
-
CDH 5.x
Modify
core-site.xmlin the Cloudera Manager: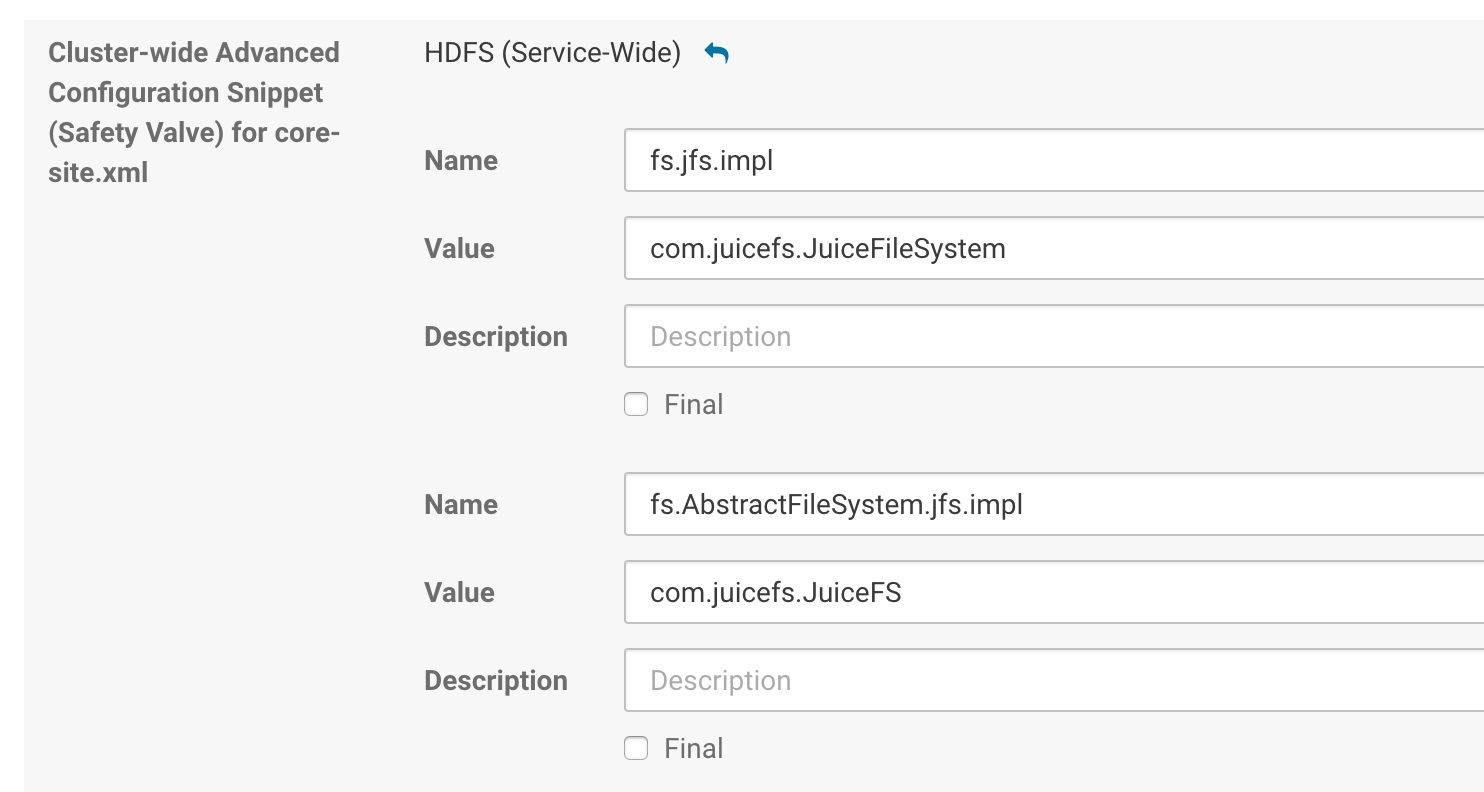
Example:
fs.jfs.impl=com.juicefs.JuiceFileSystem
fs.AbstractFileSystem.jfs.impl=com.juicefs.JuiceFS
juicefs.cache-size=10240
juicefs.cache-dir=xxxxxx
juicefs.cache-group=yarn
juicefs.discover-nodes-url=yarn
juicefs.accesskey=xxxxxx
juicefs.secretkey=xxxxxx
juicefs.token=xxxxxx
juicefs.access-log=/tmp/juicefs.access.log -
CDH 6.x
Follow above steps for 5.x version, in addition you also need to add the following path to
mapreduce.application.classpathat YARN service interface:$HADOOP_COMMON_HOME/lib/juicefs-hadoop.jar
-
-
HBase
Modify
hbase-site.xmlat HBase service interface: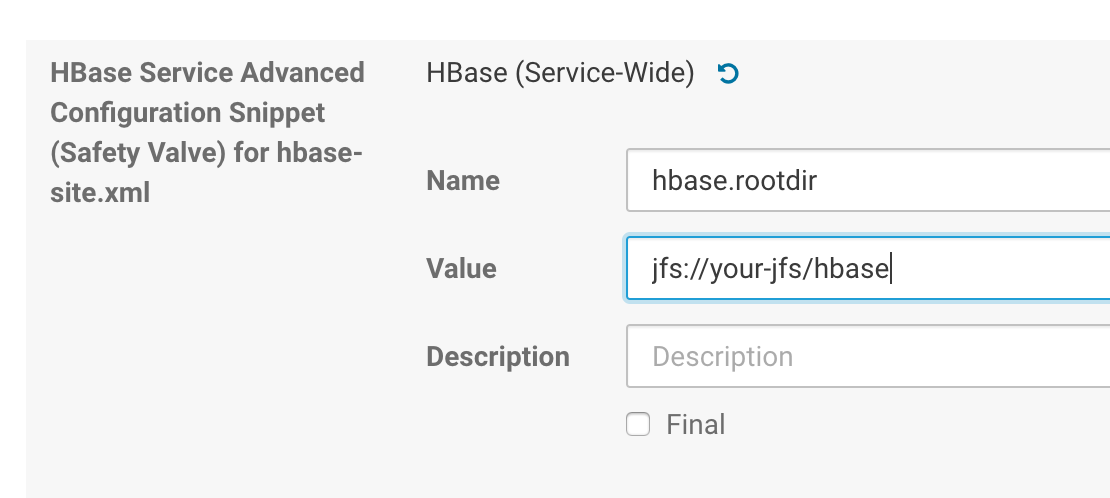
Add the following lines:
<property>
    <name>hbase.rootdir</name>
    <value>jfs://{VOL_NAME}/hbase</value>
</property>
<property>
    <name>hbase.wal.dir</name>
    <value>hdfs://your-hdfs-uri/hbase-wal</value>
</property>
Delete znode (default
/hbase)zookeeper.znode.parent, this operation will delete all data in the original HBase cluster. -
Hive
Modify
hive.metastore.warehouse.dirat Hive service interface, change the default location for table creation in Hive(optional):jfs://myjfs/your-warehouse-dir -
Impala
Modify Impala Command Line Advanced Configuration at Impala service web UI.
To increase the number of I/O threads, you could change the following parameter as
20 / Number-of-Mounted-Disks.-num_io_threads_per_rotational_disk=4 -
Solr
Modify Solr Advanced Configuration Code Snippets at Solr service web UI:
hdfs_data_dir=jfs://myjfs/solr
Finally, restart the cluster to take effect.
Hortonworks Data Platform (HDP)
Integrate JuiceFS to Ambari
-
Download HDP, unzip to
/var/lib/ambari-server/resources/stacks/HDP/{YOUR-HDP-VERSION}/services -
Restart Ambari
systemctl restart ambari-server -
Add JuiceFS Service
Ambari Management Console → Services → Add Service → JuiceFS → Choose node → Configure → Deploy
In the Configure step, pay attention to
cache_dirsanddownload_urland change according to your environment.If Ambari has no access to internet, put the downloaded JAR file into
share_download_dir, which defaults to the HDFS/tmpdirectory. -
Upgrade JuiceFS
Change the version string in
download_url, save and refresh configuration.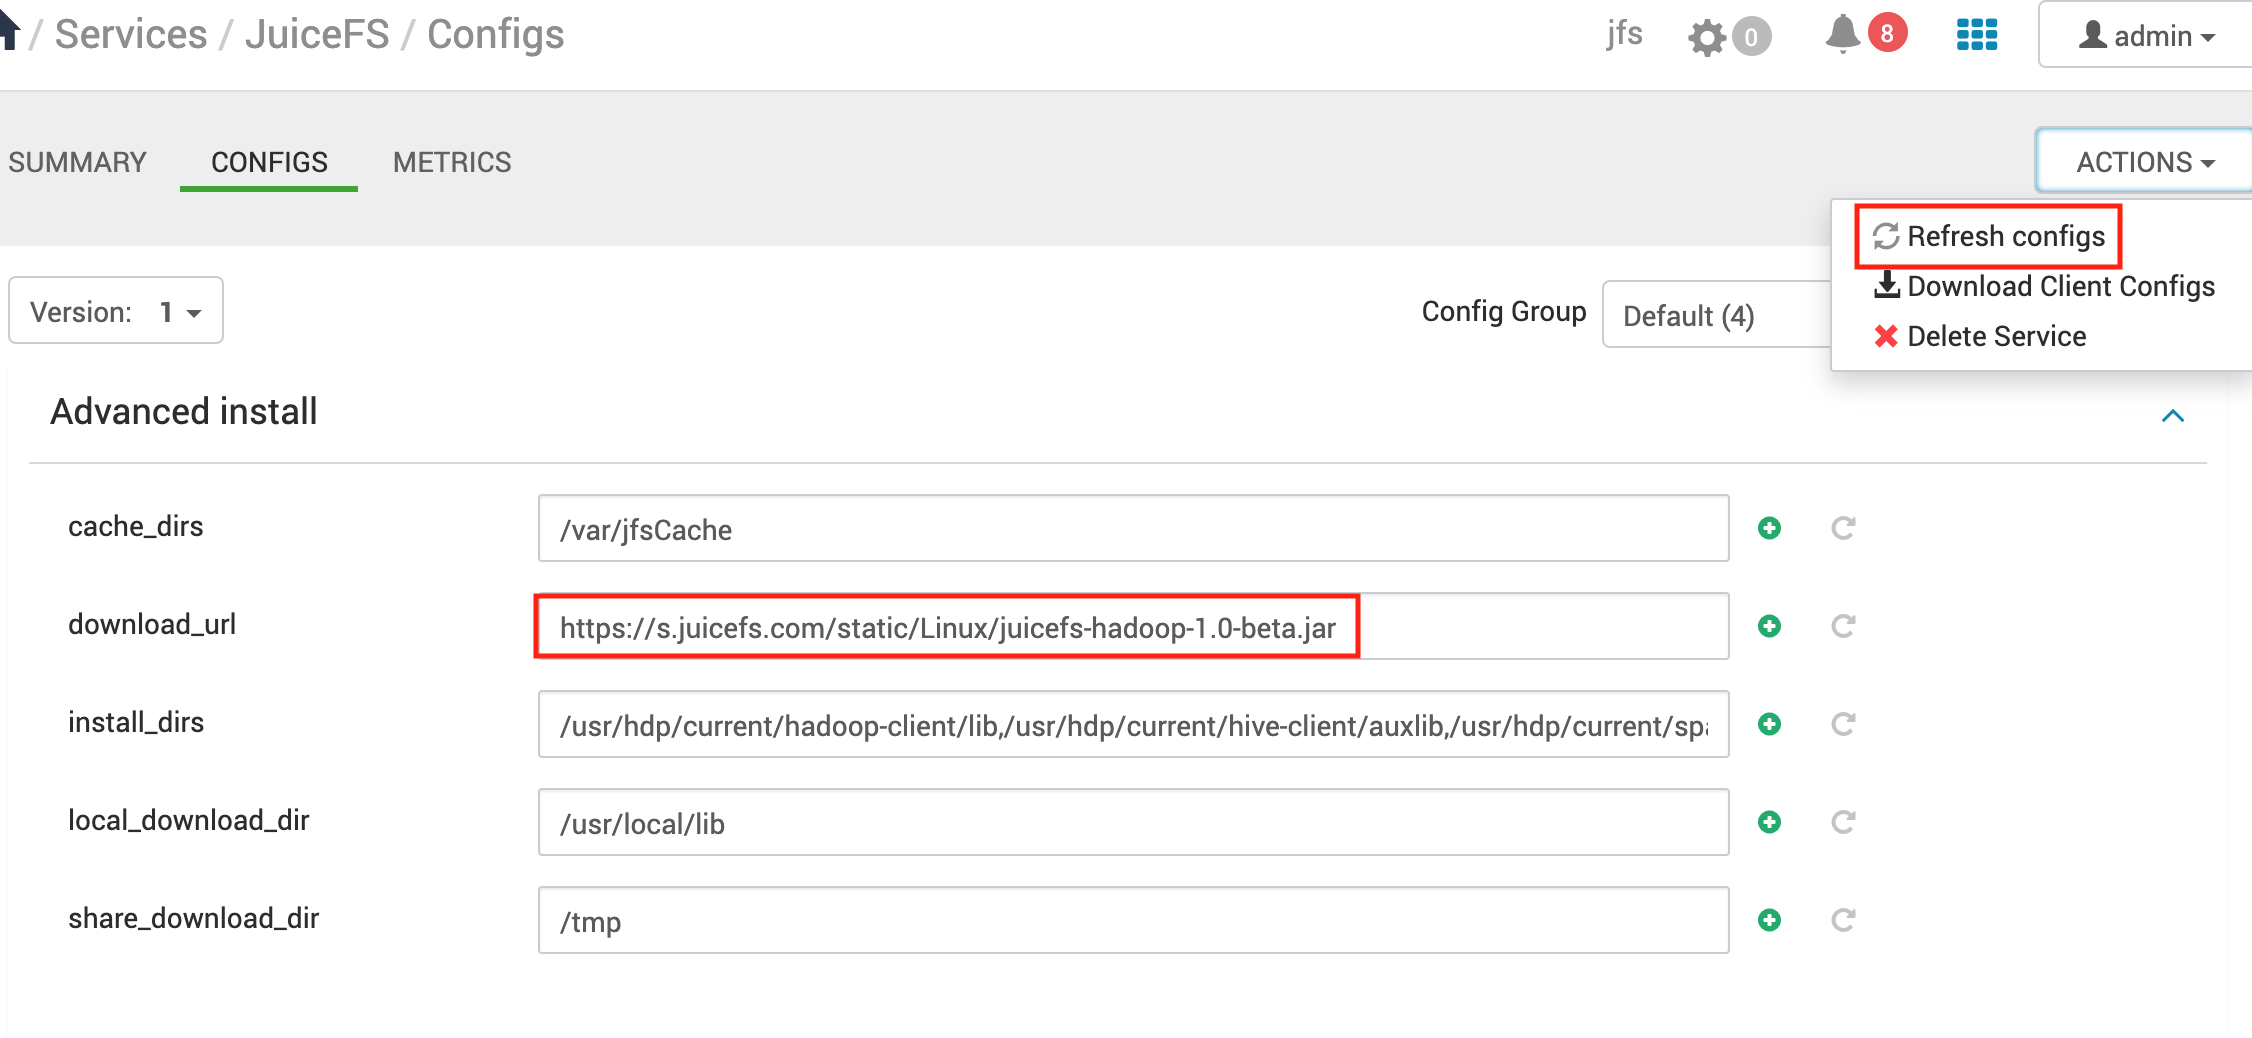
Configure in Ambari
-
Hadoop
Modify
core-site.xmlat HDFS interface, see Configuration. -
MapReduce2
At MapReduce2 interface, add the literal string
:/usr/hdp/${hdp.version}/hadoop/lib/juicefs-hadoop.jartomapreduce.application.classpath. -
Hive
Optionally modify
hive.metastore.warehouse.dirfor default location of table creation at Hive interface:jfs://myjfs/your-warehouse-dirIf Ranger is available, append
jfsat the last ofranger.plugin.hive.urlauth.filesystem.schemes:ranger.plugin.hive.urlauth.filesystem.schemes=hdfs:,file:,wasb:,adl:,jfs: -
Druid
Change the directory address at Druid interface (May need to manually create due to permission):
"druid.storage.storageDirectory": "jfs://myjfs/apps/druid/warehouse"
"druid.indexer.logs.directory": "jfs://myjfs/user/druid/logs" -
HBase
Modify these parameters at HBase
hbase.rootdir=jfs://myjfs/hbase
hbase.wal.dir=hdfs://your-hdfs-uri/hbase-wal
Delete znode (default
/hbase)zookeeper.znode.parent, this operation will delete all data in the original HBase cluster. -
Sqoop
When import data into Hive by Sqoop, Sqoop should import data into
target-dirfirst, and then load into the Hive table withhive load, so you need to modifytarget-dirwhen using Sqoop.-
1.4.6
For version 1.4.6, You need modify
fsto update the default filesystem. Please copymapreduce.tar.gzto the same path from HDFS to JuiceFS, default path is/hdp/apps/${hdp.version}/mapreduce/mapreduce.tar.gz.sqoop import \
-fs jfs://myjfs/ \
--target-dir jfs://myjfs/tmp/your-dir -
1.4.7
sqoop import \
  --target-dir jfs://myjfs/tmp/your-dir
-
Finally, restart the service to take effect.
EMR platform
Integrating JuiceFS with EMR platform is relatively easy, just these two steps:
- Add a bootstrap step to run the installation script, i.e.
emr-boot.sh --jar s3://xxx/juicefs-hadoop.jar; - Modify
core-site.xmland add JuiceFS related configs.
Existing EMR cluster
Common EMR platforms does not allow changing bootstrap configurations post-creation, which means you can't conveniently add bootstrap steps in their web console.
Thus, if you are dealing with existing EMR cluster, you should use other methods to run the installation script whenever a new node joins the cluster.
Amazon EMR
-
Fill in the configuration in Software and Steps UI
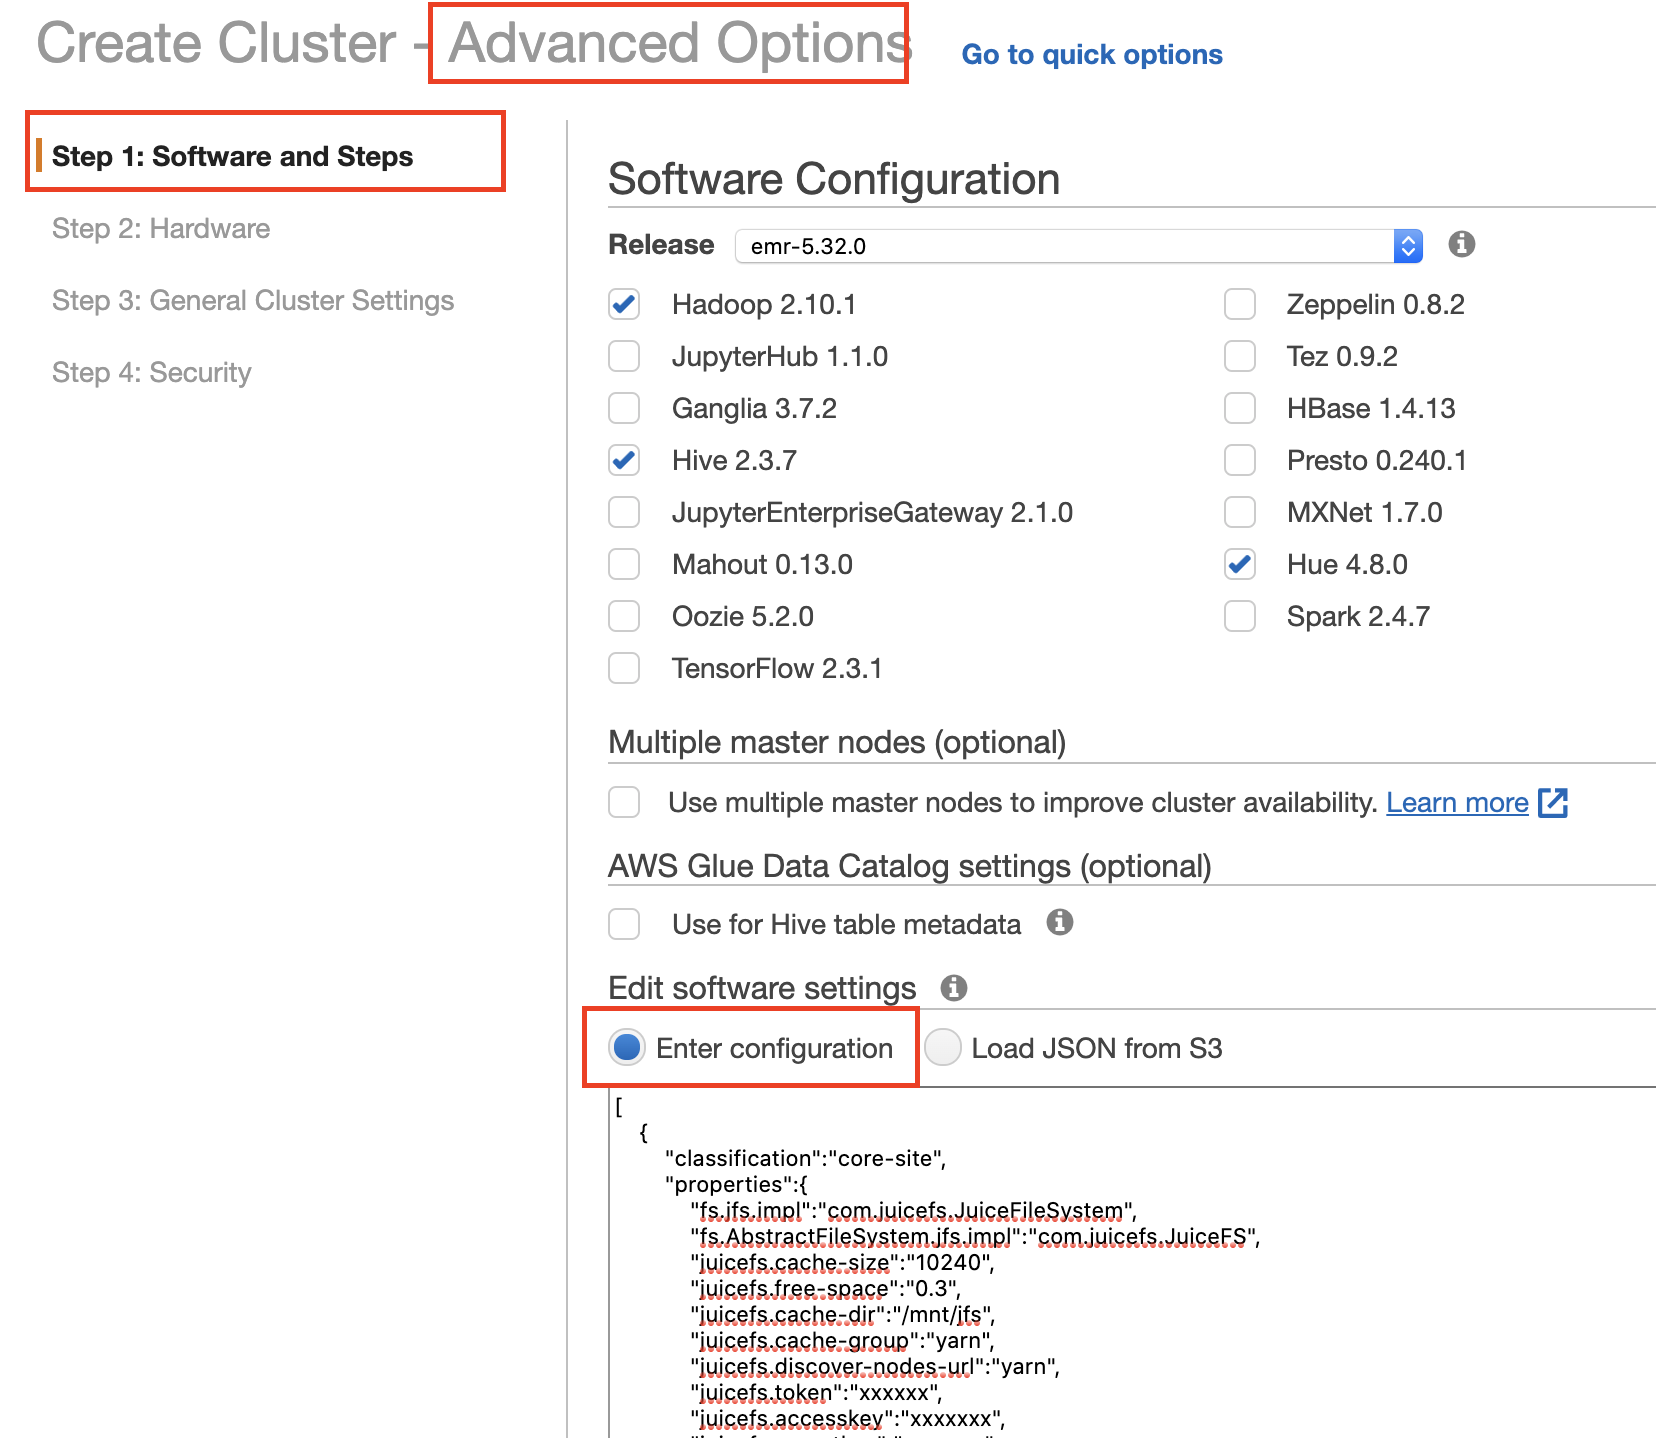
Fill in JuiceFS related configurations, the format is as follows:
[
    {
        "classification": "core-site",
        "properties": {
            "fs.jfs.impl": "com.juicefs.JuiceFileSystem",
            "fs.AbstractFileSystem.jfs.impl": "com.juicefs.JuiceFS",
            "juicefs.token": "",
            ...
        }
    }
]
HBase on JuiceFS configuration:
[
    {
        "classification": "core-site",
        "properties": {
            "fs.jfs.impl": "com.juicefs.JuiceFileSystem",
            "fs.AbstractFileSystem.jfs.impl": "com.juicefs.JuiceFS",
            ...
        }
    },
    {
        "classification": "hbase-site",
        "properties": {
            "hbase.rootdir": "jfs: //{name}/hbase"
        }
    }
] -
Create bootstrap actions in General Cluster Settings
Download
emr-boot.shandjuicefs-hadoop.jar, upload them to S3.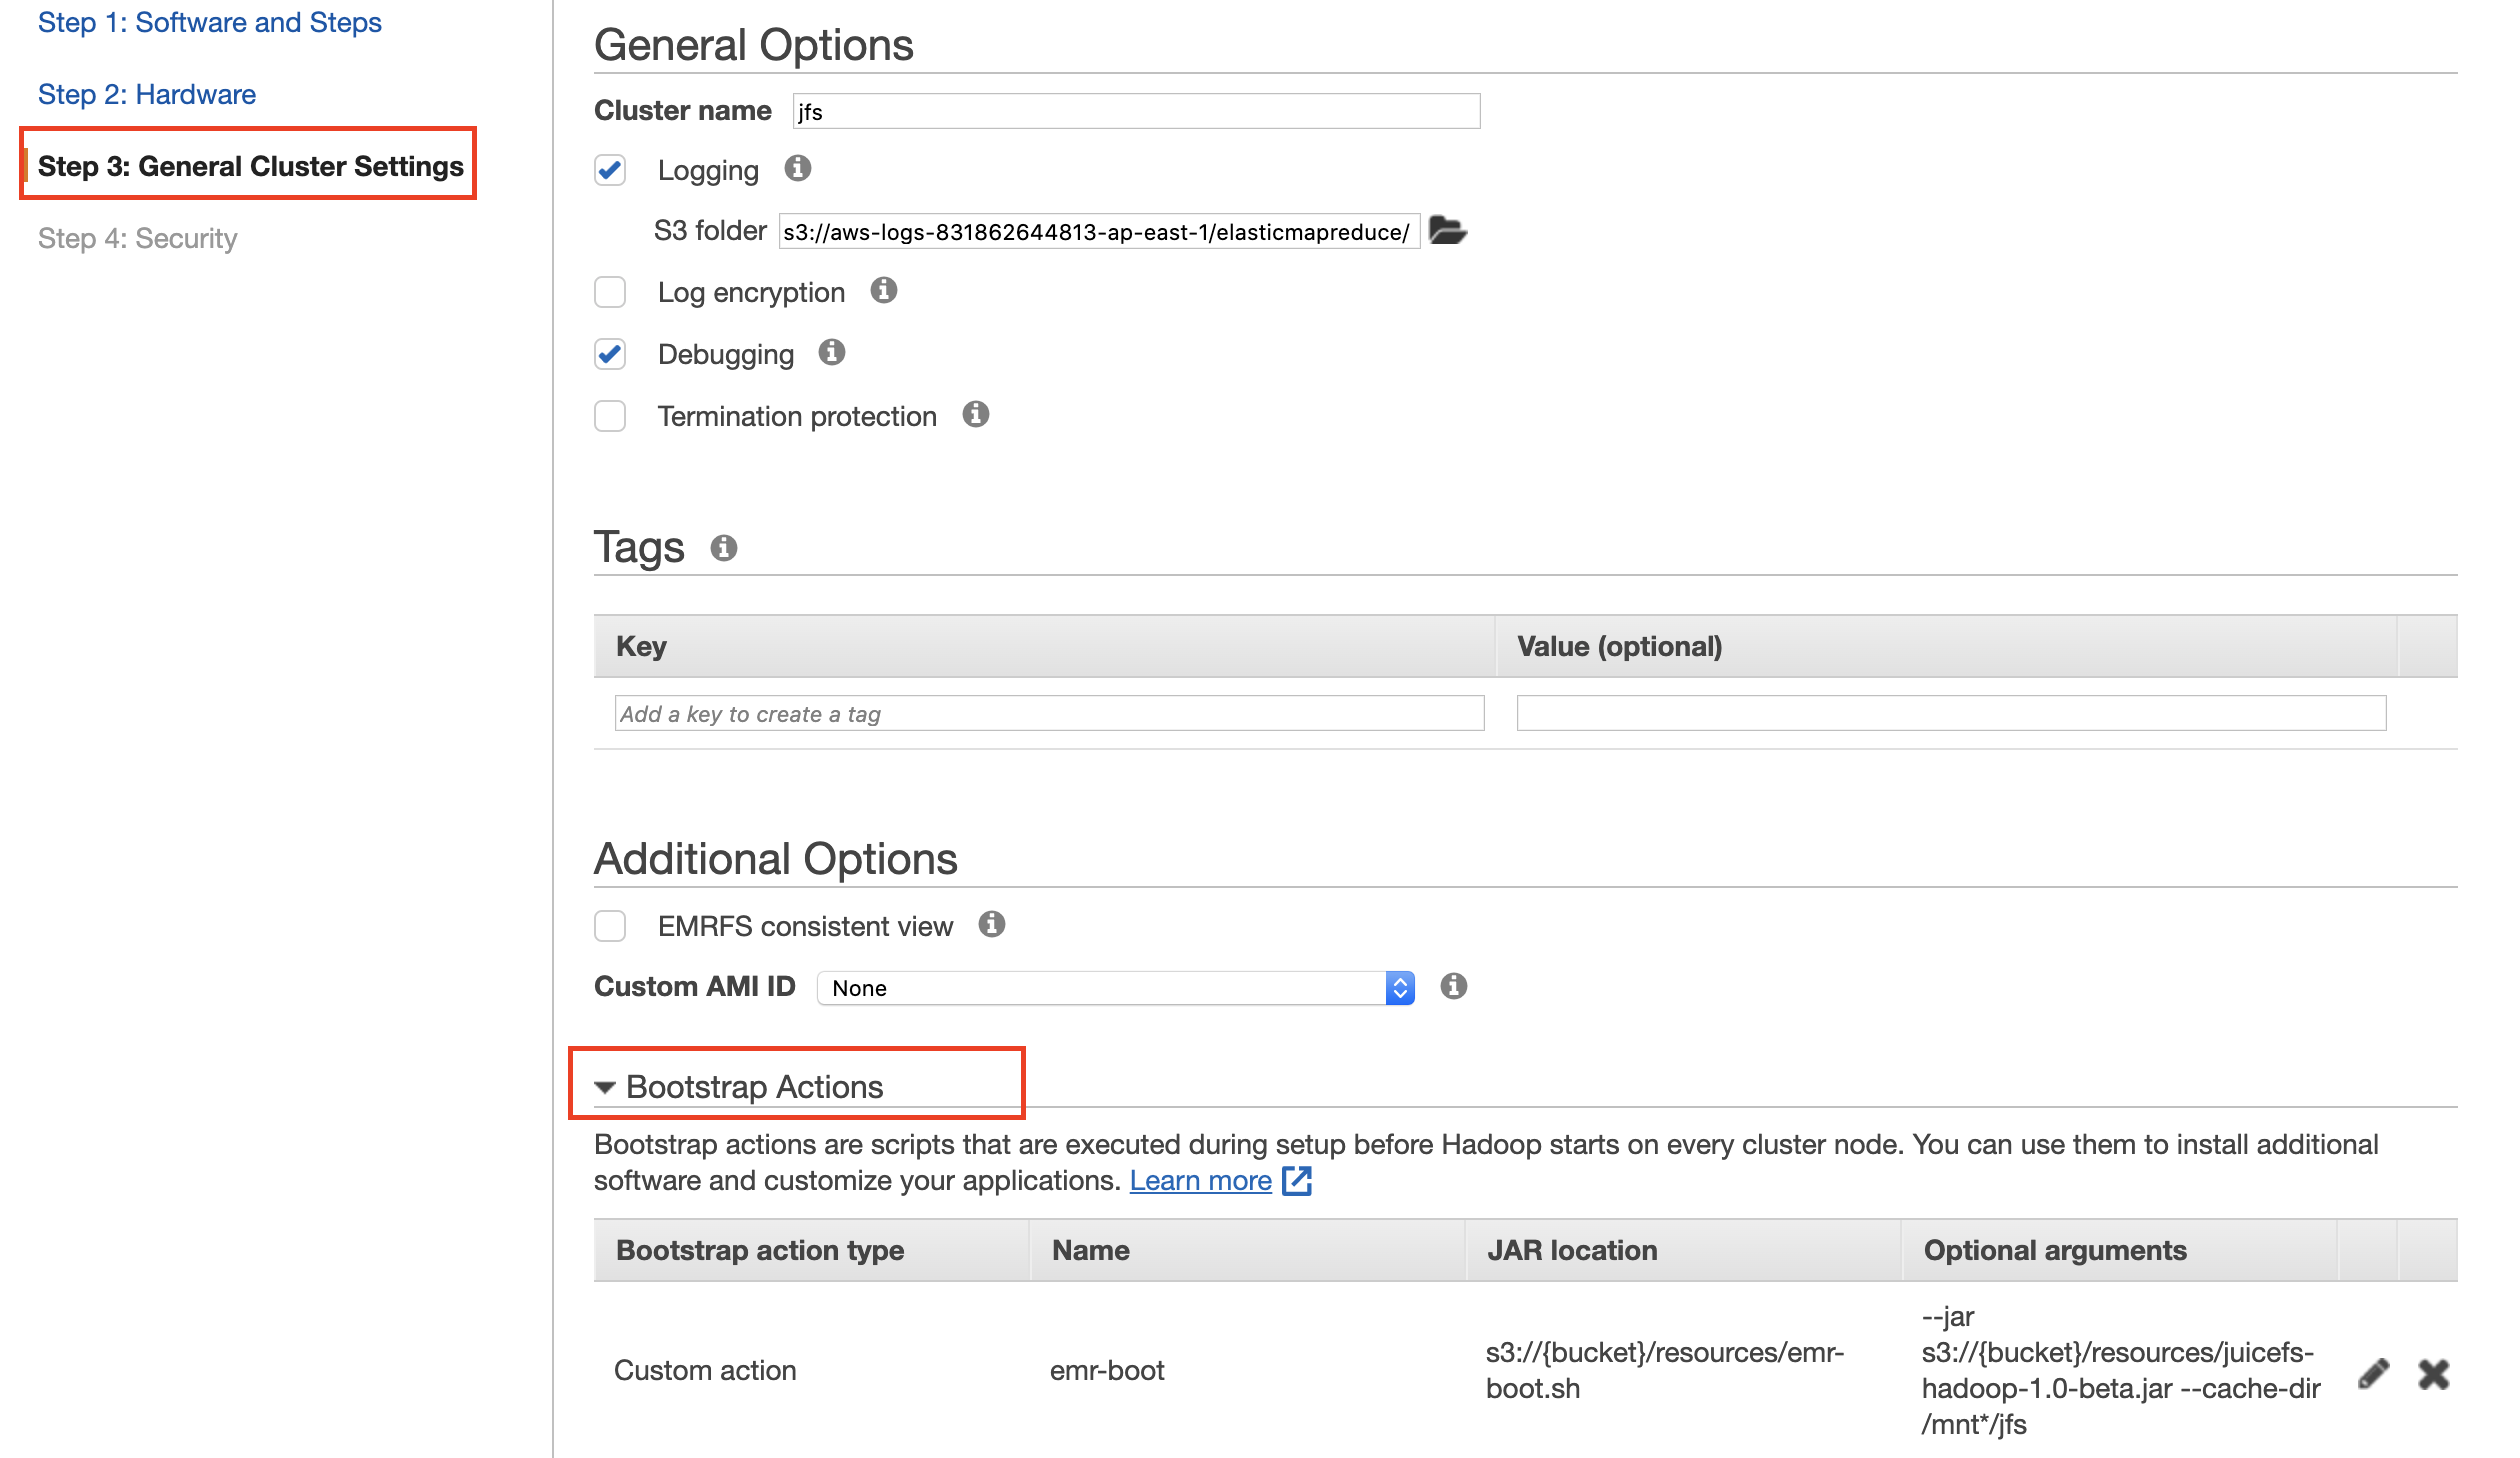
Fill in the script location for
emr-boot.sh, and use the S3 address forjuicefs-hadoop-{version}.jarfor arguments.--jar s3://{bucket}/resources/juicefs-hadoop-{version}.jar
Specific Hadoop applications
If you would like to install Hadoop SDK for specific applications, you'll need to put the juicefs-hadoop.jar (downloaded in previous steps) and $JAVA_HOME/lib/tools.jar files inside the application installation directory (listed down below).
| Name | Installation directory |
|---|---|
| Hadoop | ${HADOOP_HOME}/share/hadoop/common/lib/ |
| Hive | ${HIVE_HOME}/auxlib |
| Spark | ${SPARK_HOME}/jars |
| Presto | ${PRESTO_HOME}/plugin/hive-hadoop2 |
| Trino | ${TRINO_HOME}/plugin/hive or ${TRINO_HOME}/plugin/hive/hdfs (when there is a hdfs folder in the plugin/hive directory of the new version of Trino) |
| Flink | ${FLINK_HOME}/lib |
| DataX | ${DATAX_HOME}/plugin/writer/hdfswriter/libs ${DATAX_HOME}/plugin/reader/hdfsreader/libs |
Apache Spark
-
Install
juicefs-hadoop.jar -
Add JuiceFS config, can be done via:
-
Modify
core-site.xml -
Passing below arguments in command line:
spark-shell --master local[*] \
  --conf spark.hadoop.fs.jfs.impl=com.juicefs.JuiceFileSystem \
  --conf spark.hadoop.fs.AbstractFileSystem.jfs.impl=com.juicefs.JuiceFS \
  --conf spark.hadoop.juicefs.token=xxx \
  --conf spark.hadoop.juicefs.accesskey=xxx \
  --conf spark.hadoop.juicefs.secretkey=xxx \
... -
Modifying
$SPARK_HOME/conf/spark-defaults.conf
-
Apache Flink
-
Install
juicefs-hadoop.jar -
Add JuiceFS config, can be done via:
- Modifying
core-site.xml - Modifying
flink-conf.yaml
- Modifying
Presto
- Install
juicefs-hadoop.jar - Add JuiceFS config via modifying
core-site.xml
DataX
- Install
juicefs-hadoop.jar - Add JuiceFS config, modify DataX configuration file:
"defaultFS": "jfs://myjfs",
"hadoopConfig": {
    "fs.jfs.impl": "com.juicefs.JuiceFileSystem",
    "fs.AbstractFileSystem.jfs.impl": "com.juicefs.JuiceFS",
    "juicefs.access-log": "/tmp/juicefs.access.log",
    "juicefs.token": "xxx",
    "juicefs.accesskey": "xxx",
    "juicefs.secretkey": "xxx"
}
HBase
Modify hbase-site:
"hbase.rootdir": "jfs://myjfs/hbase"
Modify hbase:
"hbase.emr.storageMode": "jfs"
Common configurations
After installation, you'll need to configure JuiceFS inside core-site.xml, some of the more common settings have been listed here, see their full description at Configuration.
Basic configurations
fs.jfs.impl=com.juicefs.JuiceFileSystem
fs.AbstractFileSystem.jfs.impl=com.juicefs.JuiceFS
juicefs.token=
juicefs.accesskey=
juicefs.secretkey=
# File system access logs, often used for performance troubleshooting, turn off to save disk space
juicefs.access-log=/tmp/juicefs.access.log
# Overwrite Web Console address in on-premise environments
juicefs.console-url=http://host:port
Cache configurations
To allow all Hadoop applications to access cache data, we recommend you to manually create the cache directory in advance, and set permission to 777. Learn more in Cache.
# Local cache directory
juicefs.cache-dir=
# Cache capacity in MiB
juicefs.cache-size=
# Declare cache group name, if distributed cache is enabled
juicefs.cache-group=
juicefs.discover-nodes-url=
For scenarios in which clients are constantly changing, consider using a dedicated cache cluster, build a cache cluster using the following example command:
juicefs mount \
  --buffer-size=2000 \
  --cache-group=xxx \
  --cache-group-size=512 \
  --cache-dir=xxx \
  --cache-size=204800 \
  {$VOL_NAME} /jfs
Common configurations for dedicated cluster:
juicefs.cache-dir=
juicefs.cache-size=
juicefs.cache-group=xxx
juicefs.discover-nodes-url=all
# The computing nodes may change dynamically and do not need to join the cache group, so set juicefs.no-sharing to true.
juicefs.no-sharing=true
Verification
Use below steps to verify JuiceFS is working properly under Hadoop.
Hadoop
hadoop fs -ls jfs://${VOL_NAME}/
hadoop fs -mkdir jfs://${VOL_NAME}/jfs-test
hadoop fs -rm -r jfs://${VOL_NAME}/jfs-test
Hive, SparkSQL, Impala
create table if not exists person(
    name string,
    age int
)

location 'jfs://${VOL_NAME}/tmp/person';
insert into table person values('tom',25);
insert overwrite table person select name, age from person;
select name, age from person;
drop table person;
Spark Shell
import org.apache.hadoop.conf.Configuration
import org.apache.hadoop.fs._
val conf = sc.hadoopConfiguration
val p = new Path("jfs://${VOL_NAME}/")
val fs = p.getFileSystem(conf)
fs.listStatus(p)
HBase
create 'test', 'cf'
list 'test'
put 'test', 'row1', 'cf:a', 'value1'
scan 'test'
get 'test', 'row1'
disable 'test'
drop 'test'
Flume
jfs.sources =r1
jfs.sources.r1.type = org.apache.flume.source.StressSource
jfs.sources.r1.size = 10240
jfs.sources.r1.maxTotalEvents=10
jfs.sources.r1.batchSize=10
jfs.sources.r1.channels = c1

jfs.channels = c1
jfs.channels.c1.type = memory
jfs.channels.c1.capacity = 100
jfs.channels.c1.transactionCapacity = 100

jfs.sinks = k1
jfs.sinks.k1.type = hdfs
jfs.sinks.k1.channel = c1
jfs.sinks.k1.hdfs.path =jfs://${VOL_NAME}/tmp/flume
jfs.sinks.k1.hdfs.writeFormat= Text
jfs.sinks.k1.hdfs.fileType= DataStream
Flink
echo 'hello world' > /tmp/jfs_test
hadoop fs -put /tmp/jfs_test jfs://${VOL_NAME}/tmp/
rm -f /tmp/jfs_test
./bin/flink run -m yarn-cluster ./examples/batch/WordCount.jar --input jfs://${VOL_NAME}/tmp/jfs_test --output jfs://${VOL_NAME}/tmp/result
Restart relevant services
After Hadoop SDK has been installed or upgraded, relevant services need to be restarted for changes to take effect.
-
Services that doesn't require a restart:
- HDFS
- HUE
- ZooKeeper
-
Restart these services if they are using JuiceFS, if HA has been configured, you can perform a rolling restart to avoid downtime.
- YARN
- Hive Metastore Server, HiveServer2
- Spark ThriftServer
- Spark Standalone
- Master
- Worker
- Presto
- Coordinator
- Worker
- Impala
- Catalog Server
- Daemon
- HBase
- Master
- RegionServer
- Flume
Best Practices
Hadoop
Hadoop Applications typically integrates with HDFS using the org.apache.hadoop.fs.FileSystem class, JuiceFS brings support to Hadoop through inheriting this class.
After Hadoop SDK has been set up, use hadoop fs to manage JuiceFS:
hadoop fs -ls jfs://{VOL_NAME}/
To drop the jfs:// scheme, set fs.defaultFS to the JuiceFS volume in core-site.xml:
<property>
    <name>fs.defaultFS</name>
    <value>jfs://{VOL_NAME}</value>
</property>
Changing defaultFS essentially makes all path (without scheme specification) to resolve to JuiceFS, this might cause unexpected problems and should be tested thoroughly.
Hive
Use the LOCATION clause to specify data location for Hive database / table.
-
Creating database / table
CREATE DATABASE ... database_name
  LOCATION 'jfs://{VOL_NAME}/path-to-database';

CREATE TABLE ... table_name
  LOCATION 'jfs://{VOL_NAME}/path-to-table';
A Hive table is by default stored under the database location, so if the database is already stored on JuiceFS, all tables within also resides in JuiceFS.
-
Migrate database / table
ALTER DATABASE database_name
SET LOCATION 'jfs://{VOL_NAME}/path-to-database';

ALTER TABLE table_name
SET LOCATION 'jfs://{VOL_NAME}/path-to-table';

ALTER TABLE table_name PARTITION(...)
SET LOCATION 'jfs://{VOL_NAME}/path-to-partition';
For Hive, data can be stored on multiple file systems. For an unpartitioned table, all data must be located in one file system. For partitioned table, you can configure file systems for each single partition.
To use JuiceFS as the default storage for Hive, set
hive.metastore.warehouse.dirto a JuiceFS directory.
Spark
Spark supports various modes like Standalone / YARN / Kubernetes / Thrift Server.
JuiceFS cache group needs stable client IP to function properly, pay special attention and check if executor has a stable IP when using different running mode.
When the executor process is fixed (like in Thrift Server mode), or in a host with a fixed IP (like Spark on YARN or Standalone), using Distributed Cache is recommended. And juicefs.discover-nodes-url should be set accordingly.
If executor process is ephemeral, and host IP is constantly changing (like Spark on Kubernetes), using Dedicated Cache Cluster is recommended. Remember to set juicefs.discover-nodes-url to all.
-
Spark shell
scala> sc.textFile("jfs://{VOL_NAME}/path-to-input").count
HBase
HBase mainly store two types of data: WAL file and HFile. Data writes is first submitted to WAL, and then enters RegionServer memstore using hflush, so when RegionServer crashed, data can be recovered from WAL. And after RegionServer data is flushed into HFile on HDFS, WAL file will be deleted so it doesn't eat up storage space.
Due to hflush implementation differences, when juicefs.hflush is set to sync, JuiceFS cannot perform quite as good as HDFS, thus it's recommended to use HDFS for WAL files, and use JuiceFS for the final HFile.
<property>
    <name>hbase.rootdir</name>
    <value>jfs://{VOL_NAME}/hbase</value>
</property>
<property>
    <name>hbase.wal.dir</name>
    <value>hdfs://{NAME_SPACE}/hbase-wal</value>
</property>
Flink
When using the Streaming File Sink connector, to ensure data consistency, you need to use RollingPolicy for checkpointing.
For Hadoop before 2.7, HDFS truncate is not available, the alternative is OnCheckpointRollingPolicy, this policy creates new files on every checkpoint, which can potentially result in large amount of small files.
For Hadoop 2.7 and after, use DefaultRollingPolicy to allow rotating files based on file size, mtime, and free space.
JuiceFS implements truncate, thus DefaultRollingPolicy is supported.
You can integrate Flink with different file systems via plugin, put juicefs-hadoop.jar inside the lib directory.
Flume
JuiceFS integrates with Flume via HDFS sink. Due to hflush implementation differences (see hflush implementation), pay special attention to hdfs.batchSize as this is the setting that controls hflush message batch size.
To ensure data integrity, set juicefs.hflush to sync, and increase hdfs.batchSize to 4MB, which is the default block size that JuiceFS uploads to object storage.
Also, if compression is enabled (hdfs.fileType set to CompressedStream), in the event of object storage service failure, files are prone to corruption due to missing blocks. In this case, files previously committed using hflush might still face possible data loss. If this is a concern for you, disable compression by setting hdfs.fileType to DataStream, and run compression in later ETL jobs.
Sqoop
When running data imports into Hive using Sqoop, Sqoop will firstly import data into target-dir, which is then later imported into Hive table using hive load. So when using Sqoop, change target-dir accordingly.
-
1.4.6
When using this specific version, change the
fsparameter to specify JuiceFS as the default file system, after that, you need also to copy themapreduce.tar.gzfrom HDFS to JuiceFS, into the same corresponding directory, default path for this file is/hdp/apps/${hdp.version}/mapreduce/mapreduce.tar.gz.sqoop import \
-fs jfs://{VOL_NAME}/ \
--target-dir jfs://{VOL_NAME}/path-to-dir -
1.4.7
sqoop import \
  --target-dir jfs://{VOL_NAME}/path-to-dir

