Data Migration
Since JuiceFS 5.0, existing data in object storage can be imported as-is into JuiceFS, while utilizing JuiceFS' cache capabilities, see juicefs import for more.
If the juicefs import workflow does not meet your requirements, you'll have to migrate data into JuiceFS, you can choose to do it seamlessly, or offline.
Hive
JuiceFS Java Client has the unique ability to create symlinks pointing to HDFS, this allows seamless migration from HDFS to JuiceFS.
Take Hive for instance, there are two methods that both achieve seamless migration, both based on the symlink ability, one requires changing Hive metadata while the other does not.
Method 1: Modify LOCATION metadata
Modify Hive metadata for database / table / partition, replace the LOCATION clause from hdfs://{ns} to jfs://{vol_name}, this gives you finer control over migration scope, you can migrate one db / table / partition at a time.
Preparation
In this step, you'll set up JuiceFS Java Client in Hadoop, create symlinks in JuiceFS that point to HDFS, and migrate the .Trash directory into JuiceFS. After this is done, data still writes to HDFS so there's no risk of data inconsistency.
All HDFS operations will be carried out using superuser, which defaults to hdfs in most cases.
-
Add configuration for JuiceFS Java Client to
core-site.xmlfor relevant services like Hive:<property>
<name>juicefs.migrating</name>
<value>true</value>
</property> -
Restart relevant services.
-
Initialize JuiceFS for Hadoop:
java -cp `hadoop classpath`:${HIVE_HOME}/lib/* juicefs-hadoop.jar com.juicefs.Main hive \
--src-fs hdfs://{ns} \
--dst-fs jfs://{vol_name} \
--initThis tells JuiceFS to create a symlink
/pointing to the HDFS root, like so:
Symlinks towards HDFS cannot be resolved under a FUSE mount, you may use
ls -lto view them, but they are not resolvable under FUSE, only accessible via Java Client. -
Initialize the
.Trashdirectory:java -cp `hadoop classpath`:${HIVE_HOME}/lib/*:juicefs-hadoop.jar com.juicefs.Main hive \
--src-fs hdfs://{ns} \
--dst-fs jfs://{vol_name} \
--init-trashData deletion in HDFS is usually achieved by renaming to under the
/user/{username}/.Trashdirectory, and because renaming across different file systems are not supported, the.Trashdirectory needs to be migrated early on.
Once this process completes, check juicefs.access-log (defaults to /tmp/juicefs.access.log) for cmd: Lookup (/.MIGRATING,1) to verify that symlink is working as expected.
Data Migration
In this step, you'll modify LOCATION in Hive metadata, and carry out directory structure / actual data migration.
Note that after LOCATION has been changed, data I/O is still happening in HDFS, the system will continue to behave like so until full directory structure has been migrated to JuiceFS, and after this happens, we'll begin to migrate existing HDFS data into JuiceFS.
-
Modify Hive
LOCATIONmetadata:java -cp `hadoop classpath`:${HIVE_HOME}/lib/*:juicefs-hadoop.jar com.juicefs.Main hive \
--src-fs hdfs://{ns} \
--dst-fs jfs://{vol_name} \
--hive-meta thrift://{host:port} \
--tables {db_name}[:{table_name} [, {table_name}] ...]This process changes
LOCATIONdefinition for specified Hive resources, replacing all--src-fswith--dst-fsvalues, and deals with all associating partitions in the same manner. At this point, Hive accesses data in HDFS through JuiceFS symlink, because of the root level symlink created in the previous steps.The above
--tablesoption supports the following format:- Specify only database name:
--tables {db_name}, this modifies allLOCATIONmetadata under the database. - Specify one or more tables:
--table {db_name}:{table_name},{table_name}. --tablesoption can be repeated to achieve the same result.
- Specify only database name:
-
Synchronize directory structure:
java -cp `hadoop classpath`:${HIVE_HOME}/lib/* juicefs-hadoop.jar com.juicefs.Main hive \
--src-fs hdfs://{ns} \
--dst-fs jfs://{vol_name} \
--hive-meta thrift://{host:port} \
--tables {db_name}[:{table_name} [, {table_name}] ...] \
--linkThe command looks just like the previous one, except for the trailing
--linkoption, which tellsjuicefs-hadoop.jarto create symlinks for all directories in HDFS. This operation is pretty fast because it involves only metadata change.This operation introduces a transient state to the system: When directory tree is only partially on JuiceFS, renaming files across file systems will fail. The command will block if it encounters cross-filesystem renaming, and wait for up to 10 minutes by default. In order to ensure success, you can:
- Adjust
juicefs.migrate.wait, which defaults to 10, unit is minute - Reduce
--tableslist, migrate fewer files at a time
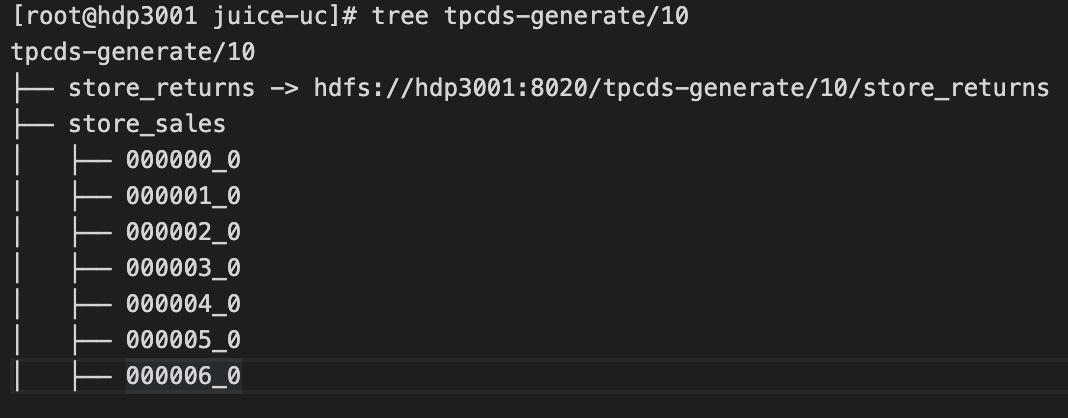
After directory structure has been fully synced to JuiceFS, new writes will occur in JuiceFS, as shown below:

File marked with red rectangle is data newly written to JuiceFS, while old data still exists as symlinks to HDFS.
- Adjust
-
Migrate HDFS Data:
java -cp `hadoop classpath`:${HIVE_HOME}/lib/* juicefs-hadoop.jar com.juicefs.Main hive \
--src-fs hdfs://{ns} \
--dst-fs jfs://{vol_name} \
--hive-meta thrift://{host:port} \
--tables {db_name}[:{table_name} [, {table_name}] ...] \
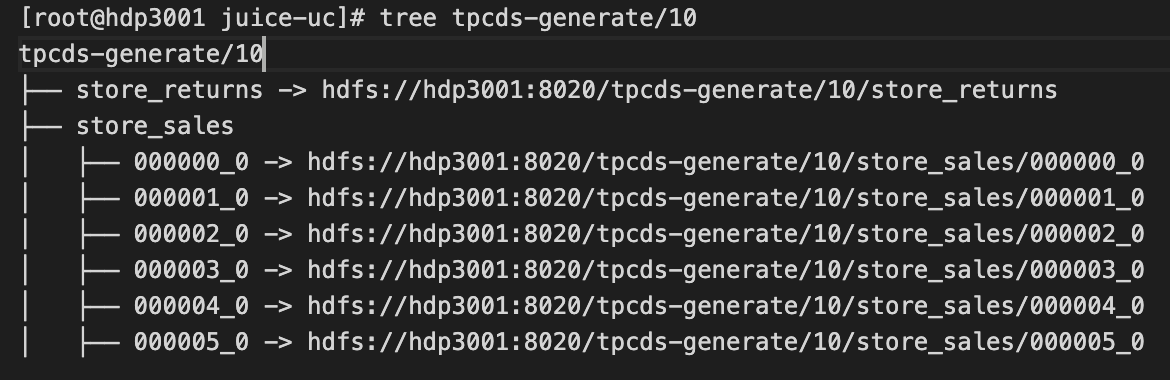
--copyBy using
--copy, this command migrates data from HDFS to JuiceFS, gradually overwriting all symlinks created in previous steps. By default this is done concurrently (10 threads, use--threadsto modify). You may choose to migrate different directories in different nodes to further accelerate this process.This is what things look like after migration:
To verify, use below command to try to find symlinks pointing to HDFS in specified directory, an empty output indicates migration has succeed, and follow-up writes will occur in JuiceFS.
find [path-to-hive-table] -type l
Rollback
Rollback is available through out the entire migration process, though rollback procedures vary when you're in different stages of the process.
-
Rollback during Preparation phase
In this phase, all writes are still happening in HDFS, you only need to revert changes to the Hive
LOCATIONmetadata, and then restart Hive to take effect.java -cp `hadoop classpath`:${HIVE_HOME}/lib/* juicefs-hadoop.jar com.juicefs.Main hive \
--src-fs hdfs://{ns} \
--dst-fs jfs://{vol_name} \
--hive-meta thrift://{host:port} \
--tables {db_name}[:{table_name} [, {table_name}] ...] \
--reverse -
Rollback during Data Migration phase
Stop all writes to the system, and use below command to revert changes made on Hive
LOCATIONmetadata, this also sync any data updates back to HDFS.java -cp `hadoop classpath`:${HIVE_HOME}/lib/* juicefs-hadoop.jar com.juicefs.Main hive \
--src-fs hdfs://{ns} \
--dst-fs jfs://{vol_name} \
--hive-meta thrift://{host:port} \
--tables {db_name}[:{table_name} [, {table_name}] ...] \
--reverse
Upon completion, restart Hive to finish up rollback.
Method 2: Change HDFS implementation
This method demands no Hive metadata changes, you'll be directly modifying HDFS implementation, which means fewer changes. But such a crucial change may cause compatibility issues with other Hadoop components, use at your own risk.
Preparation
In this step, you'll set up JuiceFS Java Client in Hadoop, create symlinks in JuiceFS that point to HDFS, and migrate the .Trash directory into JuiceFS. After this is done, data still writes to HDFS so there's no risk of data inconsistency.
All HDFS operations will be carried out using superuser, which defaults to hdfs in most cases.
-
Add configuration for JuiceFS Java Client:
<property>
    <name>juicefs.migrating</name>
    <value>true</value>
</property> -
Initialize JuiceFS for Hadoop:
java -cp `hadoop classpath`:${HIVE_HOME}/lib/* juicefs-hadoop.jar com.juicefs.Main hive \
  --src-fs hdfs://{ns} \
  --dst-fs jfs://{vol_name} \
  --init
This tells JuiceFS to create a symlink
/pointing to the HDFS root, like so:Symlinks pointing to HDFS cannot be resolved under a FUSE mount, you may use
ls -lto view them, but they are not resolvable under FUSE, only accessible via Java Client.Once this process completes, check
juicefs.access-log(defaults to/tmp/juicefs.access.log) forcmd: Lookup (/.MIGRATING,1)to verify that symlink is working as expected. -
Initialize the
.Trashdirectory:java -cp `hadoop classpath`:${HIVE_HOME}/lib/* juicefs-hadoop.jar com.juicefs.Main hive \
--src-fs hdfs://{ns} \
--dst-fs jfs://{vol_name} \
--init-trashData deletion in HDFS is usually achieved by renaming to under the
/user/{username}/.Trashdirectory, and because renaming across different file systems are not supported, the.Trashdirectory needs to be migrated early on. -
Add following content to
core-site.xml:<property>
<name>fs.hdfs.impl</name>
<value>com.juicefs.MigratingFileSystem</value>
</property>
<property>
<name>juicefs.migrate.src-fs</name>
<value>hdfs://{ns}/</value>
</property>
<property>
<name>juicefs.migrate.dst-fs</name>
<value>jfs://{vol_name}/</value>
</property>
<property>
<name>juicefs.caller-context</name>
<value>jfs</value>
</property>Carry out this step on all HDFS hosts, should be convenient if you're using Ambari.
juicefs.caller-contextis an optional property that enables audit logging for data access via JuiceFS, look for text likecallerContext=*_jfsin the HDFS audit log. This function requires Hadoop >= 2.8.0 (HDFS-9184), and withhadoop.caller.context.enabled. -
Restart relevant services
Affected services usually include YARN / HBase / Hive / Spark / Flume. A full restart on all Hadoop related services is recommended for simplicity. After restart, submitted jobs will be using JuiceFS for HDFS file access.
Data migration
In this step, you'll synchronize directory structure, and migrate data.
-
Synchronize directory structure:
java -cp $(hadoop classpath) com.juicefs.tools.Mover \
  --src-fs hdfs://{ns} \
  --dst-fs jfs://{vol_name} \
  --dir [path-to-table]
This command creates symlink in JuiceFS for all HDFS files inside specified directory:
This operation introduces a transient state to the system: When directory tree is only partially on JuiceFS, renaming files across file systems will fail. The command will block if it encounters cross-filesystem renaming, and wait for up to 10 minutes by default. In order to ensure success, you can:
- Adjust
juicefs.migrate.wait, which defaults to 10, unit is minute - Reduce
--tableslist, migrate fewer files at a time
After directory structure has been fully synced to JuiceFS, new writes will occur in JuiceFS, as shown below:
File marked with red rectangle is data newly written to JuiceFS, while old data still exists as symlinks to HDFS.
- Adjust
-
Migrate HDFS data
java -cp $(hadoop classpath) com.juicefs.tools.Mover \
  --src-fs hdfs://{ns} \
  --dst-fs jfs://{vol_name} \
  --dir [path-to-table] \
  --copy
By using
--copy, this command migrates data from HDFS to JuiceFS, gradually overwriting all symlinks created in previous steps. By default this is done concurrently (10 threads, use--threadsto modify). You may choose to migrate different directories in different nodes to further accelerate this process.This is what things look like after migration:
To verify, use below command to try to find symlinks pointing to HDFS in specified directory, an empty output indicates migration has succeed, and follow-up writes will occur in JuiceFS.
find [path-to-hive-table] -type l
Rollback
Rollback is available through out the entire migration process, though rollback procedures vary when you're in different stages of the process.
-
Rollback during Preparation phase
In this phase, all writes are still happening in HDFS, you only need to revert changes to
core-site.xml, i.e. removefs.hdfs.implclause, and then rolling restart all affected nodes. -
Rollback during Data Migration phase
Data have already been written to JuiceFS, so in order to ensure consistency, stop all writes to the system, and use below command to sync any data updates back to HDFS:
java -cp $(hadoop classpath) juicefs-hadoop.jar com.juicefs.tools.Mover \
  --src-fs hdfs://{ns} \
  --dst-fs jfs://{vol_name} \
  --dir [path-to-table] \
  --reverse
Method 3: Offline Migration
Stop all writes to HDFS and then migrate to JuiceFS, this no doubt is easier to execute. We recommend juicefs sync for this purpose, but you are free to use any other tools like DistCp.
Data warehouse software like Hive can store data on different storage systems. You can copy data from HDFS to JuiceFS via distcp and update the data location of the table with alter table.
Different partitions of the same table can also be stored in different storage systems, you could change the program to write new partition in JuiceFS, and copy existing partition to JuiceFS via distcp, update the partition location at the end.
HBase
Online Migration
Import existing data into the new JuiceFS HBase cluster and stay in sync with the original HBase cluster. Once the data is synchronized, the business can switch to the new JuiceFS HBase cluster.
In the Original HBase Cluster:
-
Turn on the replication:
add_peer '1', CLUSTER_KEY => "jfs_zookeeper:2181:/hbase",TABLE_CFS => { "your_table" => []}
enable_table_replication 'your_table'
Tables will be created automatically(include splits).
-
Turn off the replication:
disable_peer("1") -
Create a snapshot:
snapshot 'your_table','your_snapshot'
In the New JuiceFS HBase Cluster,
-
Import the snapshot:
sudo -u hbase hbase org.apache.hadoop.hbase.snapshot.ExportSnapshot \
-snapshot your_snapshot \
-copy-from s3://your_s3/hbase \
-copy-to jfs://your_jfs/hbase \
-mappers 1 \
-bandwidth 20
You could adjust
mapnumber and bandwidth(unit MB/s). -
Restore the snapshot:
disable 'your_table'
restore_snapshot 'your_snapshot'
enable 'your_table'
Turn on the replication in the Original HBase Cluster:
enable_peer("1")
Offline Migration
Close all tables in Original HBase Cluster:
bin/disable_all_tables.sh
In the New JuiceFS HBase Cluster:
-
Copy data via
distcp:sudo -u hbase hadoop distcp -Dmapreduce.map.memory.mb=1500 your_filesystem/hbase/data jfs://your_jfs/hbase/data -
Remove the Metadata of HBase
sudo -u hbase hadoop fs -rm -r jfs://your_jfs/hbase/data/hbase -
Repair the Metadata
sudo -u hbase hbase hbck -fixMeta -fixAssignments
Data Integrity Check
Offline data migration usually involves integrity check, it's easy to do with juicefs sync using the provided --check-all and --check-new options.
But for DistCp, it uses the getFileChecksum() interface of HDFS to get the checksum of the file, and then compares the checksum of the copied file to make sure the data is the same.
By default, the Checksum algorithm used by Hadoop is MD5-MD5-CRC32, relying heavily on HDFS implementation details. It is based on the file's current block form, using MD5-CRC32 Algorithm summary of each data block checksum (summary each 64K block's CRC32 checksum, then calculate an MD5) , and then calculate the checksum using MD5. This algorithm can not be used to compare HDFS clusters with different block sizes.
To be compatible with HDFS, JuiceFS also implements the MD5-MD5-CRC32 Algorithm, which reads the file data again and uses the same algorithm to calculate a checksum for comparison.
Because JuiceFS is based on object storage, which already guarantees data integrity through a variety of checksum mechanisms, JuiceFS does not enable the above checksum algorithm by default, requiring the parameter juicefs.file.checksum to enable.
The algorithm output is relevant to block size, so we need to set juicefs.block.size to the same value as HDFS (defaults to 128MB, same as dfs.blocksize). Note that the block in juicefs.block.size is a logical concept that corresponds to dfs.blocksize, not the actual uploaded block size in object storage.
In addition, HDFS supports setting different block sizes for each file, while JuiceFS does not. If checksum is enabled, the copy of some files will fail (due to different block sizes) , the JuiceFS SDK has a hotfix for DistCp (which requires tools.jar) to skip these chunked files (without comparing, rather than throwing exceptions) .
When you use DistCp for incremental copying, the default is to determine whether the contents of the file are the same based on the time and size of the file changes, which is sufficient for HDFS (because HDFS does not allow you to change the file contents) . If you want to further ensure that the data on both sides is the same, you can enable checksum comparisons with the -update parameter.

