Installation
JuiceFS has good cross-platform capability and supports various operating systems across almost all major architectures, including but not limited to Linux, macOS, and Windows.
The JuiceFS client has only one binary file. You can either download the pre-compiled version to unzip it and use it directly, or manually compile it from the provided source code.
One-click installation
The one-click installation script is available for Linux and macOS systems. It automatically downloads and installs the latest version of the JuiceFS client based on your hardware architecture.
Option 1 (Recommended): Install to the default location /usr/local/bin:
curl -sSL https://d.juicefs.com/install | sh -
Option 2: If you need to install to a custom location, for example /tmp directory:
curl -sSL https://d.juicefs.com/install | sh -s /tmp
Most users should choose Option 1 for the default installation. Only use Option 2 if you have specific requirements for the installation directory.
Install the pre-compiled client
You can download the latest version of the client at GitHub. Pre-compiled versions for different CPU architectures and operating systems are available in the download list of each client version. Please select the version that best suits your application. For example:
| File Name | Description |
|---|---|
juicefs-x.y.z-darwin-amd64.tar.gz | For macOS systems with Intel chips |
juicefs-x.y.z-darwin-arm64.tar.gz | For macOS systems with M1 series chips |
juicefs-x.y.z-linux-amd64.tar.gz | For Linux distributions on x86 architecture |
juicefs-x.y.z-linux-arm64.tar.gz | For Linux distributions on ARM architecture |
juicefs-x.y.z-windows-amd64.tar.gz | For Windows on x86 architecture |
juicefs-hadoop-x.y.z.jar | Hadoop Java SDK on x86 and ARM architectures (supports Linux, macOS, and Windows systems) |
Linux
For Linux systems with x86 architecture, download the file with the file name linux-amd64 and execute the following commands in the terminal.
-
Get the latest version number:
JFS_LATEST_TAG=$(curl -s https://api.github.com/repos/juicedata/juicefs/releases/latest | grep 'tag_name' | cut -d '"' -f 4 | tr -d 'v') -
Download the client to the current directory:
wget "https://github.com/juicedata/juicefs/releases/download/v${JFS_LATEST_TAG}/juicefs-${JFS_LATEST_TAG}-linux-amd64.tar.gz" -
Unzip the installation package:
tar -zxf "juicefs-${JFS_LATEST_TAG}-linux-amd64.tar.gz" -
Install the client:
sudo install juicefs /usr/local/bin
After completing the above 4 steps, execute the juicefs command in the terminal. If the client installation is successful, a help message will be returned.
If the terminal prompts command not found, it is probably because /usr/local/bin is not in your system's PATH environment variable. You can execute echo $PATH to see which executable paths are set in your system. Based on the returned result, select an appropriate path, adjust, and re-execute the installation command in step 4.
Ubuntu PPA
JuiceFS also provides a PPA repository, which makes it easy to install the latest version of the client on Ubuntu systems. Choose the corresponding PPA repository based on your CPU architecture:
- x86 architecture:
ppa:juicefs/ppa - ARM architecture:
ppa:juicefs/arm64
For example, on a Ubuntu 22.04 system with x86 architecture, execute the following commands:
-
Add the PPA repository:
sudo add-apt-repository ppa:juicefs/ppa -
Update the package list:
sudo apt-get update -
Install the JuiceFS client:
sudo apt-get install juicefs
Fedora Copr
JuiceFS also provides a Copr repository, which allows for easy installation of the latest version of the client on Red Hat and its derivatives. The supported systems currently include:
- Amazonlinux 2023
- CentOS 8, 9
- Fedora 37, 38, 39, rawhide
- RHEL 7, 8, 9
Taking Fedora 38 as an example, execute the following commands to install the client:
Enable the Copr repository:
sudo dnf copr enable -y juicedata/juicefs
Install the client:
sudo dnf install juicefs
Snapcraft
We have also packaged and released the Snap version of the JuiceFS client on the Canonical Snapcraft platform. For Ubuntu 16.04 and above and other operating systems that support Snap, you can install it using the following commands:
sudo snap install juicefs
Since Snap is a closed sandbox environment, it may affect the client's FUSE mount. You can remove the restriction by executing the following command. If you only need to use WebDAV and Gateway, there is no need to execute:
sudo ln -s -f /snap/juicefs/current/juicefs /snap/bin/juicefs
When there is a new version, execute the following command to update the client:
sudo snap refresh juicefs
AUR (Arch User Repository)
JuiceFS also provides an AUR repository, which makes it convenient to install the latest version of the client on Arch Linux and its derivatives.
For systems using the Yay package manager, execute the following command to install the client:
yay -S juicefs
There are multiple JuiceFS client packages available on AUR. The following are versions officially maintained by JuiceFS:
aur/juicefs: A stable compiled version that fetches the latest stable source code and compiles it during installation.aur/juicefs-bin: A stable pre-compiled version that directly downloads and installs the latest stable pre-compiled program.aur/juicefs-git: A development version that fetches the latest development source code and compiles it during installation.
Additionally, you can manually compile and install using makepkg, as shown for an Arch Linux system:
Install dependencies:
sudo pacman -S base-devel git go
Clone the AUR repository to be packaged:
git clone https://aur.archlinux.org/juicefs.git
Navigate to the repository directory:
cd juicefs
Compile and install:
makepkg -si
Windows
Since Windows does not natively support the FUSE interface, you need to download and install WinFsp first in order to implement FUSE support.
WinFsp is an open source Windows file system agent. It provides a FUSE emulation layer that allows JuiceFS clients to mount file systems on Windows systems for use.
There are three ways to use JuiceFS on Windows systems.
Using the pre-compiled Windows client
The Windows client of JuiceFS is also a standalone binary. After you download and extract it, you can run it right away.
Take the Windows 10 system as an example, download the file with the file name windows-amd64, unzip it, and get juicefs.exe which is the JuiceFS client binary.
For convenience, you can move juicefs.exe to C:\Windows\System32, so you can run the juicefs command directly from any directory in the command line.
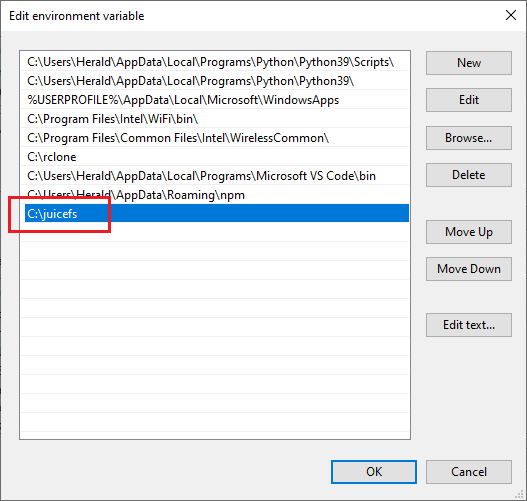
If you prefer more flexible management of the JuiceFS client, you can create a juicefs folder under the C:\ drive, place juicefs.exe inside it, and add C:\juicefs to your system's PATH environment variable. After restarting your system, you can use the juicefs command directly in terminals such as Command Prompt or PowerShell.
Using Scoop
If you have Scoop installed in your Windows system, you can use the following command to install the latest version of the JuiceFS client:
scoop install juicefs
Using the Linux client in WSL
WSL is short for Windows Subsystem for Linux, which is supported from Windows 10 version 2004 onwards or Windows 11. It allows you to run most of the command-line tools, utilities, and applications of GNU/Linux natively on a Windows system without incurring the overhead of a traditional virtual machine or dual-boot setup.
For details, see Using JuiceFS on WSL.
macOS
Since macOS does not support the FUSE interface by default, you need to install macFUSE to enable FUSE mounting. If FUSE mounting is not your primary use case, installing macFUSE is not required. You can also conveniently read and write data using JuiceFS through WebDAV, Gateway, or the Python SDK.
macFUSE is an open source file system enhancement tool that allows macOS to mount third-party file systems. It enables JuiceFS clients to mount file systems on macOS systems.
Homebrew
If you have the Homebrew package manager installed on your system, you can install the JuiceFS client by executing the following command:
brew install juicefs
For more information about this command, please refer to Homebrew Formulae page.
Pre-compiled binary
You can also download the binary with the file name darwin-amd64. After downloading, unzip the file and install the program to any executable path on your system using the install command, for example:
sudo install juicefs /usr/local/bin
Docker
For those interested in using JuiceFS in a Docker container, a Dockerfile for building a JuiceFS client image is provided below. It can be used as a base to build a JuiceFS client image alone or packaged together with other applications.
FROM ubuntu:20.04

RUN apt update && apt install -y curl fuse && \
    apt-get autoremove && \
    apt-get clean && \
    rm -rf \
    /tmp/* \
    /var/lib/apt/lists/* \
    /var/tmp/*

RUN set -x && \
    mkdir /juicefs && \
    cd /juicefs && \
    JFS_LATEST_TAG=$(curl -s https://api.github.com/repos/juicedata/juicefs/releases/latest | grep 'tag_name' | cut -d '"' -f 4 | tr -d 'v') && \
    curl -s -L "https://github.com/juicedata/juicefs/releases/download/v${JFS_LATEST_TAG}/juicefs-${JFS_LATEST_TAG}-linux-amd64.tar.gz" \
    | tar -zx && \
    install juicefs /usr/bin && \
    cd .. && \
    rm -rf /juicefs

CMD [ "juicefs" ]
Manually compiling
If there is no pre-compiled client versions that are suitable for your operating system, such as FreeBSD, you can manually compile the JuiceFS client.
One advantage of manual compilation is that you have priority access to various new features in JuiceFS development, but it requires some basic knowledge of software compilation.
For users in China, in order to speed up the acquisition of Go modules, it is recommended to set the GOPROXY environment variable to the domestic mirror server by executing go env -w GOPROXY=https://goproxy.cn,direct. For details, see Goproxy China.
Unix-like client
Compiling clients for Linux, macOS, BSD and other Unix-like systems requires the following dependencies:
- Go 1.20+
- GCC 5.4+
-
Clone the source code:
git clone https://github.com/juicedata/juicefs.git -
Enter the source code directory:
cd juicefs -
Switch to the desired branch, such as release v1.0.0:
The source code uses the
mainbranch by default. You can switch to any official release, for example, to the releasev1.0.0:git checkout v1.0.0cautionThe development branch often involves large changes, so do not use the clients compiled in the "development branch" for the production environment.
-
Compile:
makeThe compiled
juicefsbinary is located in the current directory.
Compiling on Windows
To compile the JuiceFS client on Windows systems, you need to install the following dependencies:
Among them, WinFsp and Go can be downloaded and installed directly. GCC needs to use a version provided by a third party, which can use MinGW-w64 or Cygwin. Here we take MinGW-w64 as an example.
On the MinGW-w64 download page, select a precompiled version for Windows, such as mingw-builds-binaries. After downloading, extract it to the root directory of the C drive, then find PATH in the system environment variable settings and add the C:\mingw64\bin directory. After restarting the system, execute the gcc -v command in the command prompt or PowerShell. If you can see version information, it means that MingGW-w64 is successfully installed, and you can start compiling.
-
Clone and enter the project directory:
git clone https://github.com/juicedata/juicefs.git && cd juicefs -
Copy WinFsp headers:
mkdir "C:\WinFsp\inc\fuse"copy .\hack\winfsp_headers\* C:\WinFsp\inc\fuse\dir "C:\WinFsp\inc\fuse"set CGO_CFLAGS=-IC:/WinFsp/inc/fusego env -w CGO_CFLAGS=-IC:/WinFsp/inc/fuse -
Compile the client:
go build -ldflags="-s -w" -o juicefs.exe .
The compiled juicefs.exe binary program is located in the current directory. For convenience, it can be moved to the C:\Windows\System32 directory, so that the juicefs.exe command can be used directly anywhere.
Cross-compiling Windows clients on Linux
Compiling a specific version of the client for Windows is essentially the same as Unix-like Client and can be done directly on a Linux system. However, in addition to go and gcc, you also need to install MinGW-w64.
The latest version can be installed from software repositories on many Linux distributions. For example, on Ubuntu 20.04+, you can install mingw-w64 with the following command:
sudo apt install mingw-w64
Compile the Windows client:
make juicefs.exe
The compiled client is a binary file named juicefs.exe, located in the current directory.
Cross-compiling Linux clients on macOS
-
Clone and enter the project directory:
git clone https://github.com/juicedata/juicefs.git && cd juicefs -
Install dependencies:
brew install FiloSottile/musl-cross/musl-cross -
Compile the client:
make juicefs.linux
Uninstall
The JuiceFS client has only one binary file, so it can be easily deleted once you find the location of the program. For example, to uninstall the client that is installed on the Linux system as described above, you only need to execute the following command:
sudo rm /usr/local/bin/juicefs
You can also check where the program is located by using the which command:
which juicefs
The path returned by the command is the location where the JuiceFS client is installed on your system. The uninstallation of the JuiceFS client on other operating systems follows the same way.