JuiceFS S3 Gateway
JuiceFS S3 Gateway is one of the various access methods supported by JuiceFS. It allows the JuiceFS file system to be accessed externally using the S3 protocol. This enables applications to access files stored on JuiceFS using Amazon S3 SDKs.
Architecture and principles
In JuiceFS, files are stored as objects and distributed in chunks within the underlying object storage. JuiceFS provides multiple access methods, including the FUSE POSIX, WebDAV, S3 Gateway, and CSI Driver. Among these options, S3 Gateway is particularly popular. Below is the S3 Gateway architecture:
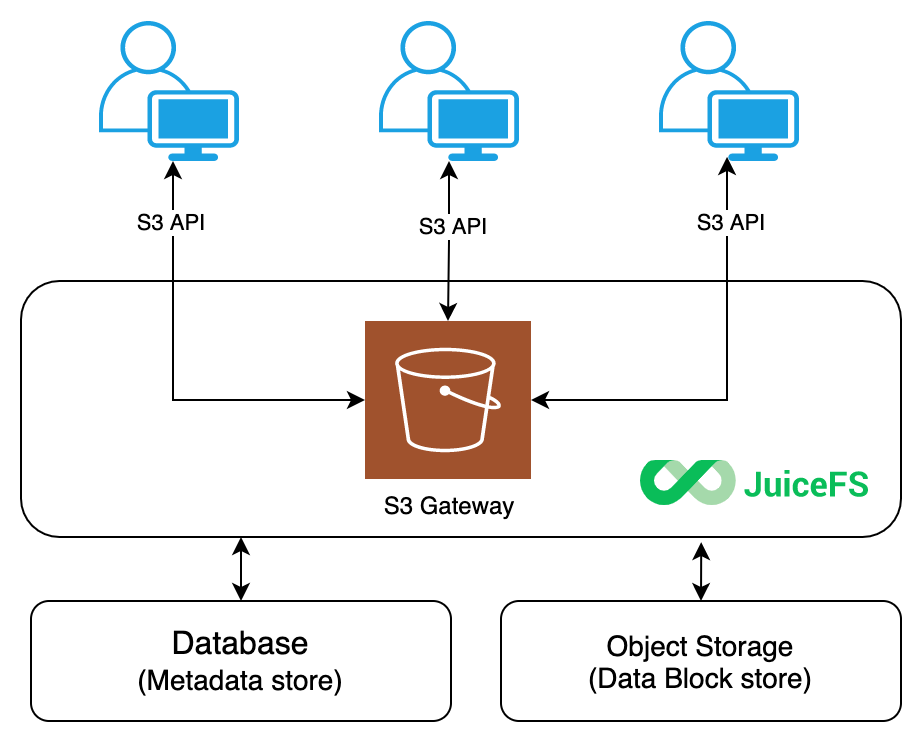
JuiceFS S3 Gateway implements its functionality through MinIO S3 Gateway. Leveraging MinIO's object interface, we integrate the JuiceFS file system as the backend storage for MinIO servers. This provides a user experience close to that of native MinIO usage while inheriting many advanced features of MinIO. In this architecture, JuiceFS acts as a local disk for the MinIO instance, and the principle is similar to the minio server /data1 command.
Common application scenarios for JuiceFS S3 Gateway include:
- Exposing the S3 API for JuiceFS: Applications can access files stored on JuiceFS using S3 SDKs.
- Using S3 clients: Using tools like S3cmd, AWS CLI, and MinIO clients to easily access and manage files stored on JuiceFS.
- Managing files in JuiceFS: JuiceFS S3 Gateway provides a web-based file manager to manage files in JuiceFS directly from a browser.
- Cluster replication: In scenarios requiring cross-cluster data replication, JuiceFS S3 Gateway serves as a unified data export for clusters. This avoids cross-region metadata access and enhances data transfer performance. For details, see Sync across regions using JuiceFS S3 Gateway.
Quick start
JuiceFS S3 Gateway enables access to an existing JuiceFS volume. If you do not have one, follow the steps in this guide to create a JuiceFS file system.
The gateway is built on MinIO, so you must set the MINIO_ROOT_USER and MINIO_ROOT_PASSWORD environment variables. They serve as the access key and secret key for authentication when you access the S3 API. These credentials are administrator credentials with the highest privileges.
export MINIO_ROOT_USER=admin
export MINIO_ROOT_PASSWORD=12345678

# Use "set" on Windows
set MINIO_ROOT_USER=admin
Note that MINIO_ROOT_USER must be at least 3 characters long, and MINIO_ROOT_PASSWORD must be at least 8 characters long. If these requirements are not met, the gateway service will display an error: MINIO_ROOT_USER should be specified as an environment variable with at least 3 characters.
Start the gateway:
# The first argument is the metadata engine URL; the second argument is the address/port for JuiceFS S3 Gateway to listen on.
juicefs gateway redis://localhost:6379/1 localhost:9000

# Since v1.2, JuiceFS supports running services in the background, using --background or -d.
# When running in background, use --log to specify the log path.
juicefs gateway redis://localhost:6379 localhost:9000 -d --log=/var/log/juicefs-s3-gateway.log
By default, multi-bucket support is not enabled. You can enable it by adding the --multi-buckets option. Additionally, you can add other options to gateway subcommands as needed. For example, you can set the default local cache to 20 GiB.
juicefs gateway --cache-size 20480 redis://localhost:6379/1 localhost:9000
This example assumes that the JuiceFS file system uses a local Redis database. When JuiceFS S3 Gateway is enabled, you can access the gateway's management interface at http://localhost:9000 on the current host.
To allow access to JuiceFS S3 Gateway from other hosts on the local network or the internet, adjust the listen address. For example:
juicefs gateway redis://localhost:6379/1 0.0.0.0:9000
This configuration makes JuiceFS S3 Gateway accept requests from all networks by default. Different S3 clients can access JuiceFS S3 Gateway using different addresses. For example:
- Third-party clients on the same host as JuiceFS S3 Gateway can use
http://127.0.0.1:9000orhttp://localhost:9000for access. - Third-party clients on the same local network as the JuiceFS S3 Gateway host can use
http://192.168.1.8:9000for access (assuming the JuiceFS S3 Gateway host's internal IP address is192.168.1.8). - Using
http://110.220.110.220:9000to access JuiceFS S3 Gateway over the internet (assuming the JuiceFS S3 Gateway host's public IP address is110.220.110.220).
Access JuiceFS S3 Gateway
Various S3 API-supported clients, desktop applications, and web applications can access JuiceFS S3 Gateway. Ensure you use the correct address and port for accessing JuiceFS S3 Gateway.
The following examples assume accessing JuiceFS S3 Gateway running on the local host with third-party clients. Adjust JuiceFS S3 Gateway's address according to your specific scenario.
Use the AWS CLI
Download and install the AWS Command Line Interface (AWS CLI) from https://aws.amazon.com/cli.
Configure it:
$ aws configure
AWS Access Key ID [None]: admin
AWS Secret Access Key [None]: 12345678
Default region name [None]:
Default output format [None]:
The program guides you interactively to add new configurations. Use the same values for Access Key ID as MINIO_ROOT_USER and Secret Access Key as MINIO_ROOT_PASSWORD. Leave the region name and output format blank.
Now you can use the aws s3 command to access JuiceFS storage, for example:
# List buckets
$ aws --endpoint-url http://localhost:9000 s3 ls

# List objects in bucket
$ aws --endpoint-url http://localhost:9000 s3 ls s3://<bucket>
Use the MinIO Client
To avoid compatibility issues, we recommend using the RELEASE.2021-04-22T17-40-00Z version of the MinIO Client (mc). You can find historical versions with different architectures of mc at this address. For example, for the amd64 architecture, you can download the RELEASE.2021-04-22T17-40-00Z version of mc from this link.
After installing mc, add a new alias:
mc alias set juicefs http://localhost:9000 admin 12345678
Then, you can freely copy, move, add, and delete files and folders between the local disk, JuiceFS storage, and other cloud storage services using the mc client.
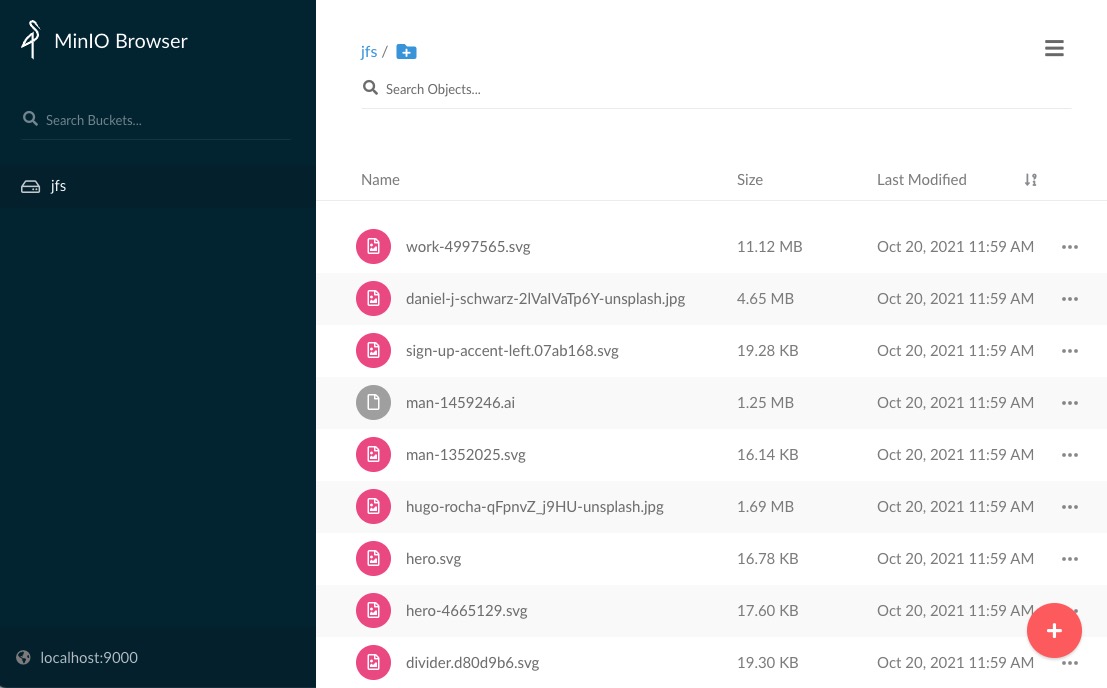
$ mc ls juicefs/jfs
[2021-10-20 11:59:00 CST] 130KiB avatar-2191932_1920.png
[2021-10-20 11:59:00 CST] 4.9KiB box-1297327.svg
[2021-10-20 11:59:00 CST]  21KiB cloud-4273197.svg
[2021-10-20 11:59:05 CST]  17KiB hero.svg
[2021-10-20 11:59:06 CST] 1.7MiB hugo-rocha-qFpnvZ_j9HU-unsplash.jpg
[2021-10-20 11:59:06 CST]  16KiB man-1352025.svg
[2021-10-20 11:59:06 CST] 1.3MiB man-1459246.ai
[2021-10-20 11:59:08 CST]  19KiB sign-up-accent-left.07ab168.svg
[2021-10-20 11:59:10 CST]  11MiB work-4997565.svg
Common features
Multi-bucket support
By default, JuiceFS S3 Gateway only allows one bucket. The bucket name is the file system name. If you need multiple buckets, you can add --multi-buckets at startup to enable multi-bucket support. This parameter exports each subdirectory under the top-level directory of the JuiceFS file system as a separate bucket. Creating a bucket means creating a subdirectory with the same name at the top level of the file system.
juicefs gateway redis://localhost:6379/1 localhost:9000 --multi-buckets
Retain ETags
By default, JuiceFS S3 Gateway does not save or return object ETag information. You can enable this with --keep-etag.
juicefs gateway myjfs localhost:9000 --keep-etag
Then if you upload the file through gateway into JuiceFS, you can get this etag by s3API head-object:
aws s3api --endpoint=http://localhost:9000 head-object --bucket myjfs --key test123/test.etag
{
    "AcceptRanges": "bytes",
    "LastModified": "Wed, 23 Apr 2025 00:17:16 GMT",
    "ContentLength": 7,
    "ETag": "\"d2fde576f44a6601b73201234b491904\"",
    "ContentType": "application/octet-stream",
    "Metadata": {}
}
This etag is calculated using the MD5 algorithm, and it's also setXattr to file with key s3-tag, if you mount the JuiceFS with --enable-xattr then you can use getfattr to get this etag:
getfattr -n s3-etag test.etag
# file: test.etag
s3-etag="d2fde576f44a6601b73201234b491904"
Enable object tags
Object tags are not supported by default, but you can use --object-tag to enable them.
Enable object metadata Added in v1.3
Object metadata is not supported by default, but you can use --object-meta to enable it. Refer to the documentation for usage.
Enable virtual host-style requests
By default, JuiceFS S3 Gateway supports path-style requests in the format of http://mydomain.com/bucket/object. The MINIO_DOMAIN environment variable is used to enable virtual host-style requests. If the request's Host header information matches (.+).mydomain.com, the matched pattern $1 is used as the bucket, and the path is used as the object.
For example:
export MINIO_DOMAIN=mydomain.com
Adjust the IAM refresh interval
The default refresh interval for Identity and Access Management (IAM) caching is 5 minutes. You can adjust this using --refresh-iam-interval. The value of this parameter is a time string with a unit, such as "300ms", "-1.5h", or "2h45m." Valid time units are "ns", "us" (or "µs"), "ms", "s", "m", and "h".
For example, to set a refresh interval of 1 minute:
juicefs gateway xxxx xxxx --refresh-iam-interval 1m
Multiple gateway instances
The distributed nature of JuiceFS allows multiple JuiceFS S3 gateway instances to be started on different nodes simultaneously. This can improve the availability and performance of S3 Gateway instances. In this scenario, each gateway instance independently handles requests, but all access the same JuiceFS file system. It is important to note the following:
- Ensure that all instances are started with the same user at initialization; use the same UID and GID for all instances.
- The IAM refresh time between nodes can vary, but it must be ensured that this interval is not too short to prevent excessive load on JuiceFS.
- Each instance's listening address and port can be freely configured. If multiple instances are started on the same machine, ensure that there is no conflict in port numbers.
Run as a daemon service
JuiceFS S3 Gateway can be configured as a systemd unit.
cat > /lib/systemd/system/juicefs-gateway.service<<EOF
[Unit]
Description=Juicefs S3 Gateway
Requires=network.target
After=multi-user.target
StartLimitIntervalSec=0

[Service]
Type=simple
User=root
Environment="MINIO_ROOT_USER=admin"
Environment="MINIO_ROOT_PASSWORD=12345678"
ExecStart=/usr/local/bin/juicefs gateway redis://localhost:6379 localhost:9000
Restart=on-failure
RestartSec=60

[Install]
WantedBy=multi-user.target
EOF
To enable the service at startup:
systemctl daemon-reload
systemctl enable juicefs-gateway --now
systemctl status juicefs-gateway
To inspect logs:
journalctl -xefu juicefs-gateway.service
Deploy S3 Gateway in Kubernetes
Installation requires Helm 3.1.0 or above, refer to the Helm Installation Guide.
helm repo add juicefs https://juicedata.github.io/charts/
helm repo update
The Helm chart supports both the Community and Enterprise Editions of JuiceFS. You can specify the version to use by configuring different fields in the values file.
secret:
  name: "myjfs"
  # If the token field is populated, the deployment will be treated as an Enterprise Edition.
  token: "xxx"
  accessKey: "xxx"
  secretKey: "xxx"
If you want to deploy Ingress, append the following content and write the corresponding Ingress configuration:
ingress:
  enabled: true
Be sure to include the values-mycluster.yaml file into your Git project (or using other source code management systems), so that all changes on the values file can be traced and rolled back.
Once the values file is ready, run the following command to deploy:
# Use this command for both initial deployment and subsequent updates.
helm upgrade --install -f values-mycluster.yaml s3-gateway juicefs/juicefs-s3-gateway
After installation, follow the output instructions to get the Kubernetes service address and verify if it is working.
$ kubectl -n kube-system get svc -l app.kubernetes.io/name=juicefs-s3-gateway
NAME                 TYPE        CLUSTER-IP      EXTERNAL-IP   PORT(S)    AGE
juicefs-s3-gateway   ClusterIP   10.101.108.42   <none>        9000/TCP   142m
The deployment will launch a Deploy named juicefs-s3-gateway. Run this command to check the Pod status:
$ kubectl -n kube-system get po -l app.kubernetes.io/name=juicefs-s3-gateway
NAME                                  READY   STATUS    RESTARTS   AGE
juicefs-s3-gateway-5c69d574cc-t92b6   1/1     Running   0          136m
Advanced features
The core feature of JuiceFS S3 Gateway is to provide the S3 API. Now, the support for the S3 protocol is comprehensive. Version 1.2 supports IAM and bucket event notifications.
These advanced features require the RELEASE.2021-04-22T17-40-00Z version of the mc client. For the usage of these advanced features, see the MinIO documentation or the mc command-line help information.
If you are unsure about the available features or how to use a specific feature, you can append -h to a subcommand to view the help information.
Identity and access control
Regular users
Before version 1.2, juicefs gateway only created a superuser when starting, and this superuser belonged only to that process. Even if multiple gateway processes shared the same file system, their users were isolated between processes. You could set different superusers for each gateway process, and they were independent and unaffected by each other.
Starting from version 1.2, juicefs gateway still requires setting a superuser at startup, and this superuser remains isolated per process. However, it allows adding new users using mc admin user add. Newly added users are shared across the same file system. You can manage new users using mc admin user. This supports adding, disabling, enabling, and deleting users, as well as viewing all users and displaying user information and policies.
$ mc admin user -h
NAME:
  mc admin user - manage users

USAGE:
  mc admin user COMMAND [COMMAND FLAGS | -h] [ARGUMENTS...]

COMMANDS:
  add      add a new user
  disable  disable user
  enable   enable user
  remove   remove user
  list     list all users
  info     display info of a user
  policy   export user policies in JSON format
  svcacct  manage service accounts
An example of adding a user:
# Add a new user.
$ mc admin user add myjfs user1 admin123

# List current users.
$ mc admin user list myjfs
enabled    user1

# List current users in JSON format.
$ mc admin user list myjfs --json
{
 "status": "success",
 "accessKey": "user1",
 "userStatus": "enabled"
}
Service accounts
Service accounts are used to create a copy of an existing user with the same permissions, allowing different applications to use separate access keys. The privileges for service accounts inherit from their parent users. They can be managed using the command:
$ mc admin user svcacct -h
NAME:
  mc admin user svcacct - manage service accounts

USAGE:
  mc admin user svcacct COMMAND [COMMAND FLAGS | -h] [ARGUMENTS...]

COMMANDS:
  add      add a new service account
  ls       List services accounts
  rm       Remove a service account
  info     Get a service account info
  set      edit an existing service account
  enable   Enable a service account
  disable  Disable a services account
Service accounts inherit privileges from their parent users and cannot be directly attached with permission policies.
For example, consider a user named user1. You can create a service account named svcacct1 for it using the following command:
mc admin user svcacct add myjfs user1 --access-key svcacct1 --secret-key 123456abc
If the parent user, user1, has read-only permissions, then so will svcacct1. To grant different permissions to svcacct1, you would need to adjust the privileges of the parent user.
AssumeRole security token service
The S3 Gateway Security Token Service (STS) is a service that allows clients to request temporary credentials to access MinIO resources. The working principle of temporary credentials is almost the same as default administrator credentials but with some differences:
- Temporary credentials are short-lived. They can be configured to last from minutes to hours. After expiration, the gateway no longer recognizes them and does not allow any form of API request access.
- Temporary credentials do not need to be stored with the application. They are dynamically generated and provided to the application when requested. When temporary credentials expire, applications can request new credentials.
The AssumeRole operation returns a set of temporary security credentials. You can use them to access gateway resources. AssumeRole requires authorization credentials for an existing gateway user and returns temporary security credentials, including an access key, secret key, and security token. Applications can use these temporary security credentials to sign requests for gateway API operations. The policies applied to these temporary credentials inherit from gateway user credentials.
By default, AssumeRole creates temporary security credentials with a validity period of one hour. However, you can specify the duration of the credentials using the optional parameter DurationSeconds, which can range from 900 (15 minutes) to 604,800 (7 days).
API request parameters
-
VersionIndicates the STS API version information. The only supported value is '2011-06-15', borrowed from the AWS STS API documentation for compatibility.
Parameter Value Type String Require Yes -
AUTHPARAMSIndicates the STS API authorization information. If you are familiar with AWS Signature V4 authorization headers, this STS API supports the signature V4 authorization as described here.
-
DurationSecondsDuration in seconds. This value can range from 900 seconds (15 minutes) to 7 days. If the value is higher than this setting, the operation fails. By default, this value is set to 3,600 seconds.
Parameter Value Type Integer Valid range From 900 to 604,800 Required No -
Policy
A JSON-format IAM policy that you want to use as an inline session policy. This parameter is optional. Passing a policy to this operation returns new temporary credentials. The permissions of the generated session are the intersection of preset policy names and the policy set here. You cannot use this policy to grant more permissions than allowed by the assumed preset policy names.
Parameter Value Type String Valid range From 1 to 2,048 Required No
Response elements
The XML response of this API is similar to AWS STS AssumeRole.
Errors
The XML error response of this API is similar to AWS STS AssumeRole.
A POST request example
http://minio:9000/?Action=AssumeRole&DurationSeconds=3600&Version=2011-06-15&Policy={"Version":"2012-10-17","Statement":[{"Sid":"Stmt1","Effect":"Allow","Action":"s3:*","Resource":"arn:aws:s3:::*"}]}&AUTHPARAMS
A response example
<?xml version="1.0" encoding="UTF-8"?>
<AssumeRoleResponse xmlns="https://sts.amazonaws.com/doc/2011-06-15/">
  <AssumeRoleResult>
    <AssumedRoleUser>
      <Arn/>
      <AssumeRoleId/>
    </AssumedRoleUser>
    <Credentials>
      <AccessKeyId>Y4RJU1RNFGK48LGO9I2S</AccessKeyId>
      <SecretAccessKey>sYLRKS1Z7hSjluf6gEbb9066hnx315wHTiACPAjg</SecretAccessKey>
      <Expiration>2019-08-08T20:26:12Z</Expiration>
      <SessionToken>eyJhbGciOiJIUzUxMiIsInR5cCI6IkpXVCJ9.eyJhY2Nlc3NLZXkiOiJZNFJKVTFSTkZHSzQ4TEdPOUkyUyIsImF1ZCI6IlBvRWdYUDZ1Vk80NUlzRU5SbmdEWGo1QXU1WWEiLCJhenAiOiJQb0VnWFA2dVZPNDVJc0VOUm5nRFhqNUF1NVlhIiwiZXhwIjoxNTQxODExMDcxLCJpYXQiOjE1NDE4MDc0NzEsImlzcyI6Imh0dHBzOi8vbG9jYWxob3N0Ojk0NDMvb2F1dGgyL3Rva2VuIiwianRpIjoiYTBiMjc2MjktZWUxYS00M2JmLTg3MzktZjMzNzRhNGNkYmMwIn0.ewHqKVFTaP-j_kgZrcOEKroNUjk10GEp8bqQjxBbYVovV0nHO985VnRESFbcT6XMDDKHZiWqN2vi_ETX_u3Q-w</SessionToken>
    </Credentials>
  </AssumeRoleResult>
  <ResponseMetadata>
    <RequestId>c6104cbe-af31-11e0-8154-cbc7ccf896c7</RequestId>
  </ResponseMetadata>
</AssumeRoleResponse>
Use the AWS CLI with the AssumeRole API
-
Start the gateway and create a user named
foobar. -
Configure the AWS CLI:
[foobar]
region = us-east-1
aws_access_key_id = foobar
aws_secret_access_key = foo12345 -
Use the AWS CLI to request the
AssumeRoleAPI.NoteIn the command below,
--role-arnand--role-session-namehave no significance for the gateway. You can set them to any value that meets the command line requirements.$ aws --profile foobar --endpoint-url http://localhost:9000 sts assume-role --policy '{"Version":"2012-10-17","Statement":[{"Sid":"Stmt1","Effect":"Allow","Action":"s3:*","Resource":"arn:aws:s3:::*"}]}' --role-arn arn:xxx:xxx:xxx:xxxx --role-session-name anything
{
"AssumedRoleUser": {
"Arn": ""
},
"Credentials": {
"SecretAccessKey": "xbnWUoNKgFxi+uv3RI9UgqP3tULQMdI+Hj+4psd4",
"SessionToken": "eyJhbGciOiJIUzUxMiIsInR5cCI6IkpXVCJ9.eyJhY2Nlc3NLZXkiOiJLOURUSU1VVlpYRVhKTDNBVFVPWSIsImV4cCI6MzYwMDAwMDAwMDAwMCwicG9saWN5IjoidGVzdCJ9.PetK5wWUcnCJkMYv6TEs7HqlA4x_vViykQ8b2T_6hapFGJTO34sfTwqBnHF6lAiWxRoZXco11B0R7y58WAsrQw",
"Expiration": "2019-02-20T19:56:59-08:00",
"AccessKeyId": "K9DTIMUVZXEXJL3ATUOY"
}
}
Access the AssumeRole API in Go applications
See the MinIO official example program.
Superusers defined by environment variables cannot use AssumeRole APIs; only users added by mc admin user add can use AssumeRole APIs.
Permission management
By default, newly created users have no permissions and need to be granted permissions using mc admin policy before they can be used. This command supports adding, deleting, updating, and listing policies, as well as adding, deleting, and updating permissions for users.
$ mc admin policy -h
NAME:
  mc admin policy - manage policies defined in the MinIO server

USAGE:
  mc admin policy COMMAND [COMMAND FLAGS | -h] [ARGUMENTS...]

COMMANDS:
  add     add new policy
  remove  remove policy
  list    list all policies
  info    show info on a policy
  set     set IAM policy on a user or group
  unset   unset an IAM policy for a user or group
  update  Attach new IAM policy to a user or group
The gateway includes the following common policies:
readonly: Read-only users.readwrite: Read-write users.writeonly: Write-only users.consoleAdmin: Read-write-admin users, where "admin" means the ability to use management APIs such as creating users.
For example, to set a user as a read-only user:
# Set user1 as a read-only user.
$ mc admin policy set myjfs readonly user=user1

# Check user policy.
$ mc admin user list myjfs
enabled    user1                 readonly
For custom policies, use mc admin policy add:
$ mc admin policy add -h
NAME:
  mc admin policy add - add new policy

USAGE:
  mc admin policy add TARGET POLICYNAME POLICYFILE

POLICYNAME:
  Name of the canned policy on the MinIO server.

POLICYFILE:
  Name of the policy file associated with the policy name.

EXAMPLES:
  1. Add a new canned policy 'writeonly'.
     $ mc admin policy add myjfs writeonly /tmp/writeonly.json
The policy file to be added here must be in JSON format with IAM-compatible syntax, limited to 2,048 characters. This syntax allows for more fine-grained access control. If you are unfamiliar with this, you can first use the following command to see the simple policies and then modify them accordingly.
$ mc admin policy info myjfs readonly
{
 "Version": "2012-10-17",
 "Statement": [
  {
   "Effect": "Allow",
   "Action": [
    "s3:GetBucketLocation",
    "s3:GetObject"
   ],
   "Resource": [
    "arn:aws:s3:::*"
   ]
  }
 ]
}
User group management
JuiceFS S3 Gateway supports creating user groups, similar to Linux user groups, and uses mc admin group for management. You can set one or more users to a group and grant permissions uniformly to the group. This usage is similar to user management.
$ mc admin  group -h
NAME:
  mc admin group - manage groups

USAGE:
  mc admin group COMMAND [COMMAND FLAGS | -h] [ARGUMENTS...]

COMMANDS:
  add      add users to a new or existing group
  remove   remove group or members from a group
  info     display group info
  list     display list of groups
  enable   enable a group
  disable  disable a group
Anonymous access management
In addition to user-specific permissions, anonymous access management is also possible. This allows specific objects or buckets to be accessible to anyone. You can use the mc policy command to manage this functionality.
Name:
  mc policy - manage anonymous access to buckets and objects

USAGE:
  mc policy [FLAGS] set PERMISSION TARGET
  mc policy [FLAGS] set-json FILE TARGET
  mc policy [FLAGS] get TARGET
  mc policy [FLAGS] get-json TARGET
  mc policy [FLAGS] list TARGET

PERMISSION:
  Allowed policies are: [none, download, upload, public].

FILE:
  A valid S3 policy JSON filepath.

EXAMPLES:
  1. Set bucket to "download" on Amazon S3 cloud storage.
     $ mc policy set download s3/burningman2011

  2. Set bucket to "public" on Amazon S3 cloud storage.
     $ mc policy set public s3/shared

  3. Set bucket to "upload" on Amazon S3 cloud storage.
     $ mc policy set upload s3/incoming

  4. Set policy to "public" for bucket with prefix on Amazon S3 cloud storage.
     $ mc policy set public s3/public-commons/images

  5. Set a custom prefix based bucket policy on Amazon S3 cloud storage using a JSON file.
     $ mc policy set-json /path/to/policy.json s3/public-commons/images

  6. Get bucket permissions.
     $ mc policy get s3/shared

  7. Get bucket permissions in JSON format.
     $ mc policy get-json s3/shared

  8. List policies set to a specified bucket.
     $ mc policy list s3/shared

  9. List public object URLs recursively.
     $ mc policy --recursive links s3/shared/
The gateway has built-in support for four types of anonymous permissions by default:
none: Disallows anonymous access (typically used to clear existing permissions).download: Allows anyone to read.upload: Allows anyone to write.public: Allows anyone to read and write.
The following example shows how to set an object to allow anonymous downloads:
# Set testbucket1/afile for anonymous access.
mc policy set download useradmin/testbucket1/afile

# View specific permissions.
mc policy get-json useradmin/testbucket1/afile

$ mc policy --recursive links useradmin/testbucket1/
http://127.0.0.1:9001/testbucket1/afile

# Directly download the object.
wget http://127.0.0.1:9001/testbucket1/afile

# Clear download permission for afile.
mc policy set none  useradmin/testbucket1/afile
Configuration effective time
All management API updates for JuiceFS S3 Gateway take effect immediately and are persisted to the JuiceFS file system. Clients that accept these API requests also immediately reflect these changes.
However, in a multi-server gateway setup, the situation is slightly different. This is because when the gateway handles request authentication, it uses in-memory cached information as the validation baseline. Otherwise, reading configuration file content for every request would pose unacceptable performance issues. However, caching also introduces potential inconsistencies between cached data and the configuration file.
Currently, JuiceFS S3 Gateway's cache refresh strategy involves forcibly updating the in-memory cache every 5 minutes (certain operations also trigger cache update operations). This ensures that configuration changes take effect within a maximum of 5 minutes in a multi-server setup. You can adjust this time by using the --refresh-iam-interval parameter. If immediate effect on a specific gateway is required, you can manually restart it.
Bucket event notifications
You can use bucket event notifications to monitor events happening on objects within a storage bucket and trigger certain actions in response.
Currently supported object event types include:
s3:ObjectCreated:Puts3:ObjectCreated:CompleteMultipartUploads3:ObjectAccessed:Heads3:ObjectCreated:Posts3:ObjectRemoved:Deletes3:ObjectCreated:Copys3:ObjectAccessed:Get
Supported global events include:
s3:BucketCreateds3:BucketRemoved
You can use the mc client tool with the event subcommand to set up and monitor event notifications. Notifications sent by MinIO for publishing events are in JSON format. See the JSON structure.
To reduce dependencies, JuiceFS S3 Gateway has cut support for certain event destination types. Currently, storage bucket events can be published to the following destinations:
- Redis
- MySQL
- PostgreSQL
- Webhooks
$ mc admin config get myjfs | grep notify
notify_webhook        publish bucket notifications to webhook endpoints
notify_mysql          publish bucket notifications to MySQL databases
notify_postgres       publish bucket notifications to Postgres databases
notify_redis          publish bucket notifications to Redis datastores
Here, assuming the JuiceFS file system name is 'images', enable the S3 Gateway service and define its alias as 'myjfs' in mc. For the S3 Gateway, the JuiceFS file system name 'images' serves as a bucket name.
Use Redis to publish events
Redis event destination supports two formats: namespace and access.
In the namespace format, the gateway synchronizes objects in the bucket to entries in a Redis hash. Each entry corresponds to an object in the storage bucket, with the key set to "bucket name/object name" and the value as JSON-formatted event data specific to that gateway object. Any updates or deletions of objects also update or delete corresponding entries in the hash.
In the access format, the gateway uses RPUSH to add events to a list. Each element in this list is a JSON-formatted list with two elements:
- A timestamp string
- A JSON object containing event data related to operations on the bucket
In this format, elements in the list are not updated or deleted.
To use notification destinations in namespace and access formats:
-
Configure Redis with the gateway.
Use the
mc admin config setcommand to configure Redis as the event notification destination:# Command-line parameters
# mc admin config set myjfs notify_redis[:name] address="xxx" format="namespace|access" key="xxxx" password="xxxx" queue_dir="" queue_limit="0"
# An example
$ mc admin config set myjfs notify_redis:1 address="127.0.0.1:6379/1" format="namespace" key="bucketevents" password="yoursecret" queue_dir="" queue_limit="0"You can use
mc admin config get myjfs notify_redisto view the configuration options. Different types of destinations have different configuration options. For Redis type, it has the following configuration options:$ mc admin config get myjfs notify_redis
notify_redis enable=off format=namespace address= key= password= queue_dir= queue_limit=0Here are the meanings of each configuration option:
notify_redis[:name]               Supports setting multiple Redis instances with different names.
address*     (address)            Address of the Redis server. For example: localhost:6379.
key*         (string)             Redis key to store/update events. The key is created automatically.
format*      (namespace*|access)  Determines the format type, either 'namespace' or 'access'; defaults to 'namespace'.
password     (string)             Password for the Redis server.
queue_dir    (path)               Directory to store unsent messages, for example, '/home/events'.
queue_limit  (number)             Maximum limit of unsent messages. The default is '100000'.
comment      (sentence)           Optional comment description.
The gateway supports persistent event storage. Persistent storage backs up events when the Redis broker is offline and replays events when the broker comes back online. You can set the directory for event storage using the
queue_dirfield and the maximum limit for storage usingqueue_limit. For example, you can setqueue_dirto/home/events, and you can setqueue_limitto 1,000. By default,queue_limitis 100,000. Before updating the configuration, you can use themc admin config getcommand to get the current configuration.$ mc admin config get myjfs notify_redis
notify_redis:1 address="127.0.0.1:6379/1" format="namespace" key="bucketevents" password="yoursecret" queue_dir="" queue_limit="0"
# Effective after restart
$ mc admin config set myjfs notify_redis:1 queue_limit="1000"
Successfully applied new settings.
Please restart your server: 'mc admin service restart myjfs'.
# Note that the `mc admin service restart myjfs` command cannot be used to restart. JuiceFS S3 Gateway does not currently support this functionality. When you see this prompt after configuring with `mc`, you need to manually restart JuiceFS S3 Gateway.After using the
mc admin config setcommand to update the configuration, restart JuiceFS S3 Gateway to apply the changes. JuiceFS S3 Gateway will output a line similar toSQS ARNs: arn:minio:sqs::1:redis.Based on your needs, you can add multiple Redis destinations by providing the identifier for each Redis instance (like the "1" in the example "notify_redis:1") along with the configuration parameters for each instance.
-
Enable bucket notifications.
Now you can enable event notifications on a bucket named "images." When a JPEG file is created or overwritten, a new key is created or an existing key is updated in the previously configured Redis hash. If an existing object is deleted, the corresponding key is also removed from the hash. Therefore, the rows in the Redis hash map to
.jpgobjects in the "images" bucket.To configure bucket notifications, you need to use the Amazon Resource Name (ARN) information outputted by the gateway in the previous steps. See more information about ARNs.
You can use the
mctool to add these configuration details. Assuming the gateway service alias is myjfs, you can execute the following script:mc event add myjfs/images arn:minio:sqs::1:redis --suffix .jpg
mc event list myjfs/images
arn:minio:sqs::1:redis s3:ObjectCreated:*,s3:ObjectRemoved:*,s3:ObjectAccessed:* Filter: suffix=".jpg" -
Verify Redis.
Start the
redis-cliRedis client program to check the content in Redis. Running themonitorRedis command will output every command executed on Redis.redis-cli -a yoursecret
127.0.0.1:6379> monitor
OKUpload a file named
myphoto.jpgto theimagesbucket.mc cp myphoto.jpg myjfs/imagesIn the previous terminal, you can see the operations performed by the gateway on Redis:
127.0.0.1:6379> monitor
OK
1712562516.867831 [1 192.168.65.1:59280] "hset" "bucketevents" "images/myphoto.jpg" "{\"Records\":[{\"eventVersion\":\"2.0\",\"eventSource\":\"minio:s3\",\"awsRegion\":\"\",\"eventTime\":\"2024-04-08T07:48:36.865Z\",\"eventName\":\"s3:ObjectCreated:Put\",\"userIdentity\":{\"principalId\":\"admin\"},\"requestParameters\":{\"principalId\":\"admin\",\"region\":\"\",\"sourceIPAddress\":\"127.0.0.1\"},\"responseElements\":{\"content-length\":\"0\",\"x-amz-request-id\":\"17C43E891887BA48\",\"x-minio-origin-endpoint\":\"http://127.0.0.1:9001\"},\"s3\":{\"s3SchemaVersion\":\"1.0\",\"configurationId\":\"Config\",\"bucket\":{\"name\":\"images\",\"ownerIdentity\":{\"principalId\":\"admin\"},\"arn\":\"arn:aws:s3:::images\"},\"object\":{\"key\":\"myphoto.jpg\",\"size\":4,\"eTag\":\"40b134ab8a3dee5dd9760a7805fd495c\",\"userMetadata\":{\"content-type\":\"image/jpeg\"},\"sequencer\":\"17C43E89196AE2A0\"}},\"source\":{\"host\":\"127.0.0.1\",\"port\":\"\",\"userAgent\":\"MinIO (darwin; arm64) minio-go/v7.0.11 mc/RELEASE.2021-04-22T17-40-00Z\"}}]}"
Here, you can see that the gateway executed the
HSETcommand on theminio_eventskey.In the
accessformat,minio_eventsis a list, and the gateway callsRPUSHto add it to the list. In themonitorcommand, you can see:127.0.0.1:6379> monitor
OK
1712562751.922469 [1 192.168.65.1:61102] "rpush" "aceesseventskey" "[{\"Event\":[{\"eventVersion\":\"2.0\",\"eventSource\":\"minio:s3\",\"awsRegion\":\"\",\"eventTime\":\"2024-04-08T07:52:31.921Z\",\"eventName\":\"s3:ObjectCreated:Put\",\"userIdentity\":{\"principalId\":\"admin\"},\"requestParameters\":{\"principalId\":\"admin\",\"region\":\"\",\"sourceIPAddress\":\"127.0.0.1\"},\"responseElements\":{\"content-length\":\"0\",\"x-amz-request-id\":\"17C43EBFD35A53B8\",\"x-minio-origin-endpoint\":\"http://127.0.0.1:9001\"},\"s3\":{\"s3SchemaVersion\":\"1.0\",\"configurationId\":\"Config\",\"bucket\":{\"name\":\"images\",\"ownerIdentity\":{\"principalId\":\"admin\"},\"arn\":\"arn:aws:s3:::images\"},\"object\":{\"key\":\"myphoto.jpg\",\"size\":4,\"eTag\":\"40b134ab8a3dee5dd9760a7805fd495c\",\"userMetadata\":{\"content-type\":\"image/jpeg\"},\"sequencer\":\"17C43EBFD3DACA70\"}},\"source\":{\"host\":\"127.0.0.1\",\"port\":\"\",\"userAgent\":\"MinIO (darwin; arm64) minio-go/v7.0.11 mc/RELEASE.2021-04-22T17-40-00Z\"}}],\"EventTime\":\"2024-04-08T07:52:31.921Z\"}]"
Use MySQL to publish events
The MySQL notification destination supports two formats: namespace and access.
If you use the namespace format, the gateway synchronizes objects in the bucket to rows in the database table. Each row has two columns:
key_name. It is the bucket name plus the object name.value. It is the JSON-formatted event data about that gateway object.
If objects are updated or deleted, the corresponding rows in the table are also updated or deleted.
If you use the access format, the gateway adds events to the table. Rows have two columns:
event_time. It is the time the event occurred on the gateway server.event_data. It is the JSON-formatted event data about that gateway object.
In this format, rows are not deleted or modified.
The following steps show how to use the notification destination in namespace format. The access format is similar and not further described here.
-
Ensure the MySQL version meets the minimum requirements.
JuiceFS S3 Gateway requires MySQL version 5.7.8 or above, because it uses the JSON data type introduced in MySQL 5.7.8.
-
Configure MySQL to the gateway.
Use the
mc admin config setcommand to configure MySQL as the event notification destination.mc admin config set myjfs notify_mysql:myinstance table="minio_images" dsn_string="root:123456@tcp(172.17.0.1:3306)/miniodb"You can use
mc admin config get myjfs notify_mysqlto view the configuration options. Different destination types have different configuration options. For MySQL type, the following configuration options are available:$ mc admin config get myjfs notify_mysql
format=namespace dsn_string= table= queue_dir= queue_limit=0 max_open_connections=2Here are the meanings of each configuration item:
KEY:
notify_mysql[:name]  Publish bucket notifications to the MySQL database. When multiple MySQL server endpoints are required, you can add a user-specified "name" to each configuration, for example, "notify_mysql:myinstance."

ARGS:
dsn_string*  (string)             MySQL data source name connection string, for example, "<user>:<password>@tcp(<host>:<port>)/<database>".
table*       (string)             Name of the database table to store/update events. The table is automatically created.
format*      (namespace*|access)  'namespace' or 'access.' The default is 'namespace.'
queue_dir    (path)               The directory for storing unsent messages, for example, '/home/events'.
queue_limit  (number)             The maximum limit of unsent messages. The default is '100000'.
comment (sentence) Optional comment description.dsn_stringis required and must be in the format<user>:<password>@tcp(<host>:<port>)/<database>.MinIO supports persistent event storage. Persistent storage backs up events when the MySQL connection is offline and replays events when the broker comes back online. You can set the storage directory for events using the
queue_dirfield, and the maximum storage limit usingqueue_limit. For example, you can setqueue_dirto/home/events, andqueue_limitto 1,000. By default,queue_limitis set to 100,000.Before updating the configuration, you can use the
mc admin config getcommand to get the current configuration.$ mc admin config get myjfs/ notify_mysql
notify_mysql:myinstance enable=off format=namespace host= port= username= password= database= dsn_string= table= queue_dir= queue_limit=0Update the MySQL notification configuration using the
mc admin config setcommand with thedsn_stringparameter:mc admin config set myjfs notify_mysql:myinstance table="minio_images" dsn_string="root:xxxx@tcp(127.0.0.1:3306)/miniodb"You can add multiple MySQL server endpoints as needed, by providing the identifier of the MySQL instance (for example, "myinstance") and the configuration parameter information for each instance.
After updating the configuration with the
mc admin config setcommand, restart the gateway to apply the configuration changes. The gateway server will output a line during startup similar toSQS ARNs: arn:minio:sqs::myinstance:mysql. -
Enable bucket notifications.
Now you can enable event notifications on a bucket named "images." When a file is uploaded to the bucket, a new record is inserted into MySQL, or an existing record is updated. If an existing object is deleted, the corresponding record is also deleted from the MySQL table. Therefore, each row in the MySQL table corresponds to an object in the bucket.
To configure bucket notifications, you need to use the ARN information outputted by MinIO in previous steps. See more information about ARNs.
Assuming the gateway service alias is myjfs, you can execute the following script:
# Add notification configuration to the 'images' bucket using the MySQL ARN. The --suffix parameter is used to filter events.
mc event add myjfs/images arn:minio:sqs::myinstance:mysql --suffix .jpg
# Print the notification configuration on the 'images' bucket.
mc event list myjfs/images
arn:minio:sqs::myinstance:mysql s3:ObjectCreated:*,s3:ObjectRemoved:*,s3:ObjectAccessed:* Filter: suffix=”.jpg” -
Verify MySQL.
Open a new terminal and upload a JPEG image to the
imagesbucket:mc cp myphoto.jpg myjfs/imagesOpen a MySQL terminal and list all records in the
minio_imagestable. You will find a newly inserted record.
Use PostgreSQL to publish events
The method of publishing events using PostgreSQL is similar to publishing MinIO events using MySQL, with PostgreSQL version 9.5 or above required. The gateway uses PostgreSQL 9.5's INSERT ON CONFLICT (aka UPSERT) feature and 9.4's jsonb data type.
Use a webhook to publish events
Webhooks use a push model to get data instead of continually pulling.
-
Configure a webhook to the gateway.
The gateway supports persistent event storage. Persistent storage backs up events when the webhook is offline and replays events when the broker comes back online. You can set the directory for event storage using the
queue_dirfield, and the maximum storage limit usingqueue_limit. For example, you can setqueue_dirto/home/eventsandqueue_limitto 1,000. By default,queue_limitis 100,000.KEY:
notify_webhook[:name] Publish bucket notifications to webhook endpoints.
ARGS:
endpoint* (url) Webhook server endpoint, for example, http://localhost:8080/minio/events.
auth_token (string) Opaque token or JWT authorization token.
queue_dir (path) The directory for storing unsent messages, for example, '/home/events'.
queue_limit (number) The maximum limit of unsent messages. The default is '100000'.
client_cert (string) The client certificate for mTLS authentication of the webhook.
client_key (string) The client certificate key for mTLS authentication of the webhook.
comment (sentence) Optional comment description.Use the
mc admin config setcommand to update the configuration. The endpoint here is the service that listens for webhook notifications. Save the configuration file and restart the MinIO service to apply the changes. Note that when restarting MinIO, this endpoint must be up and accessible.mc admin config set myjfs notify_webhook:1 queue_limit="0" endpoint="http://localhost:3000" queue_dir="" -
Enable bucket notifications.
Now you can enable event notifications. When a file is uploaded to the bucket, an event is triggered. Here, the ARN value is
arn:minio:sqs::1:webhook. See more information about ARNs.mc mb myjfs/images-thumbnail
mc event add myjfs/images arn:minio:sqs::1:webhook --event put --suffix .jpgIf the command report cannot create a bucket, please check if the S3 Gateway has enabled multi-bucket support.
-
Use Thumbnailer to verify.
Thumbnailer is a project that generates thumbnails using MinIO's
listenBucketNotificationAPI. JuiceFS uses Thumbnailer to listen to gateway notifications. If a file is uploaded to the gateway service, Thumbnailer listens to that notification, generates a thumbnail, and uploads it to the gateway service.To install Thumbnailer:
git clone https://github.com/minio/thumbnailer/
npm install
Open the Thumbnailer's
config/webhook.jsonconfiguration file, add the configuration for the MinIO server, and start Thumbnailer using:NODE_ENV=webhook node thumbnail-webhook.jsThumbnailer runs on
http://localhost:3000/.Next, configure the MinIO server to send messages to this URL (mentioned in step 1) and set up bucket notifications using
mc(mentioned in step 2). Then upload an image to the gateway server:mc cp ~/images.jpg myjfs/images
.../images.jpg: 8.31 KB / 8.31 KB ┃▓▓▓▓▓▓▓▓▓▓▓▓▓▓▓▓▓▓▓▓▓▓▓▓▓▓▓▓▓▓▓▓▓▓▓┃ 100.00% 59.42 KB/s 0sAfter a moment, use
mc lsto check the content of the bucket. You will see a thumbnail.mc ls myjfs/images-thumbnail
[2017-02-08 11:39:40 IST] 992B images-thumbnail.jpg