Data Synchronization
juicefs sync is a powerful data synchronization tool that can copy data across all supported storage systems, including object storage, JuiceFS, and local file systems. You can freely copy data between any of these systems. It also supports syncing remote directories accessed via SSH, HDFS, and WebDAV. Advanced features include incremental synchronization, pattern matching (like rsync), and distributed syncing.
juicefs sync shares code between Community and Enterprise Editions. Therefore, even when you use different editions of the JuiceFS client, sync works normally. The only exception is when the jfs:// protocol header is involved. Due to the different metadata engine implementations in the Community and Enterprise Editions, clients from different editions cannot be mixed when using the jfs:// protocol header.
juicefs sync works like this:
juicefs sync [command options] SRC DST
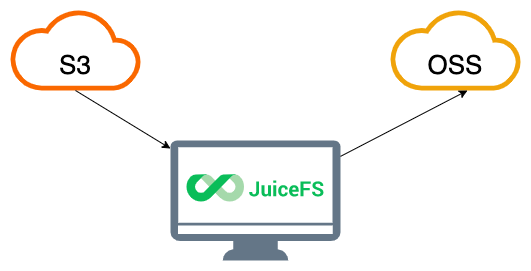
# Sync object from OSS to S3
juicefs sync oss://mybucket.oss-cn-shanghai.aliyuncs.com s3://mybucket.s3.us-east-2.amazonaws.com
# Sync objects from S3 to JuiceFS
juicefs sync s3://mybucket.s3.us-east-2.amazonaws.com/ jfs://VOL_NAME/
# Copy all files ending with .gz
juicefs sync --match-full-path --include='**.gz' --exclude='*' s3://xxx jfs://VOL_NAME/
# Copy all files that do not end with .gz
juicefs sync --match-full-path --exclude='**.gz' s3://xxx/ jfs://VOL_NAME/
# Copy all files except the subdirectory named tempdir
juicefs sync --match-full-path --include='*' s3://xxx/ jfs://VOL_NAME/
Pattern matching
You can use --exclude and --include for filtering. If no filtering rules are provided, all files are scanned and copied (--include='*' is the default). However, if you use the --include filter to match files with a specific pattern, you must also use --exclude to exclude other files. See the examples above for reference.
When using multiple matching patterns, it may be difficult to determine whether a file will be synchronized due to the filtering logic. In such cases, it is recommended to add the --dry --debug option to preview the files selected for synchronization. If the results are not as expected, adjust the matching patterns accordingly.
Matching rules
You can use any word or substring for filtering, as well as these special patterns (similar to shell wildcards):
- A single
*matches any character, but terminates at/. **matches any character, including/.?matches any single character except/.[...]matches a set of characters, such as[a-z]for any lowercase letter.[^...]excludes specified characters. For example,[^abc]matches any character excepta,b, andc.
In addition:
- If the matching pattern does not contain regex patterns, it tries to match the full file name. For example,
foomatchesfooandxx/foobut notfoo1,2foo, orfoo/xx, since none of them is a file named exactlyfoo. - If the matching pattern ends with
/, it only matches directories, not files. - A pattern that starts with
/stands for absolute path, so/foomatches thefoofile at the root.
Here are some examples of matching patterns:
--exclude='*.o'excludes all files matching*.o.--exclude='/foo/*/bar'excludesbarfiles located two levels under/foo, such as/foo/spam/bar, but not/foo/spam/eggs/bar.--exclude='/foo/**/bar'excludesbarfiles at any level under/foo.
The sync command supports two filtering modes: full path filtering and layer-by-layer filtering. Both use --include and --exclude to filter files, but their behaviors are different. By default, sync employs the layer-by-layer filtering mode, which is more complicated but resembles rsync's usage. Therefore, it is only recommended for users familiar with rsync. For most people, --match-full-path is recommended because it is much easier to understand.
Full path filtering (recommended) Added in v1.2.0
Since v1.2.0, JuiceFS supports the --match-full-path option. This mode directly matches the full path of an object against all specified filters sequentially. Once a pattern matches, the result is returned (either "include" or "exclude"), and subsequent patterns are ignored.
Below is the workflow of full path filtering mode:

For example, consider a file located at a1/b1/c1.txt and three matching patterns --include 'a*.txt' --include 'c1.txt' --exclude 'c*.txt'. In full path filtering mode:
The string a1/b1/c1.txt is first matched against --include 'a*.txt'. This fails because * does not match the / character (see matching rules).
a1/b1/c1.txt is then matched against --include 'c1.txt', which succeeds. According to the mode's logic, subsequent patterns, such as --exclude 'c*.txt', are ignored once a match is found. This file will be handled by the sync command.
Here are some more examples:
--exclude '/foo**'excludes all files or directories whose root directory name starts withfoo.--exclude '**foo/**'excludes all directories ending withfoo.--include '*/' --include '*.c' --exclude '*'includes all directories and files with the.cextension while excluding everything else.--include 'foo/bar.c' --exclude '*'includes only thefoodirectory and thefoo/bar.cfile.
Layer-by-layer filtering mode
In layer-by-layer filtering mode, the full path is split into hierarchical levels, generating a sequence of strings. For example, a path like a1/b1/c1.txt is split into the sequence a1, a1/b1, and a1/b1/c1.txt. Each element in this sequence is processed as though in "full path filtering" mode.
If an element matches a certain pattern, two outcomes are possible:
- If it is an exclude pattern, the exclude behavior is immediately returned as the final result.
- If it is an include pattern, remaining patterns for that layer are skipped and the process moves on to the next layer.
If no patterns match at a particular layer, the process moves on to the next layer. If "exclude" is not returned after all layers are processed, the scanned files are included (be "handled" by the sync command) by default.
Below is the workflow for layer-by-layer filtering mode:

For example, given the file a1/b1/c1.txt and the patterns --include 'a*.txt' --include 'c1.txt' --exclude 'c*.txt', in layer-by-layer filtering mode, the sequence is a1, a1/b1, and a1/b1/c1.txt. The specific matching steps are:
- At the first layer
a1, no patterns match. Move on to the next layer. - At the second layer
a1/b1, no patterns match. Move to the next level. - At the third layer
a1/b1/c1.txt, the--inlude 'c1.txt'pattern matches. So as for the current state, this file will be handled, and the process will continue to the next layer. - Since there is no next layer,
a1/b1/c1.txtwill be included and handled by this command.
In the example above, the matching is successful until the last layer. In addition, there may be two situations:
- If the match is successful before the last layer, and the matching pattern is an exclude filter, the file is excluded as a final state, skipping all subsequent layers.
- If all layers are processed but no matches occur, this file will be included.
Essentially, this mode processes paths hierarchically, applying full path filtering at each layer. Each layer comes out with either a hit to exclude or a miss and continue to the next layer. The only way to get the file included is to process all layers of filtering.
Some more examples:
-
--exclude /fooexcludes all files or directories namedfoounder the root directory. -
--exclude foo/excludes all directories namedfoo. -
For multi-level directories such as
dir_name/.../.../..., all paths underdir_namewill be processed according to the directory hierarchy. If the parent directory of a file is "excluded," the file will not be handled, even if an include rule is subsequently specified for it. If you want this file to be included, you must guarantee that all its parent directories are not excluded. For example,/some/path/this-file-will-not-be-syncedin the following example will not be included because its parent directorysomehas been excluded by the rule--exclude '*':--include '/some/path/this-file-will-not-be-synced' \
--exclude '*'
One solution is to include all directories in the directory hierarchy by using the --include '*/' rule (which needs to be placed before the --exclude '*' rule). Alternatively, you can add include rules to each parent directory, for example:
--include '/some/' \
--include '/some/path/' \
--include '/some/path/this-file-will-be-synced' \
--exclude '*'
Storage protocols
You can sync data between any supported storage system, but note that if one of the endpoint is a JuiceFS volume, it it then recommended to sync without mount point since it runs without FUSE overhead.
Sync without mount point Added in v1.1
For data migrations that involve JuiceFS, it's recommended use the jfs:// protocol, rather than mount JuiceFS and access its local directory, which bypasses the FUSE mount point and access JuiceFS directly. Under large scale scenarios, bypassing FUSE can save precious resources and increase performance.
myfs=redis://10.10.0.8:6379/1 juicefs sync s3://ABCDEFG:[email protected]/movies/ jfs://myfs/movies/
Synchronize between object storage and JuiceFS
The following command synchronizes movies directory from object storage to JuiceFS.
# mount JuiceFS
juicefs mount -d redis://10.10.0.8:6379/1 /mnt/jfs
# synchronize
juicefs sync s3://ABCDEFG:[email protected]/movies/ /mnt/jfs/movies/
The following command synchronizes images directory from JuiceFS to object storage.
# mount JuiceFS
juicefs mount -d redis://10.10.0.8:6379/1 /mnt/jfs
# synchronization
juicefs sync /mnt/jfs/images/ s3://ABCDEFG:[email protected]/images/
Synchronize between object storages
The following command synchronizes all of the data from object storage to another bucket.
juicefs sync s3://ABCDEFG:[email protected] oss://ABCDEFG:[email protected]
Synchronize between local and remote servers
To copy files between directories on a local computer, simply specify the source and destination paths. For example, to synchronize the /media/ directory with the /backup/ directory:
juicefs sync /media/ /backup/
If you need to synchronize between servers, you can access the target server using the SFTP/SSH protocol. For example, to synchronize the local /media/ directory with the /backup/ directory on another server:
juicefs sync /media/ [email protected]:/backup/
# Specify password (optional)
juicefs sync /media/ "username:password"@192.168.1.100:/backup/
When using the SFTP/SSH protocol, if no password is specified, the sync task will prompt for the password. If you want to explicitly specify the username and password, you need to enclose them in double quotation marks, with a colon separating the username and password.
Sync behavior
Incremental and full synchronization
By default, juicefs sync performs incremental synchronization. It only overwrites files if their sizes are different. You can also use --update to overwrite files when the mtime of the source file has been updated. For scenarios with higher demand for data integrity, use --check-new or --check-all to perform byte-by-byte comparison between the source and the destination.
For full synchronization (where all files are synchronized regardless of their presence on the destination path), use --force-update.
Directory structure and file permissions
By default, empty directories are not synchronized. To include them, use the --dirs option.
In addition, when migrating data between file systems such as local, SFTP, and HDFS, use the --perms option to synchronize file permissions.
Copy symbolic links
For synchronization between local directories, the --links option allows symbolic links to be copied as is, instead of resolving their targets. The synchronized symbolic link retains the original path stored in the source, regardless of whether the path is valid before or after the synchronization.
Note:
- The
mtimeof a symbolic link is not synchronized. - The
--check-newand--permsoptions will be ignored when synchronizing symbolic links.
Data sync and compaction
For sequential write scenarios, ensure each file write has at least a 4M (the default block size) buffer available. If the write concurrency is too high or the buffer size is too small, the client will not be able to maintain the desired "writing by large chunks" pattern. Instead, it could only write by small slices, which combined with compaction, could really deteriorate performance due to write amplification.
Compaction can be monitored using juicefs_compact_size_histogram_bytes, If compaction traffic is substantial during a sync operation, consider the following optimizations:
-
If the object storage bandwidth is limited, avoid setting high concurrency (
--threads). Instead, start with low concurrency and gradually increase it until you get the desired speed. -
When the destination is a JuiceFS file system, use the
jfs://protocol, because it bypasses the FUSE mount point (reducing overhead) and is already optimized for file fragmentation problems. See the next point for details. -
When the destination is a JuiceFS file system, ensure the destination has sufficient available buffer capacity. Each write file handler must have at least 4MB of reserved memory. This means the
--buffer-sizeshould be at least 4 times the--threadsvalue. If higher write concurrency is needed, consider setting it to 8 or 12 times the value. Depending on the destination file system's deployment model, you will use different methods to configure buffer size:- When the destination starts with the
jfs://protocol, the JuiceFS client is part of thejuicefs synccommand itself. In this case,--buffer-sizeneeds to be appended to thejuicefs synccommand. - When the destination is a FUSE mount point, the JuiceFS client runs as the
juicefs mountprocess on the host machine. In this case,--buffer-sizeneeds to be added directly to the mount command.
- When the destination starts with the
-
If you need to limit the bandwidth via
--bwlimit, you must also lower the--threadsvalue to avoid write fragmentation caused by concurrency congestion. Since storage systems come with different performance levels, exact calculations cannot be provided here. Therefore, it is recommended to start with low concurrency and adjust as needed.
Delete selected files
Using filters, you can even delete files by pattern via juicefs sync, the trick is to create an empty directory and use it as SRC.
Below are some examples which uses --dry --debug just to be cautious, they will not delete anything as long as --dry is specified, after the behavior is verified, remove the option to actually execute.
mkdir empty-dir
# Delete all objects in mybucket except the .gz files
juicefs sync ./empty-dir/ s3://mybucket.s3.us-east-2.amazonaws.com/ --match-full-path --delete-dst --exclude='**.gz' --include='*' --dry --debug
# Delete all files ending with .gz in mybucket
juicefs sync ./empty-dir/ s3://mybucket.s3.us-east-2.amazonaws.com/ --match-full-path --delete-dst --include='**.gz' --exclude='*' --dry --debug
Accelerate synchronization
By default, juicefs sync starts 10 threads to run syncing jobs. You can set the --threads option to increase or decrease the number of threads as needed. However, adding threads beyond a system's resource limits may cause issues like out-of-memory errors. If performance is still insufficient, consider:
-
Check if
SRCorDSTstorage systems have reached bandwidth limits. If either is constrained, increasing concurrency will not help. -
Performing
juicefs syncon a single host may be limited by host resources, such as CPU or network throttle. If this is the case, consider the following:- If a node with better hardware resources (such as CPU or network bandwidth) is available in your environment, consider using that node to run
juicefs syncand access the source data via SSH. For example,juicefs sync root@src:/data /jfs/data. - Use distributed synchronization (introduced below).
- If a node with better hardware resources (such as CPU or network bandwidth) is available in your environment, consider using that node to run
-
If the synchronized data is mainly small files, and the
listAPI ofSRCstorage system has excellent performance, the default single-threadedlistofjuicefs syncmay become a bottleneck. You can enable concurrentlist(introduced below).
Concurrent list
If Pending objects in juicefs sync output remains 0, it means consumption is faster than production. You can increase --list-threads to enable concurrent list and then use --list-depth to control directory depth of list.
For example, if you are dealing with an object storage bucket used by JuiceFS, the directory structure is /<vol-name>/chunks/xxx/xxx/.... In this case, setting --list-depth=2 enables concurrent listing on <vol-name>/chunks.
Distributed synchronization
Synchronizing between two object storage services is essentially pulling data from one and pushing it to the other. The efficiency of the synchronization depends on the bandwidth between the client and the cloud.
When copying large scale data, node bandwidth can easily bottleneck the synchronization process. For this scenario, juicefs sync provides a multi-machine concurrent solution, as shown in the figure below.
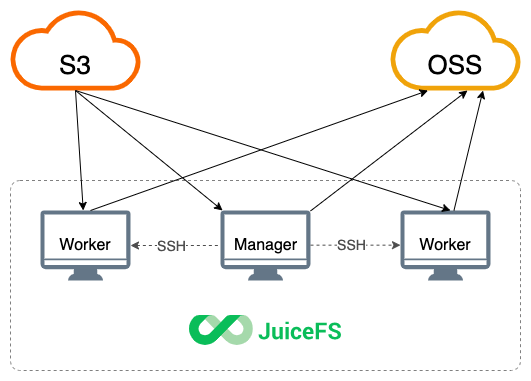
The manager node executes the sync command as the master and defines multiple worker nodes by setting the --worker option (the manager node also serves as a worker node). JuiceFS splits the workload and distributes it to workers for distributed synchronization. This increases the amount of data that can be processed per unit time, and the total bandwidth is also multiplied.
When using distributed syncing, you should configure SSH logins so that the manager can access all worker nodes without a password. If the SSH port is not the default 22, you need to include that in the manager's ~/.ssh/config. The manager will distribute the JuiceFS Client to all worker nodes, so they should all use the same architecture to avoid compatibility problems.
For example, to synchronize data between two object storage services:
juicefs sync --worker [email protected],[email protected] s3://ABCDEFG:[email protected] oss://ABCDEFG:[email protected]
The synchronization workload between the two object storage services is shared by the manager machine and two workers, [email protected] and [email protected].
The above command demonstrates object → object synchronization, if you need to sync via FUSE mount points, then you need to mount the file system in all worker nodes, and then run the following command to achieve distributed sync:
# Source file system needs better read performance, increase its buffer-size
parallel-ssh -h hosts.txt -i juicefs mount -d redis://10.10.0.8:6379/1 /jfs-src --buffer-size=1024 --cache-size=0

# Destination file system needs better write performance
parallel-ssh -h hosts.txt -i juicefs mount -d redis://10.10.0.8:6379/1 /jfs-dst --buffer-size=1024 --cache-size=0 --max-uploads=50

# Copy data
juicefs sync --worker host1,host2 /jfs-src /jfs-dst
Observation
When using sync to transfer large files, the progress bar might move slowly or get stuck. If this happens, you can observe the progress using other methods.
sync is designed for scenarios involving a large number of files. Its progress bar only updates when a file has been transferred. In a large file scenario, each file is transferred slowly, so the progress bar updates infrequently or even appears stuck. This is worse for destinations without multipart upload support (such as file, sftp, and jfs schemes), where each file is transferred using a single thread.
If you notice the progress bar is not changing, use the methods below for monitoring and troubleshooting:
-
Add the
--verboseor--debugoption to thejuicefs synccommand to print debug logs. -
If either end is a JuiceFS mount point:
- Use
juicefs statsto quickly check current I/O status. - Review the client log (default path:
/var/log/juicefs.log) for slow requests or timeout errors.
- Use
-
If the destination is a local disk, check the directory for temporary files with
.tmp.xxx. During the synchronization process, the transfer results are written to these temporary files. Once the transfer is complete, they are renamed to finalize the write. By monitoring the size changes of the temporary files, you can determine the current I/O status. -
If both the source and destination are object storage systems, use tools like
nethogsto check network I/O. -
If none of the above methods provide useful debug information, please collect its goroutine and send it to Juicedata engineers:
# Replace <PID> with the actual PID of the stuck sync process
# This command will print its pprof listen port
lsof -p <PID> | grep TCP | grep LISTEN
# pprof port is typically 6061, but in the face of port conflict,
# port number will be automatically increased
curl -s localhost:6061/debug/pprof/goroutine?debug=1
Application scenarios
Geo-disaster recovery backup
Geo-disaster recovery backup backs up files, and thus the files stored in JuiceFS should be synchronized to other object storages. For example, synchronize files from JuiceFS to object storage:
# mount JuiceFS
juicefs mount -d redis://10.10.0.8:6379/1 /mnt/jfs
# synchronization
juicefs sync /mnt/jfs/ s3://ABCDEFG:[email protected]/
Build a JuiceFS data copy
Unlike the file-oriented disaster recovery backup, the purpose of creating a copy of JuiceFS data is to establish a mirror with exactly the same content and structure as the JuiceFS data storage. When the object storage in use fails, you can switch to the data copy by modifying the configurations. Note that only the file data of the JuiceFS file system is replicated, and the metadata stored in the metadata engine still needs to be backed up.
This requires manipulating the underlying object storage directly to synchronize it with the target object storage. For example, to take the object storage as the data copy of a JuiceFS volume:
juicefs sync cos://ABCDEFG:[email protected] oss://ABCDEFG:[email protected]
Sync across regions using S3 Gateway
When transferring a large number of small files across different regions via FUSE mount points, clients will inevitably talk to the metadata service in the opposite region via the public internet (or dedicated network connection with limited bandwidth). In such cases, metadata latency can become the bottleneck of the data transfer:

JuiceFS S3 Gateway is the solution in these scenarios: by deploying a gateway in the source region, metadata is accessed over a private network, minimizing metadata latency and delivering optimal performance for small-file-intensive workloads.

Read S3 Gateway to learn its deployment and use.

