


Access Control Lists (ACLs) are a mechanism for implementing finer-grained permissions control in Unix-like systems, such as Linux, macOS, and FreeBSD. They extend the traditional Unix permissions model and provide a more flexible and detailed way to manage permissions. In the traditional Unix permissions model, the permissions for a file or directory are categorized into three types:
- Owner permissions
- Group permissions
- Others permissions
This model is simple and easy to understand but can be limiting in scenarios that require more granular control. For example, if you want to allow a specific user to access a file without making them a part of the file's group, the traditional Unix permissions model falls short.
This is where POSIX ACLs come into play. With POSIX ACLs, you can assign individual permissions to each user or group, rather than just the file's owner, group, or others.
This article guides on managing POSIX ACLs in JuiceFS for detailed file permissions. It covers enabling ACLs, setting and checking permissions, and ensuring ACLs are preserved during file operations.
Requirements for using ACLs in JuiceFS
JuiceFS Enterprise Edition always supports ACLs, while JuiceFS Community Edition supports POSIX ACLs starting from version 1.2. This guide focuses on the community edition.
- Before enabling ACLs in JuiceFS Community Edition, keep the following points in mind:
- ACLs are associated with the file system and cannot be disabled once enabled.
To enable ACLs on a file system, you need to upgrade all clients to version 1.2 or later to avoid interference with permissions settings by older clients.
Prepare the file system
Confirm the client version
Check the client version.
$ juicefs version
juicefs version 1.2.0-beta1+2024-04-18.041e931
As of the publication of this article, the latest client version is JuiceFS v1.2.0-beta2. You can find the precompiled version for your CPU architecture on Github Releases or follow our document to compile the client manually.
The ACL feature has no requirements on the metadata engine and can be used on any JuiceFS file system, whether created with the new client or an older one. As long as you use the new client version, you can enable ACLs in an existing file system.
Create your file system
If you don’t have a file system, refer to the document to create your file system.
Enable ACLs for the new file system
To enable ACLs when creating a file system, use the version 1.2 or later client with the --enable-acl option:
juicefs format --enable-acl \
--bucket xxx
--access-key xxx
--secret-key xxx
...
redis://xxx.myserver.com/1 myjfs
Enable ACLs for the file system
Use the client of version 1.2 or later to enable ACLs for the existing file system with the config command:
juicefs config --enable-acl redis://xxx.myserver.com/1
Check if a file system has ACLs enabled
You need to use the client of version 1.2 or later to check if a file system has ACLs enabled, as older clients cannot output ACL-related information. For example:
$ juicefs status redis://192.168.1.80/1

{
  "Setting": {
    "Name": "myjfs",
    "UUID": "fdc09170-3e1b-43be-bc64-c30e6031a7b9",
    "Storage": "minio",
    "Bucket": "http://192.168.1.80:9123/myjfs",
    "AccessKey": "herald",
    "SecretKey": "removed",
    "BlockSize": 4096,
    "Compression": "none",
    "EncryptAlgo": "aes256gcm-rsa",
    "KeyEncrypted": true,
    "TrashDays": 1,
    "MetaVersion": 1,
    "MinClientVersion": "1.1.0-A",
    "DirStats": true,
    "EnableACL": false
  },
...
After enabling ACLs for a file system, the minimum client version recorded in the status information will also change. For example:
{
  "Setting": {
    "Name": "myjfs",
    "UUID": "fdc09170-3e1b-43be-bc64-c30e6031a7b9",
    "Storage": "minio",
    "Bucket": "http://192.168.1.80:9123/myjfs",
    "AccessKey": "herald",
    "SecretKey": "removed",
    "BlockSize": 4096,
    "Compression": "none",
    "EncryptAlgo": "aes256gcm-rsa",
    "KeyEncrypted": true,
    "TrashDays": 1,
    "MetaVersion": 1,
    "MinClientVersion": "1.2.0-A",
    "DirStats": true,
    "EnableACL": true
  },
Tools for managing ACLs
In Linux, the primary tools for managing and configuring ACLs are:
getfacl: Gets the ACL information of a file or directorysetfacl: Sets the ACL of a file or directory.
Some Linux distributions do not install these tools by default. To install them:
- For Debian and Ubuntu systems, you can run the
sudo apt-get install aclcommand. - For Red Hat, Almalinux, and Rocky Linux, you can use the
sudo dnf install aclcommand.
Use ACLs to manage file permissions in JuiceFS
POSIX file permissions
In Linux systems, permissions for files or directories are managed by users or groups.
For example, when you use the ls -l command to list the information of files in a directory, the first field of each record is a 10-character string like -rw-r--r--. This represents the permissions of the user, group, and others for that file:
-
The 1st character represents the file type:
-for a regular filedfor a directorylfor a symbolic linksfor a socket
-
The 2nd to 4th characters represent the owner's permissions:
rfor readswfor writesxfor execution- If a permission is not granted, it’s represented by
-
-
The 5th to 7th characters represent the group's permissions:
rfor readswfor writesxfor execution- If a permission is not granted, it’s represented by
-
-
The 8th to 10th characters represent the permissions for others:
rfor readswfor writesxfor execution- If a permission is not granted, it’s represented by
-
For example, -rw-r--r-- indicates:
- This is a regular file.
- The owner has read and write permissions.
- The group and others have read-only permissions.
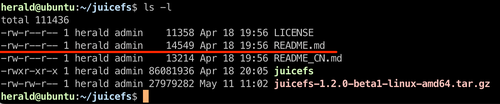
In the permissions information shown above, the owner is herald and the group is admin. If you want to grant read and write permissions for the file README.md to a user named tom, there are a few options:
- Setting
tomas the owner of the file, but this would remove ownership fromherald. - Adding
tomto theadmingroup and granting write permissions to the entire group. But this would break the read-only restriction for theadmingroup, giving all members read and write access. - Assigning read and write permissions to others. But this would widen the permissions too much.
Clearly, the standard Linux permission model cannot implement fine-grained file permission control, while ACLs can easily fulfill this requirement.
Use ACLs to assign permissions
To set ACL permissions for files and directories, you can use the tools getfacl and setfacl:
getfacllists the ACL information.setfaclsets ACL permissions.
Set ACL permissions for files
Using the README.md file as an example, first, check its ACL settings:
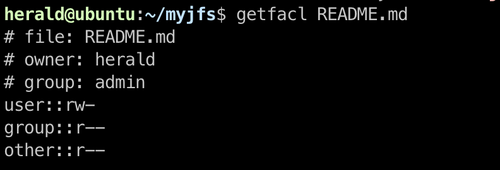
The output shows the file's ACL information:
- The first three lines are the file name, owner, and group.
- The next three lines show the current permissions settings, which match those listed by the
ls -lcommand. This means that without ACL settings, the displayed information is the default POSIX permissions.
Now, use setfacl to grant read and write permissions to a user named tom, who is not in the admin group. The syntax for setting ACL permissions for a user is setfacl -m u:username:permissions filename_or_directoryname.

As shown in the figure:
- The
idcommand confirms that the user is not in theadminuser group. setfaclgrants the userrwread-write permissions.- After setting the permissions,
getfacllists the file's ACL settings.
After setting, the output shows two new lines:
user:tom:rw-: The newly added ACL entry, indicating that usertomhas read and write permissions for the file.mask::rw-: It is the permission mask automatically added by the ACL to the file. It sets the maximum effective permissions for ACL entries in the group class.
Now, user tom has edit permissions for the README.md file and can verify this by using sudo -u tom nano README.md to modify and save the file.
In my system, there is a user named jerry in the admin group. As the figure below shows, when attempting to edit the file as jerry, it shows that it does not have write permissions:

This indicates that the ACL settings did not affect the default file permissions.
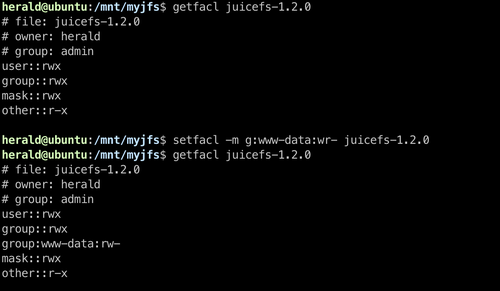
Similarly, you can assign read and write permissions to a specific user group using the syntax setfacl -m g:user-group:permissions filename_or_directoryname.
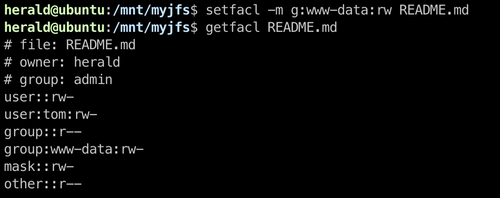
As shown in the image, the www-data user group was granted read and write permissions for the README.md file. This means that all users in this group now have read and write access to the file. However, the default POSIX permissions for the admin user group remain read-only. This allows for flexible permission definitions for any number of users or groups based on specific needs.
Set ACL permissions for a directory
Setting ACL permissions for a directory is similar to setting them for a file. Use getfacl to retrieve the ACL information for the directory, and setfacl to set the ACL permissions.
As the figure below shows, I extracted files at the JuiceFS mount point and created a new directory. By using getfacl, I retrieved the ACL information for this directory and used setfacl to grant user tom read, write, and execute (rwx) permissions for the directory.
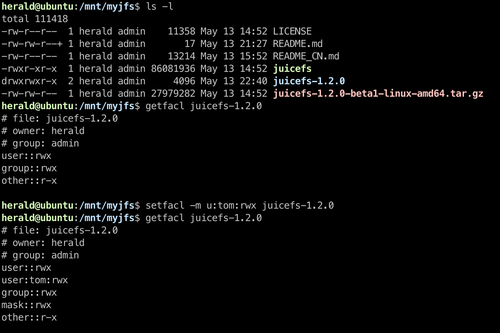
From the figure, you can see that directories by default include execute (x) permissions; without these, you cannot enter the directory. Following this logic, you can set ACL permissions based on directory access, such as restricting the www-data group from accessing the directory using sudo setfact -m g:www-data:wr- directory.
Similarly, you can assign access permissions for any user or group to a directory. To apply the ACL rules to all files and directories, use the -R option. For example, setfacl -R -m u:tom:wrx your-directory.
Set default ACL permissions for a directory
You might notice that setting ACL permissions on a directory only affects the directory itself. For example, granting tom rwx permissions to the directory does not provide write access to the files within. This is because ACL settings do not propagate by default.
To propagate ACL permissions to newly created files in a directory, use default permissions by adding the -d option when setting them.
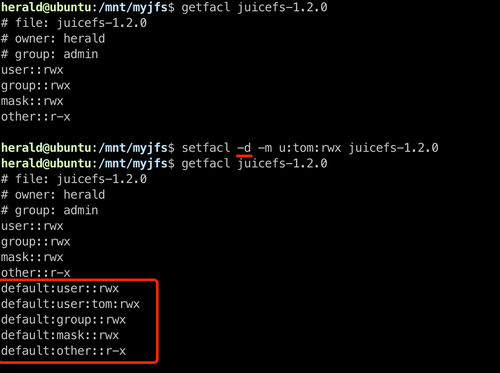
After setting default permissions, the directory's ACL information will include default definitions. Any new files added to this directory will automatically inherit these default ACL permissions. In the example above, tom will have full read, write, and execute permissions for any new files or directories created within.
Note that the default ACL permissions do not affect existing files in the directory. To apply the ACL rules to existing files, use the -R option. For example, setfacl -R -m u:tom:wrx your-directory.
Remove ACL permissions
To remove ACL rules defined on a file or directory, use the -x option, as shown in the figure below:
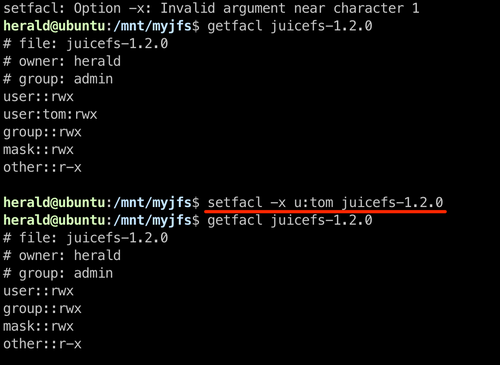
In addition, to recursively remove all ACL settings from all files in a directory, use setfacl -R -b your-directory.
Note
Preserving ACL permissions during copying
Tools like cp and rsync do not preserve ACL settings by default. To retain ACL permissions during file or directory operations, ensure you understand the relevant options for these tools. For example:
# cp uses -a or --archive
cp -a source file destination
# rsync uses -X or --acl
rsync -avX source file destination
Conclusion
This article introduced the basic usage of POSIX ACL from the perspective of the JuiceFS file system, highlighting the differences from default POSIX permissions and considerations in daily use. It provides detailed examples of using getfacl and setfacl commands for setting file, directory, and default ACL permissions.
I hope this information is helpful to JuiceFS users. If you have any feedback or suggestions, you can join JuiceFS discussions on GitHub and our community on Slack.