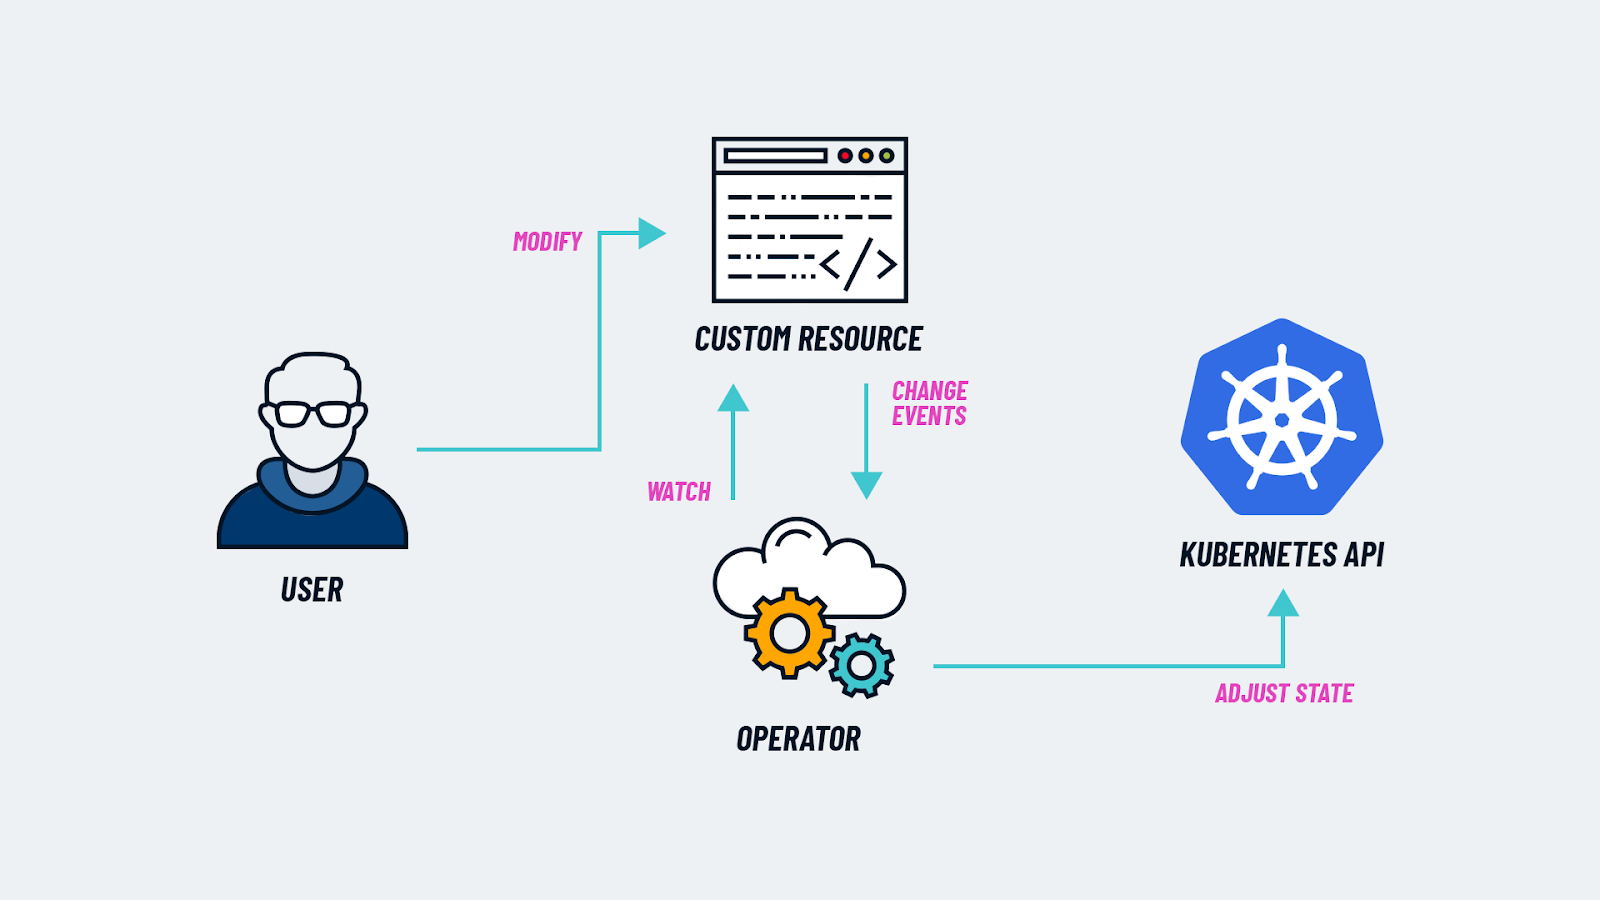
JuiceFS Enterprise Edition has recently introduced the Cache Group Operator, a tool for automating the creation and management of cache groups. The operator simplifies the management of Kubernetes applications by automating lifecycle management tasks. This makes deployment, scaling, and operations more efficient.
In this article, we’ll describe the challenges of managing cache groups with traditional methods, the features and benefits introduced by the Cache Group Operator, and step-by-step instructions on how to install and use the operator effectively in Kubernetes environments.

Why we developed the Cache Group Operator
Before introducing the operator:
Previously, we used StatefulSet or DaemonSet to create cache groups. This posed the following challenges for users:
- Inflexible node configuration: It was difficult to configure different node types or resources (such as mount parameters, cache group weights, and cache disks) within the same cluster.
- Manual node management: Adding or removing nodes required manual monitoring and adjustments. This makes the process cumbersome and error-prone.
- No automated cache cleaning: Cache cleaning had to be performed manually, lacking automation.
With the operator:
The Cache Group Operator addresses these issues with the following features:
- Configuring different node types and resources within the same cluster to meet diverse needs.
- Supporting seamless addition or removal of nodes with minimal impact on cache hit rates.
- Automating cache cleaning.
- Providing a visual interface for managing cache groups.
How to use the operator
Install the operator
First, add the JuiceFS Helm repository and update it:
helm repo add juicefs https://juicedata.github.io/charts/
helm repo update
Use Helm to install the JuiceFS Cache Group Operator:
helm upgrade --install juicefs-cache-group-operator juicefs/juicefs-cache-group-operator -n juicefs-cache-group --create-namespace
You can use kubectl wait to ensure the operator is ready:
kubectl wait -n juicefs-cache-group --for=condition=Available=true --timeout=120s deployment/juicefs-cache-group-operator
Create a cache group
Here’s an example configuration to create a cache group:
apiVersion: v1
kind: Secret
metadata:
  name: juicefs-secret
  namespace: juicefs-cache-group
type: Opaque
stringData:
  name: juicefs-xx
  token: xx
  access-key: xx
  secret-key: xx
---
apiVersion: juicefs.io/v1
kind: CacheGroup
metadata:
  name: cachegroup-sample
  namespace: juicefs-cache-group
spec:
  secretRef:
    name: juicefs-secret
  worker:
    template:
      nodeSelector:
        juicefs.io/cg-worker: "true"
      image: juicedata/mount:ee-5.1.1-1faf43b
      opts:
        - group-weight=100
      resources:
        requests:
          cpu: 100m
          memory: 128Mi
        limits:
          cpu: 1
          memory: 1Gi
Label the required nodes to add them to the cache group:
kubectl label node node1 juicefs.io/cg-worker=true
For heterogeneous configurations (such as different cache disk sizes), use the spec.worker.overwrite field to specify
different configurations for different nodes:
apiVersion: juicefs.io/v1
kind: CacheGroup
metadata:
  name: cachegroup-sample
spec:
  worker:
    template:
      nodeSelector:
        juicefs.io/cg-worker: "true"
      image: juicedata/mount:ee-5.1.1-1faf43b
      hostNetwork: true
      cacheDirs:
        - path: /var/jfsCache-0
          type: HostPath
      opts:
        - group-weight=100
        # Unit: MiB
        - cache-size=2048
    overwrite:
      - nodes:
          - k8s-03
        # You can also use nodeSelecto.
        # nodeSelector:
        #   kubernetes.io/hostname: k8s-02
        opts:
          # Unit: MiB
          - cache-size=1024
          - group-weight=50
        cacheDirs:
        - path: /var/jfsCache-1
          type: HostPath
        - path: /var/jfsCache-2
          type: HostPath
Check cache group status
Run the following command to check the status:
$ kubectl get cachegroups

NAME                CACHE GROUP NAME                        PHASE   READY   AGE
cachegroup-sample   juicefs-cache-group-cachegroup-sample   Ready   1/1     10s
When the phase status changes to ready, the cache group is successfully created. You can now use the cache group by adding the mount parameter to your client:
juicefs mount xx -o cache-group=juicefs-cache-group-cachegroup-sample,no-sharing
Smooth node scaling
The Cache Group Operator ensures smooth node scaling with minimal disruption to cache hit rates:
- Adding nodes: New worker pods are created with the
group-backupmount parameter. During this transition, requests that miss the cache on the new worker pod are forwarded to other nodes. After 10 minutes (default), thegroup-backupparameter is removed. You can usespec.backupDurationto set the default time.
apiVersion: juicefs.io/v1
kind: CacheGroup
metadata:
  name: cachegroup-sample
spec:
  backupDuration: 10m
- Removing nodes: Cache data is migrated to other nodes before deletion. The maximum wait time for data migration is 1 hour (default). You can use
spec.waitingDeletedMaxDurationto set the default time.
apiVersion: juicefs.io/v1
kind: CacheGroup
metadata:
  name: cachegroup-sample
spec:
  waitingDeletedMaxDuration: 1h
Use JuiceFS CSI Dashboard
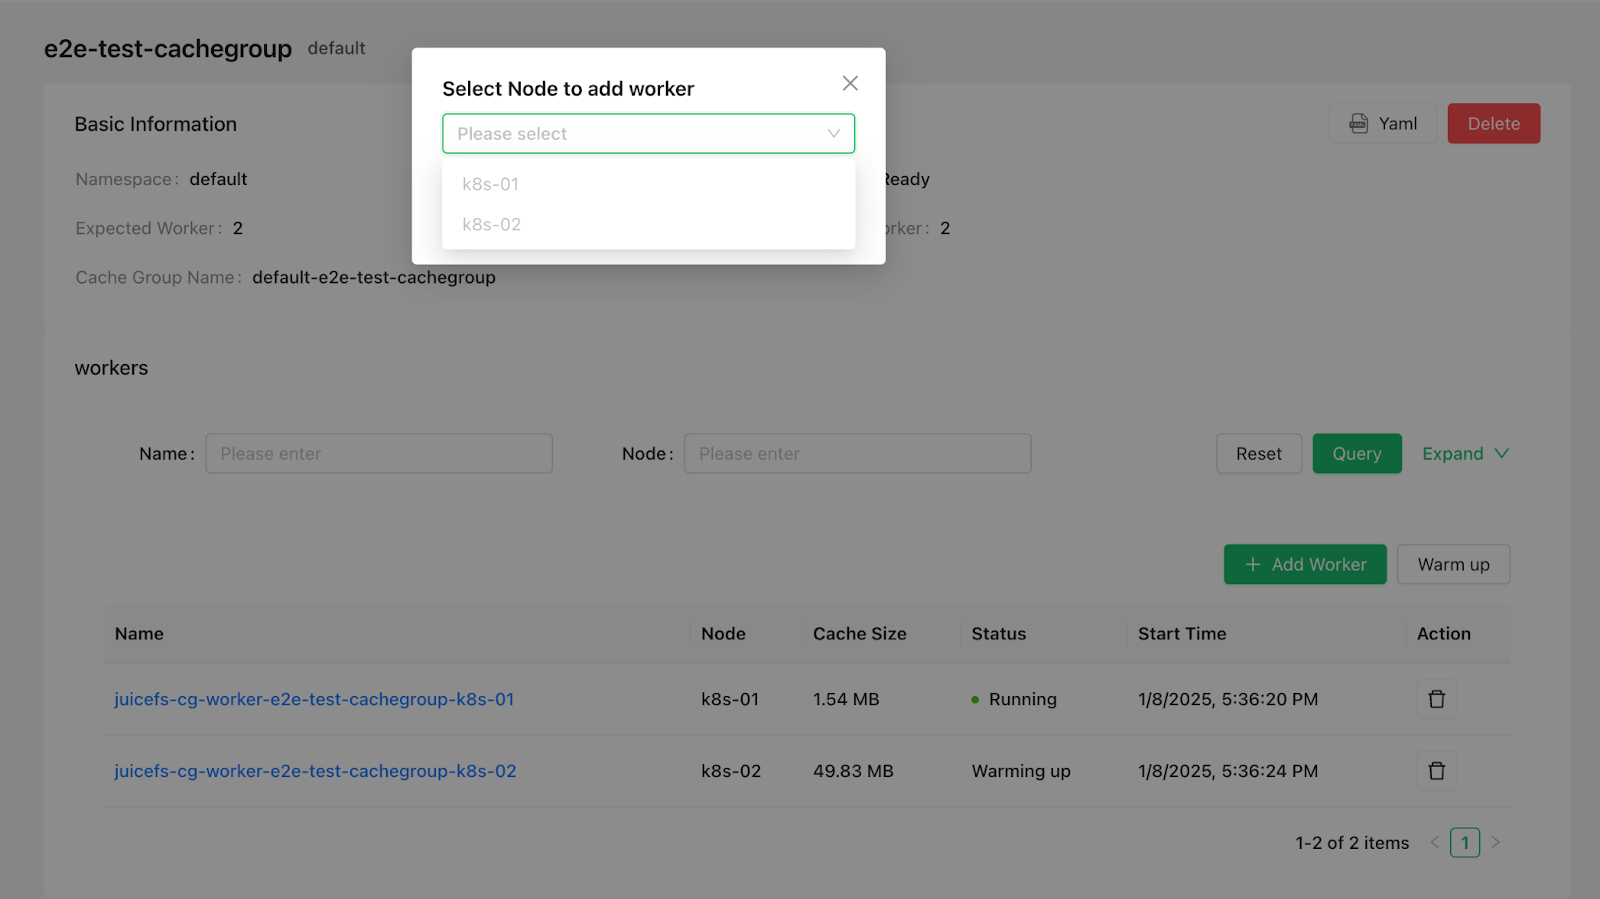
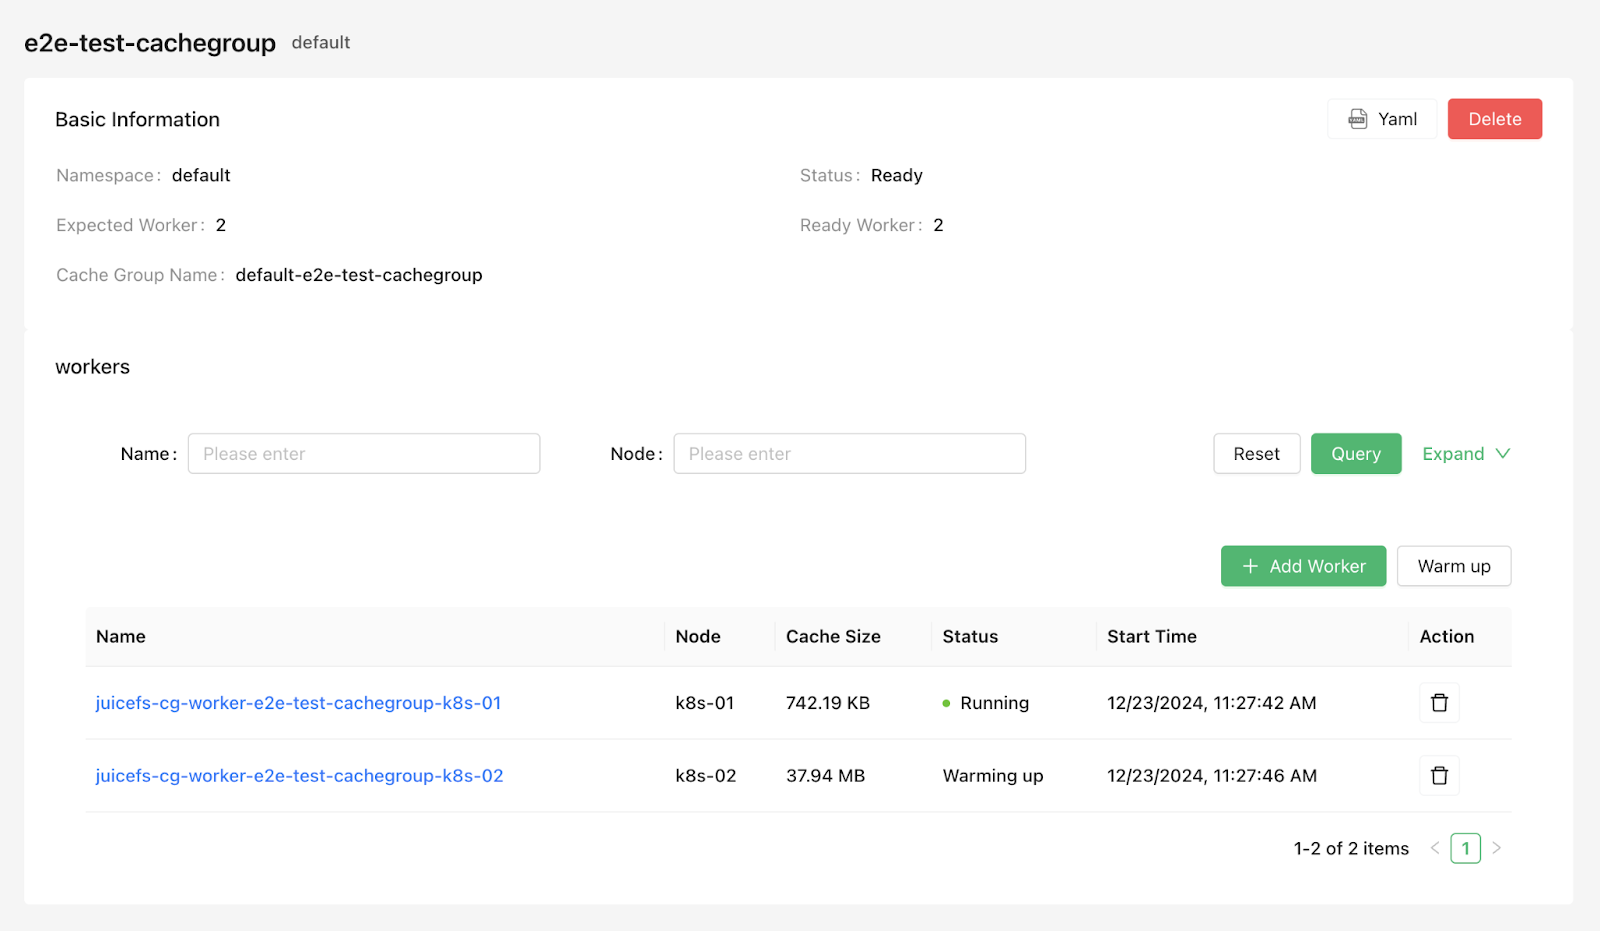
With the Cache Group Operator installed, you can manage cache groups through JuiceFS CSI Dashboard. The dashboard provides an intuitive interface to help monitor the running status of the cache group in real time, flexibly add or remove cache nodes, and view cache usage in detail.
Add/remove a cache node
Add a node:

View cache usage
View node status and cache usage:

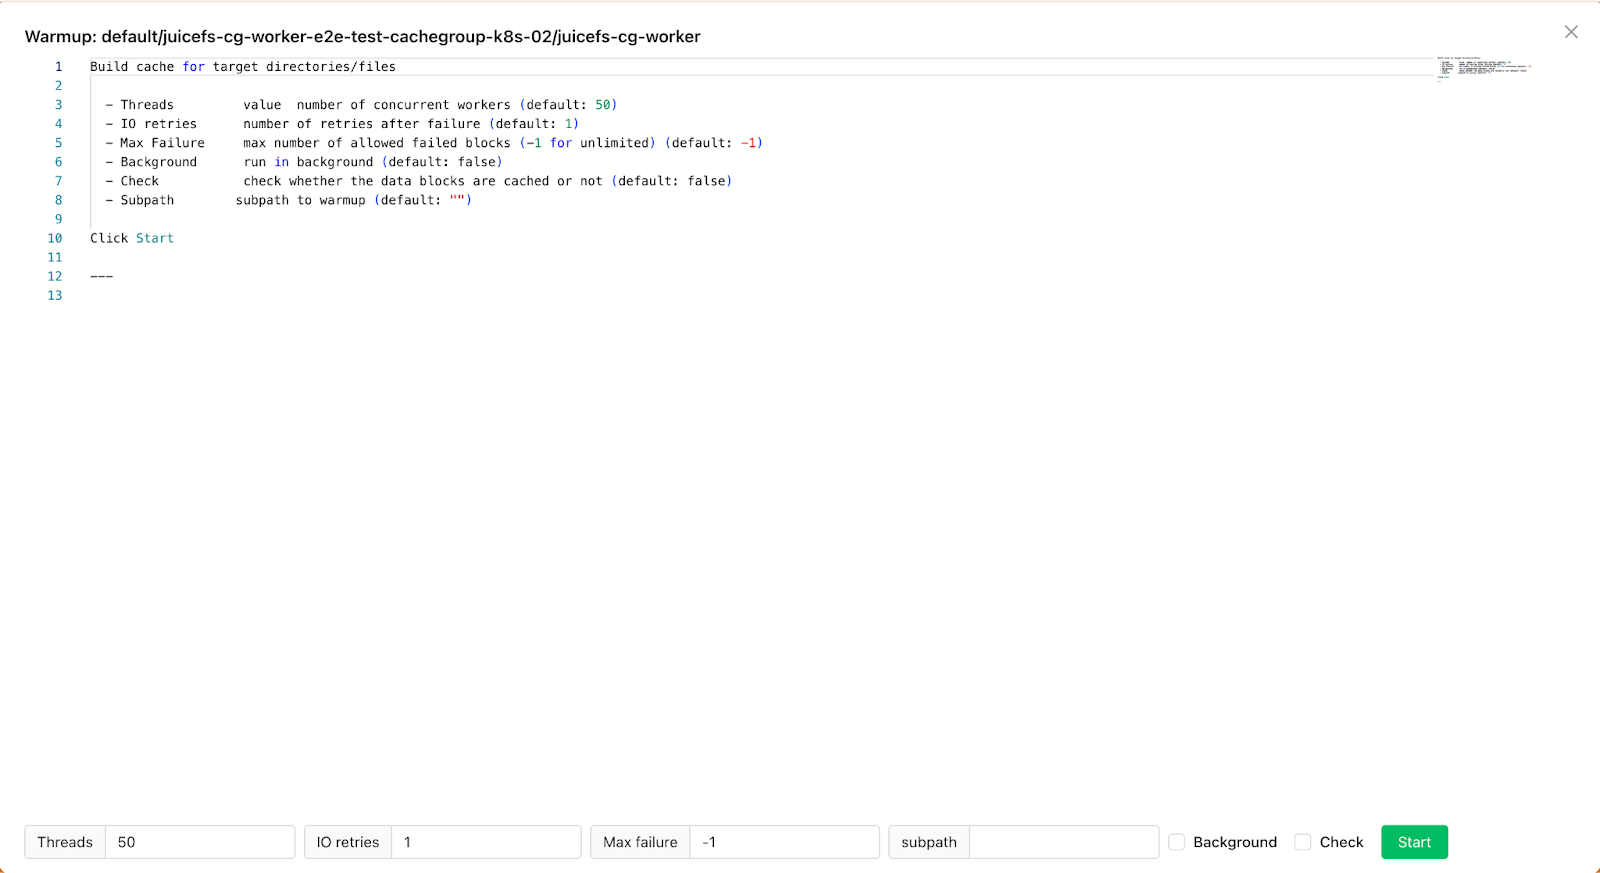
Warm up a cache group
You can preload the cache group by clicking Warm up.

By adjusting the parameters below, you can customize the warm-up process. For example, by default, the entire file system is warmed up, but you can set a specific directory for warming up by modifying the subpath parameter.

For more details about the JuiceFS Cache Group Operator, please refer to Cache Group Operator.
If you have any questions for this article, feel free to join JuiceFS discussions on GitHub and community on Slack.


