


WebDAV is an HTTP-based file sharing protocol originally designed for multi-user document collaboration, and is also widely used in Internet-based file storage, data synchronization, and other scenarios.
There are a large number of mobile and PC applications with built-in support for WebDAV, such as the well-known document management tool Zotero, the popular note-taking tool Notability on iPad, the cross-platform Markdown note-taking tool Joplin, ES file manager, etc. This means that with your own WebDAV storage, you can use WebDAV to save data from these software anytime and anywhere.
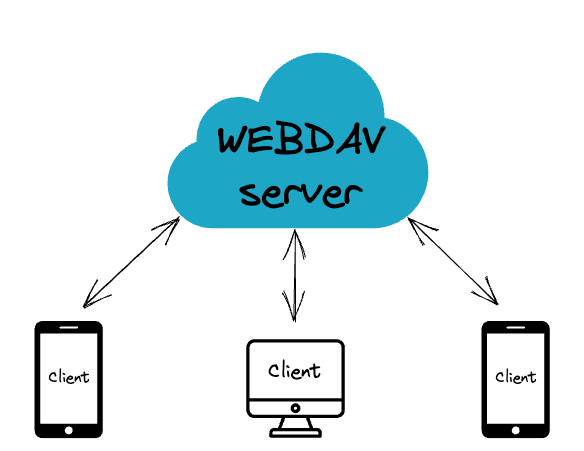
In order to avoid confusion, it is necessary to clarify the concepts related to WebDAV, which consists of two parts: the server and the client, as shown in the following figure.
- WebDAV Server: The blue cloud represents the WebDAV server, which stores data in response to client read/write requests.
- WebDAV Client: A variety of programs with built-in WebDAV clients that run on your phone, tablet, or computer.
With a basic understanding of the WebDAV architecture, let's configure our own WebDAV server (i.e. WebDAV sharing), which corresponds to the “blue cloud” part of the architecture diagram.
In the past, configuring WebDAV shares usually involves using web server software such as Apache HTTP service or Nginx, which adds complexity since since these modules were not available out of the box.
While some NAS operating systems will also provide WebDAV shared configuration capabilities, they are limited by the intranet environment, making it difficult to share across the internet.
If you are looking for a more general, efficient, and simple solution for configuring WebDAV, JuiceFS may be an ideal option.
JuiceFS is a open source distributed file system designed for the cloud, relying on object storage and database, and can quickly build a high-performance storage system with elastic capacity. JuiceFS provides POSIX, S3 API, HDFS API, Kubernetes CSI driver, Docker Volume Plugin, WebDAV access, making it easy to work with various applications.
The following content demonstrate how to configure a WebDAV service on top of JuiceFS.
Preparation
The WebDAV share presented in this article is an access interface provided by JuiceFS and is built on top of the JuiceFS file system. Therefore, you need to create a JuiceFS file system in advance.
JuiceFS file system consists of two parts: data storage and metadata engine, data storage can be object storage services provided by various public cloud services, or self-hosted MinIO or local disk. Metadata engine is used to store the metadata of the files, which can use network-based databases such as Redis, MySQL, PostgreSQL, or standalone databases such as SQLite or BadgerDB.
To make our WebDAV accessible over the Internet, we will then create it on a cloud server with a fixed public IPv4 address, then it can be accessed everywhere via IP address or domain name. Therefore, the JuiceFS data storage and metadata engine can be built with more flexibility, for example:
- Local disk + Standalone Database: When there is enough space available on the local disk of the cloud server.
- Object Storage + Standalone Database: When you need more storage capacity.
- Object Storage + Network Database: When you need both more storage space, and expose JuiceFS as a distributed file system.
Cloud Server
Suppose we have a cloud service with the following specifications:
- Operating System: Ubuntu Server 22.04 AMD64
- CPU: 1 Core
- Memory: 1 GB
- Disk: 25 GB
- Public IP: 120.118.8.10 (Please note this is a FAKE IP)
For the scenario presented, any entry-level cloud server will suffice, as long as it has a public IPv4 address.
Object Storage
Suppose we have prepared the following Bucket:
- Storage Type: AWS S3
- Bucket URL: https://myjfs.s3.us-east-1.amazonaws.com
- Access Key: abcdefg
- Secret Key: gfedcba
For this scenario, object storage is not a necessity, and if the cloud server has enough hard disk space, it is perfectly fine to use the hard disk as the data storage for JuiceFS.
Database
For this scenario, a standalone database is the easiest and simplest option, and here we use SQLite. No need to create the database in advance as it will be generated automatically when the JuiceFS file system is created.
You can also refer to the document ”How to Set Up Metadata Engine” to use other types of databases as Metadata Engine.
Creating a JuiceFS file system
1. install JuiceFS client
curl -sSL https://d.juicefs.com/install | sh -
2. Create the file system
There are two methods to create a file system, either of which can be used depending on actual requirements.
Method 1: Use local hard disk as object storage
juicefs format sqlite3://myjfs.db myjfs
Method 2: Use Object Storage Service (data stored in object storage)
juicefs format --storage oss \
 --bucket https://myjfs.s3.us-east-1.amazonaws.com \
 --access-key abcdefg \
 --secret-key gfedcba \
 sqlite3://myjfs.db myjfs
Deploying WebDAV
Once you have prepared the JuiceFS file system you can start configuring the WebDAV. The easiest way to do this is to run JuiceFS directly as a WebDAV server.
sudo juicefs webdav sqlite3://myjfs.db 120.118.8.10:80
Just connect to http://120.118.8.10 using any WebDAV application.
Although it is very simple, anonymous access presents great security risks, first, no authentication means anyone who knows this IP address can read and write our files directly through WebDAV client; second, using unencrypted HTTP protocol, the communication process is easy to be eavesdropped and attacked. Solve the first problem by setting authentication for WebDAV, and the second problem by configuring SSL certificate to enable HTTPS encrypted connection support.
Enable authentication
JuiceFS v1.1 (as of this writing, this version is not officially released) and above start to support WebDAV authentication and SSL certificate function, please confirm your client version before enabling it, please refer to ”Manually Compiling JuiceFS Client” to compile the main branch.
It is simple to set the username and password for WebDAV, just set the appropriate environment variables:
export WEBDAV_USER=user
export WEBDAV_PASSWORD=mypassword
SSL Certificates
Enabling HTTPS for WebDAV requires an SSL certificate, use a certificate issued by a trusted CA authority or a self-signed certificate.
CAs usually only issue certificates for domain names. Free certificate issuance tools include certbot, acme.sh, etc. Use these tools to apply for a free SSL certificate.
Requesting a certificate from a CA is a separate topic, so for simplicity’s sake, we’ll use a self-signed certificate.
1. Generate the server private key
openssl genrsa -out private.key 4096
2. Generate Certificate Signing Request (CSR)
A series of information needs to be provided interactively in this step.
openssl req -new -key private.key -out client.csr
3. Use CSR to issue certificates
openssl x509 -req -days 365 -in client.csr -signkey private.key -out client.crt
4. Cleanup
rm client.csr
After above steps, private.key and client.crt are generated in the current directory, use them to run the WebDAV service.
Enable WeDAV
You can now run a WebDAV service with basic authentication and HTTPS:
export WEBDAV_USER=user
export WEBDAV_PASSWORD=mypassword
sudo juicefs webdav --cert-file ./client.crt --key-file ./private.key sqlite3://myjfs.db 120.118.8.10:443
At this point, with HTTPS enabled, we need to use the address https://120.118.8.10, and enter the username and password to connect.
In addition, since a self-signed certificate is used here, some clients may issue a warning that the certificate is not trusted during access, which can be safely ignored.
If you have mapped a domain name for your server and have applied for an SSL certificate, the command to deploy WebDAV should be adjusted:
export WEBDAV_USER=user
export WEBDAV_PASSWORD=mypassword
sudo juicefs webdav --cert-file ./your-domain.crt --key-file ./your-domain.key sqlite3://myjfs.db www.your-domain.com:443
Accordingly, the access address should also be changed to your domain name, for example: https://www.your-domain.com . With the certificate issued by CA, WebDAV clients can access without warning.
Examples
Here is an example of how to configure the ES file browser, Joplin, to synchronize document data using your own WebDAV service.
Note: When setting up WebDAV in some applications, if the application complains that it cannot connect to WebDAV despite the authentication information were entered correctly, the application itself might not support self-signed certificates, resolve this problem by configuring the WebDAV service with a trusted certificate issued by a CA instead.
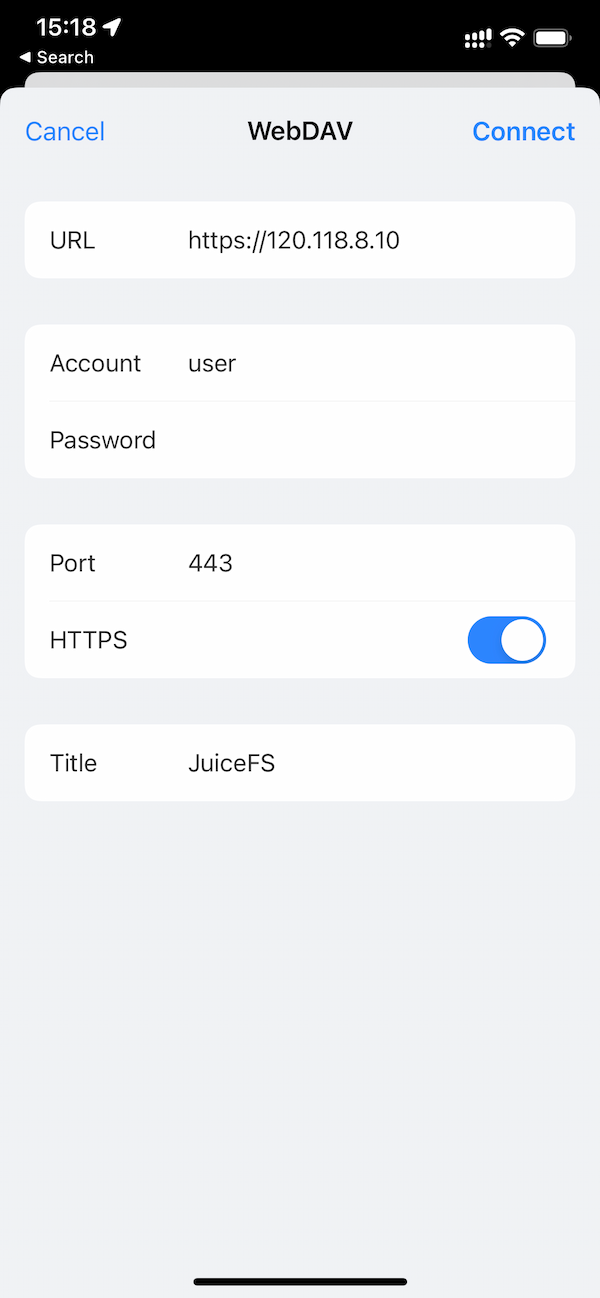
ES File Explorer
ES File Explorer is a common third-party file manager for cell phones. In addition to managing files on the phone, it also supports adding many third-party storage services, including WebDAV.
Simply add a new WebDAV type of storage in the service menu and fill in the address, user name and password as shown below.
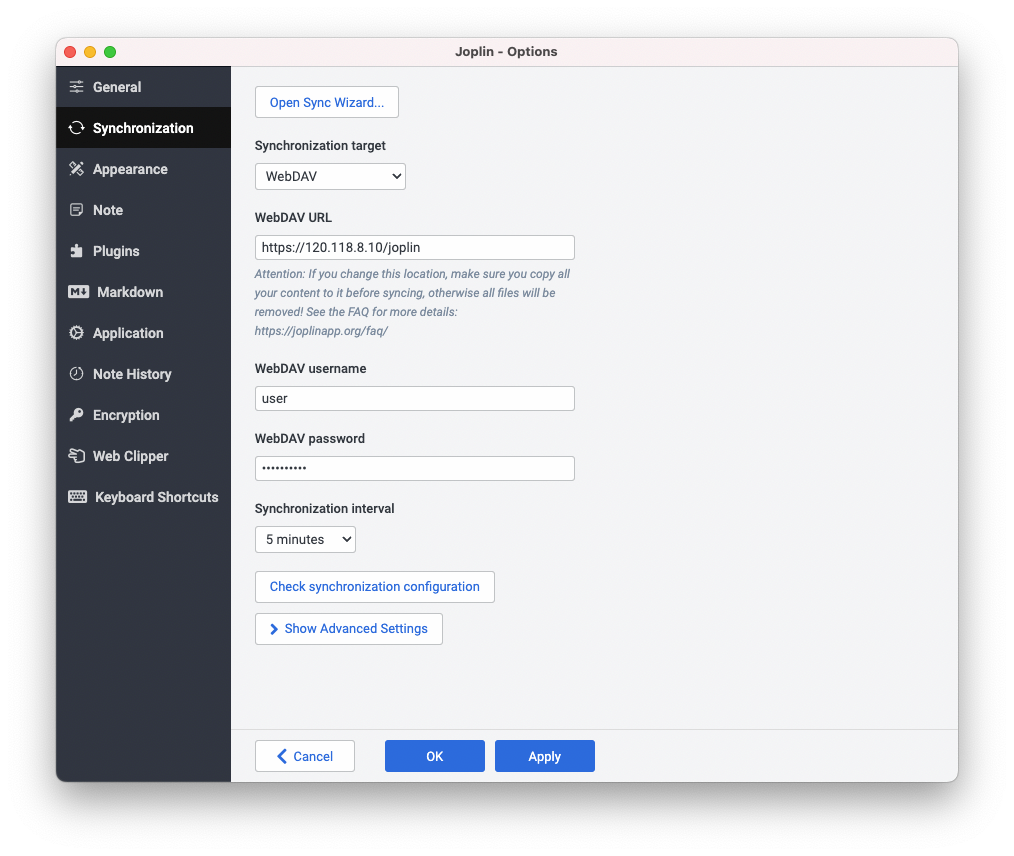
Joplin
Joplin is an open source Markdown note-taking software that supports synchronizing documents using WebDAV. Simply enter the WebDAV URL, username and password in the sync settings.
Note that we are using a self-signed certificate here, which will cause Joplin to report an error when checking the sync configuration. The solution is to expand the advanced options, check “Ignore TLS certificate errors”, apply the settings and try to check to pass the verification.
Finally
Similar to FTP, WebDAV is also a relatively old file sharing protocol, but they are still widely used today. There is never a best tool in the information technology field, only the most suitable one. In terms of features, WebDAV may not be as feature-rich as other file hosting services, but the WebDAV protocol is more universal and open, and can be used directly on a large number of applications with built-in support, not only to protect your privacy, but also to avoid being coupled to a specific platform.
WebDAV is just one of the many access interfaces supported by JuiceFS. You can further explore other access interfaces if you are interested, such as POSIX in the form of local disk access, S3 gateway in the form of S3 API, and Docker Volume Plugin, Kubernetes CSI driver, etc. The flexible use of these access methods can achieve more efficient and flexible cloud storage management capabilities, and we will share more about them in future articles.