Google Colaboratory (Colab) is a cloud-based Jupyter notebook environment provided by Google. It allows Python programming directly through a web browser. Leveraging Google's idle cloud computing resources, Colab offers free online programming services and GPU resources.
Although there are certain rules and restrictions on use, it’s adequate for research and learning purposes. To persistently store files in Colab, users often use Google Drive. However, Google Drive has usage restrictions such as total upload bandwidth and maximum file count. As an open-source distributed file system, JuiceFS has no such limitations and is cost-effective by flexibly organizing resources.
This post will share how to use JuiceFS in Google Colab for persistent data storage. It will also provide examples to illustrate its practical application for better data storage and reuse.
About Google Colab
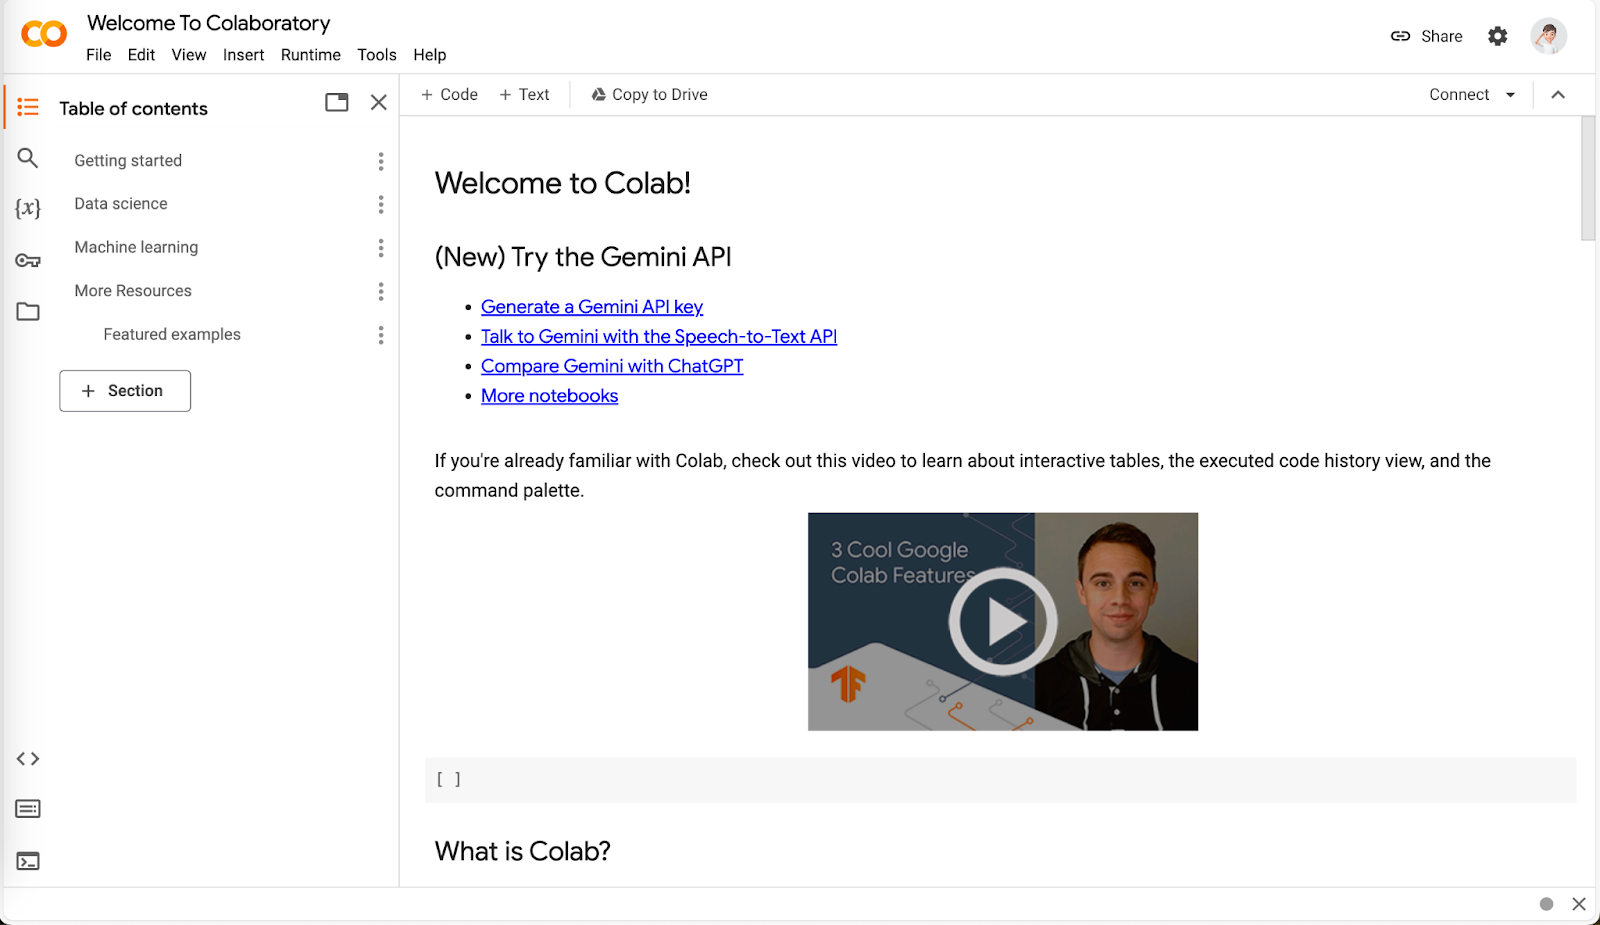
In Colab, you can create new notebooks, load notebooks from Google Drive or GitHub, or directly upload from local storage.
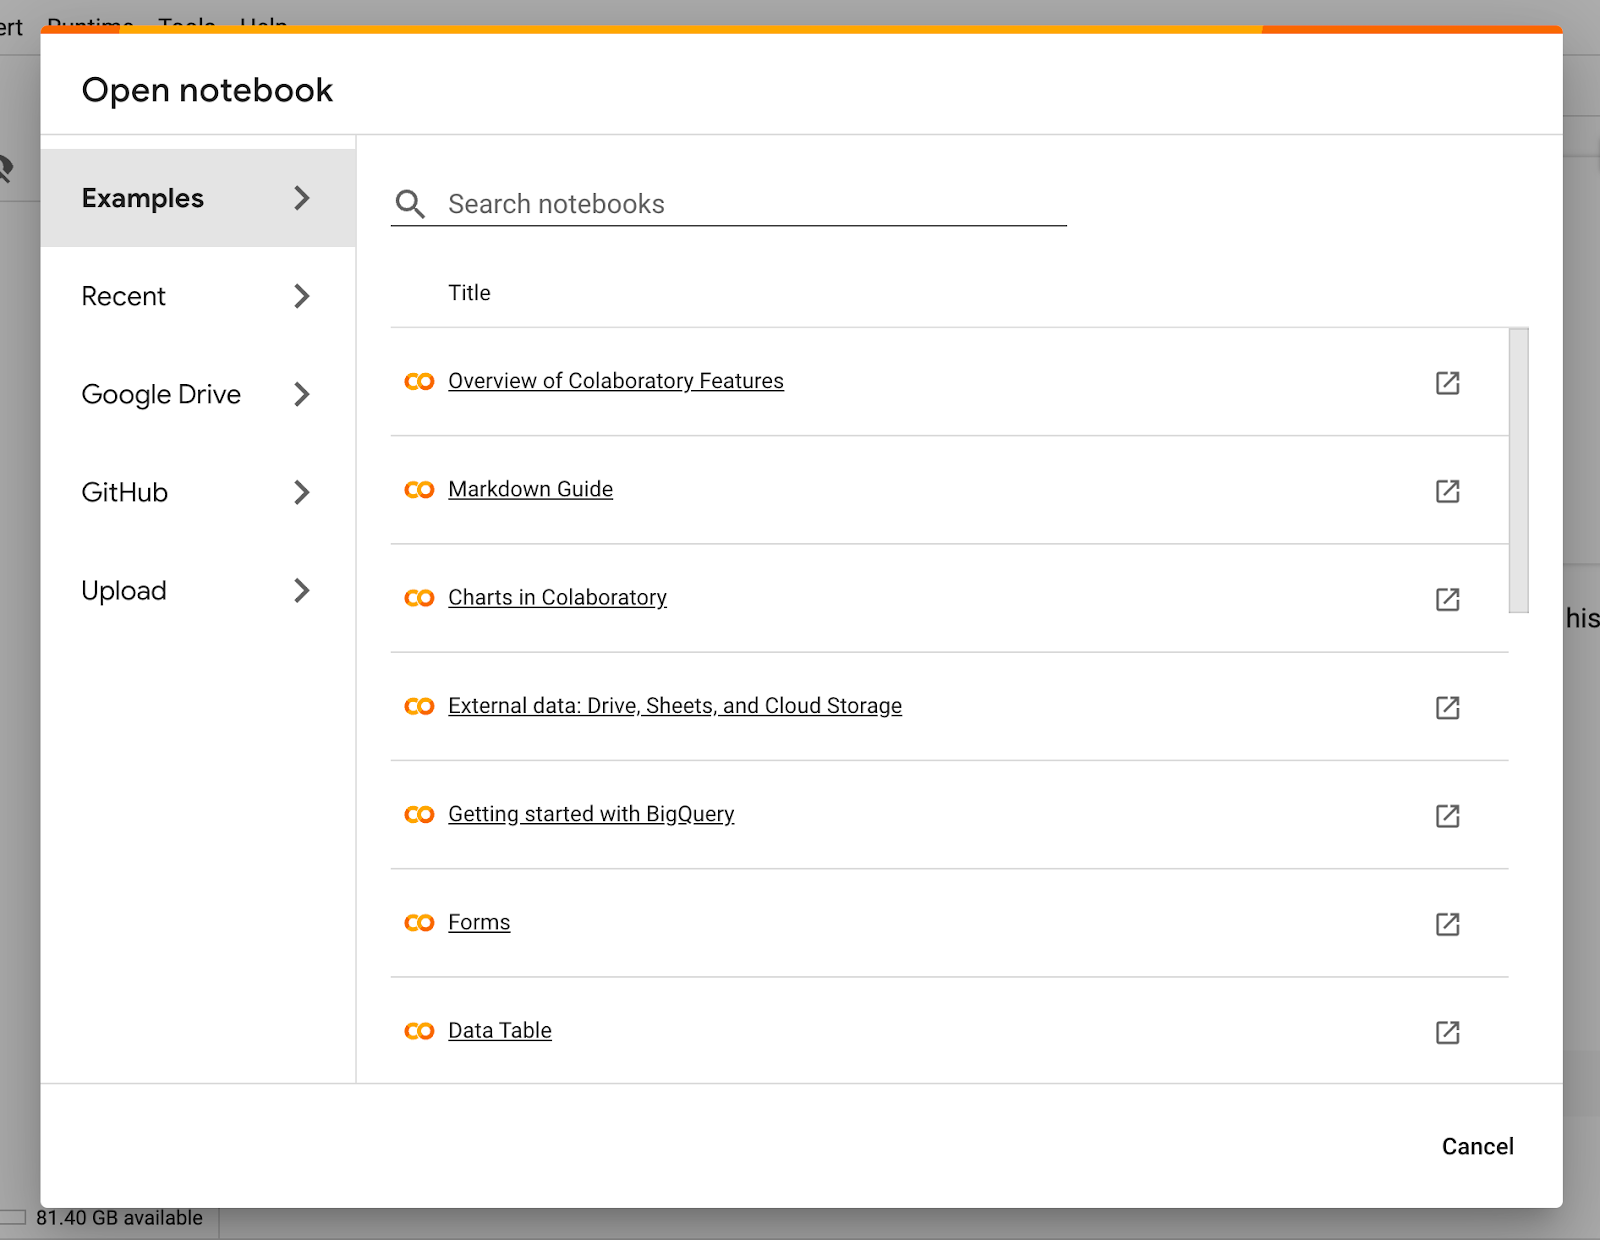
Colab offers a Python programming environment with ample resources, as shown below, with 12 GB of RAM and 100 GB of disk space.
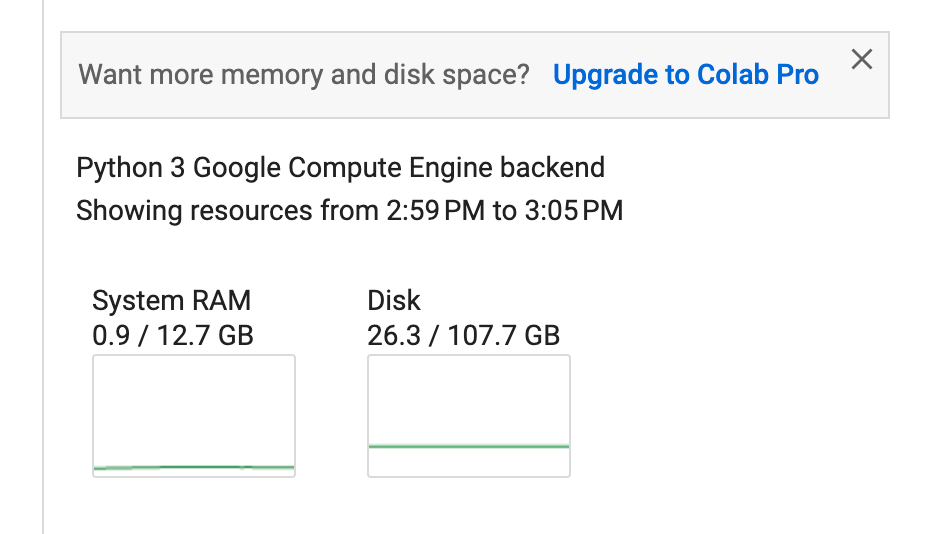
If you want to accelerate hardware, you can switch runtime types. As the figure below shows, my account can use T4 GPUs and TPUs for free.
Note that Colab runtime is temporary. The platform monitors runtime activity. Long-term idleness or high-intensity usage may cause the runtime to be disconnected and released, and all data will be cleared.
Persist data in Colab using Google Drive
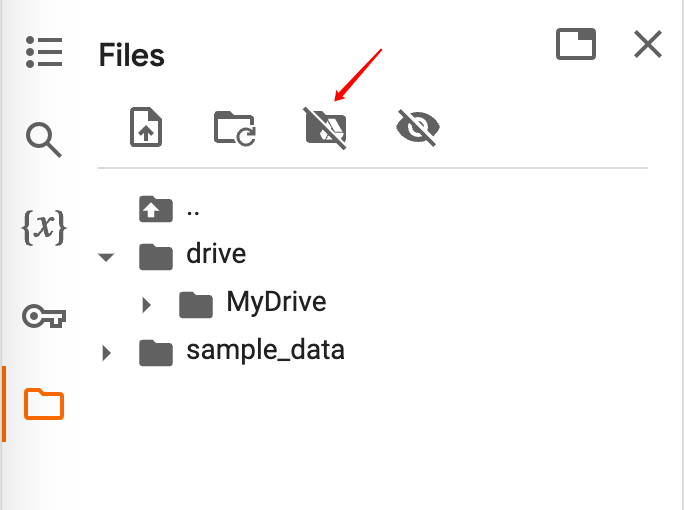
To persistently store files in Colab, users generally use Google Drive. As shown in the figure below, click the button in the file management on the left side of the interface to mount Google Drive to the runtime. Then, save the data that needs to be retained or reused for a long time in it. It can be loaded from Google Drive when used again. This avoids data loss when the runtime is released.
In addition to Google Drive, you can use JuiceFS as an alternative for persistent storage in Colab notebooks. This allows you to save and share large-scale data more flexibly.
JuiceFS vs. Google Drive
The table below offers a general comparison between JuiceFS and Google Drive. I’ll share more details of JuiceFS' architecture and how to create a file system suitable for Google Colab. In summary:
- Google Drive has platform advantages, offering easy integration with Colab and a variety of storage capacities for scaling. However, it comes with usage restrictions such as total upload bandwidth and maximum file count.
- JuiceFS is a self-managed service without such limitations and can be cost-effective by flexibly organizing resources.
| Comparison basis | JuiceFS | Google Drive |
|---|---|---|
| Pricing | Flexible cost (depends on metadata engine and object storage) | Fixed subscription based on capacity |
| Integrated with Colab | Easy | Easy |
| Maintenance | Required | Not required |
| Scalability | Unlimited capacity | 15 GB ~ 30 TB |
| Upload limit | No limit | 750 GB of data can be uploaded and copied to cloud storage within 24 hours |
| Cross-platform sharing | Flexible | Not so flexible |
Using JuiceFS
JuiceFS is a cloud-native high-performance distributed file system, licensed under Apache 2.0. It has complete POSIX compatibility and supports various access methods, including FUSE POSIX, HDFS, S3, Kubernetes CSI Driver, and WebDAV.
In Colab, you can mount JuiceFS using the FUSE POSIX method as a background daemon.
JuiceFS architecture
The following figure shows the JuiceFS architecture:
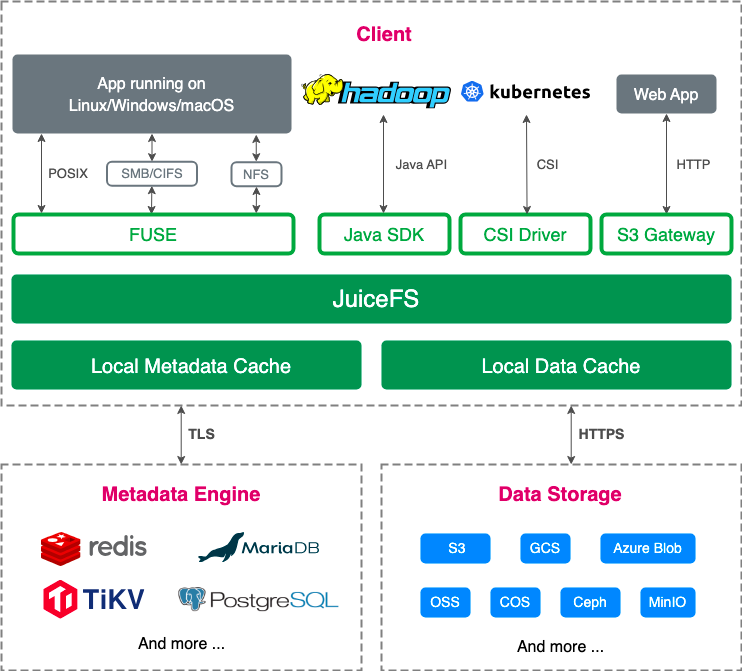
A typical JuiceFS file system comprises an object storage for data storage and a metadata engine for metadata storage:
-
For object storage, it supports nearly all public cloud object storages, on-premises deployed object storages, NFS, SFTP, and local disks.
-
For metadata engines, it supports various databases such as Redis, Postgres, MySQL, TiKV, and SQLite.
By employing a data and metadata separated storage architecture, JuiceFS conducts read and write operations on the metadata engine first. Only when actual data operations are involved, it will access the object storage. This brings highly efficient processing of massive data and provides better performance compared to direct interaction with object storage.
In short, the metadata engine is crucial. If you want to improve the performance of the JuiceFS file system, a golden rule is to "deploy the metadata engine as close to the application end as possible." Taking Colab as an example, most of its servers are located in the United States. Therefore, finding an American cloud server to deploy Redis and pairing it with a reliable object storage is an ideal combination for building a JuiceFS file system.
JuiceFS configuration for Colab
1.Set the metadata engine
To maximize JuiceFS' potential on Colab, I chose a cloud server located in Silicon Valley, USA, to deploy Redis as JuiceFS' metadata engine. The configuration includes:
- Location: Silicon Valley, USA
- CPU: 2 cores
- RAM: 4 GB
- SSD: 60 GB
- OS: Ubuntu Server 22.04
- IP: 18.18.18.18
- Domain: redis.xxx.com
Note: The IP and domain above are for demonstration purposes. Please replace them with your actual information.
Based on JuiceFS' documentation, using Redis as a key-value database for metadata storage typically consumes about 300 bytes per file. Thus, 1GB of memory can store metadata for approximately 3.5 million files. You can adjust the server's memory configuration based on your expected total file count.
In this article, I use Docker to deploy Redis and use Let's Encrypt to issue a free SSL certificate to encrypt the server:
# Pull the Redis image.
sudo docker pull bitnami/redis:7.2

# Delete the existing Redis container with the same name (if it exists).
sudo docker rm -f redis

# Create a new Redis container.
sudo docker run -d --name redis \
-p 6379:6379 \
-v redis_aof_data:/bitnami/redis/data \
-v ./ssl:/ssl \
-e REDIS_PASSWORD=abcdefg \
-e REDIS_TLS_ENABLED=yes \
-e REDIS_TLS_PORT_NUMBER=6379 \
-e REDIS_TLS_AUTH_CLIENTS=no \
-e REDIS_TLS_CERT_FILE=/ssl/redis.xxx.com.crt \
-e REDIS_TLS_KEY_FILE=/ssl/redis.xxx.com.key \
-e REDIS_TLS_CA_FILE=/ssl/ca.crt \
--restart unless-stopped \
bitnami/redis:7.2
This Redis instance enables the following features:
- AOF (Append Only File): It records each write operation to the local disk, thereby enhancing data security.
- Server SSL: The Redis server communicates with clients using the SSL/TLS protocol. Simply place the SSL certificate in the
ssldirectory and ensure to modify the certificate file names in the environment variables.
After deploying Redis, you need to check the firewall to ensure that the server allows inbound requests on port 6379. With this setup, the Redis metadata engine is ready for use.
2.Set the object storage
For object storage, I chose Cloudflare R2. This is because it offers free upstream and downstream traffic, and I only need to pay for storage and API requests. It’s suitable for Colab scenarios where external access to JuiceFS is required. Especially when the storage capacity is large, the model data needs to be loaded into Colab every time, and downstream charging will incur considerable expenses.
The following is the object storage information written for demonstration purposes. Please replace it with your own real information in your configuration:
- Bucket name:
myjfs - Endpoint URL:
https://xxx.r2.cloudflarestorage.com/myjfs - Access key:
abcdefg - Secret key:
gfedcba
3.Create a file system
With the metadata engine and object storage ready, use the JuiceFS client to create the file system.
You can perform this step on any computer that supports JuiceFS client installation, whether it's your local machine or the cloud server where the Redis instance is deployed.
Because JuiceFS is cloud-based, JuiceFS clients can be created and used as long as they have access to the metadata engine and object storage.
1.Install the JuiceFS client:
# For macOS or Linux systems
curl -sSL https://d.juicefs.com/install | sh -

# For Windows systems (Scoop recommended)
scoop install juicefs
For other systems and installation methods, see the JuiceFS installation document.
2.Use the prepared metadata engine and object storage to create a file system:
# Create a file system.
juicefs format --storage s3 \
--bucket https://xxx.r2.cloudflarestorage.com/myjfs \
--access-key abcdefg \
--secret-key gfedcba \
rediss://:[email protected]/1 \
myjfs
The JuiceFS file system only needs to be created once, and then you can mount and use it on any device with the JuiceFS client installed. It’s a cloud-based shared file system that supports concurrent reads and writes across devices, regions, and networks.
3.Now you can mount and use this file system on any device with the JuiceFS client installed.
Here are several commonly used access methods:
# Mount using FUSE POSIX.
juicefs mount rediss://:[email protected]/1 mnt

# Mount as S3 Gateway.
export MINIO_ROOT_USER=admin
export MINIO_ROOT_PASSWORD=12345678
juicefs gateway rediss://:[email protected]/1 localhost:9000

# Mount as WebDAV.
juicefs webdav rediss://:[email protected]/1 localhost:8000
When mounting the JuiceFS file system, you only need to specify the metadata engine URL. The object storage-related information is no longer needed. This is because the object storage-related information has already been written to the metadata engine during the file system creation.
Mount JuiceFS in Colab
As shown in the figure below, the underlying layer of Colab runtime is an Ubuntu system. Therefore, you only need to install the JuiceFS client in Colab and execute the mount command to use it.
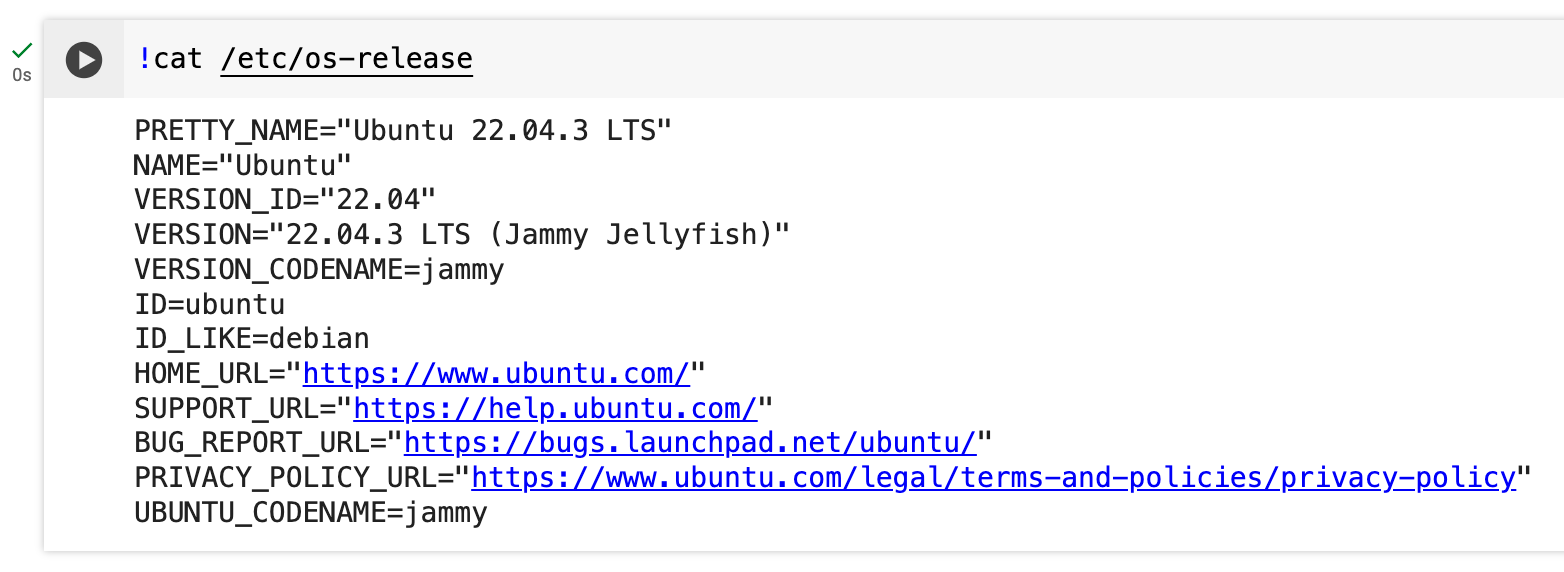
You can place the installation command and the mount command in one code block, or separate them into two independent code blocks as shown in the figure below.

Note: When mounting JuiceFS, do not forget the
-doption. It allows JuiceFS to be mounted in the background as a daemon process. Because Colab only allows one code block to run at a time, if JuiceFS is not mounted in the background, it will keep the code block running. This will prevent other code blocks from running.
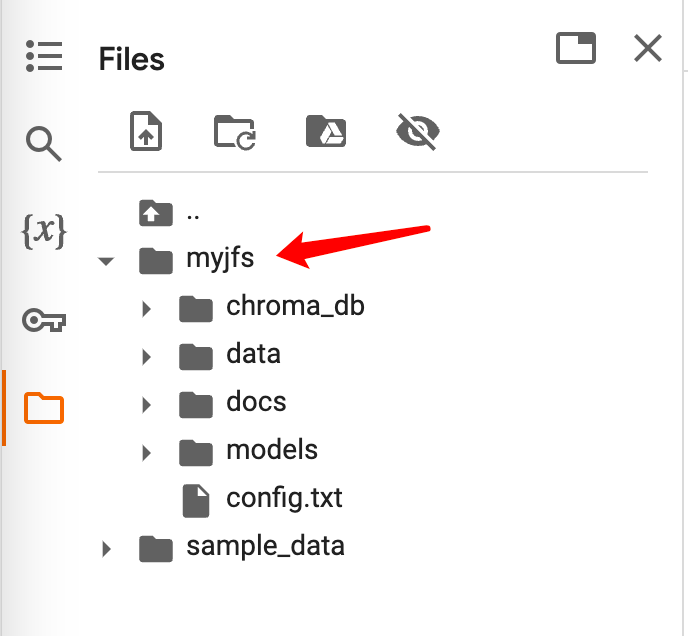
As shown in the figure below, you can see the JuiceFS file system that has been mounted in the file management on the left.
Examples
Example 1: Saving Fooocus models using JuiceFS
Fooocus is an open-source AI image generator. It uses the Stable Diffusion model but optimizes and encapsulates complex parameters to offer a simple and intuitive drawing experience like Midjourney.
You can use the Colab Notebook and add the code blocks for installing and mounting the JuiceFS file system to it. Alternatively, you can refer to the following code for more flexible creation and management of Fooocus-related code:
# Install the JuiceFS client.
!curl -sSL https://d.juicefs.com/install | sh -

# Mount the JuiceFS file system.
!juicefs mount rediss://:[email protected]/1 myjfs -d

# Create the directory structure for Fooocus models in JuiceFS.
!mkdir -p myjfs/models/{checkpoints,loras,embeddings,vae_approx,upscale_models,inpaint,controlnet,clip_vision}

# Clone the Fooocus repository.
!git clone https://github.com/lllyasviel/Fooocus.git
Create a custom config.txt file in the root directory of the Fooocus project to make Fooocus use the directory in JuiceFS as the default model storage directory:
{
  "path_checkpoints": "/content/myjfs/models/checkpoints",
  "path_loras": "/content/myjfs/models/loras",
  "path_embeddings": "/content/myjfs/models/embeddings",
  "path_vae_approx": "/content/myjfs/models/vae_approx",
  "path_upscale_models": "/content/myjfs/models/upscale_models",
  "path_inpaint": "/content/myjfs/models/inpaint",
  "path_controlnet": "/content/myjfs/models/controlnet",
  "path_clip_vision": "/content/myjfs/models/clip_vision"
}
Launch Fooocus:
!pip install pygit2==1.12.2
%cd /content/Fooocus
!python entry_with_update.py --share
Initial use requires downloading models from the public repository, which may take some time. You can simultaneously mount JuiceFS locally and observe the status of model saving.
For subsequent use, simply mount the JuiceFS file system and ensure that Fooocus can read the models from it. The program will dynamically pull the required models from JuiceFS. Although this takes some time, it’s more convenient than downloading them from the public repository every time. This advantage becomes more obvious when the models are fine-tuned or custom data is generated.
Example 2: Save the Chroma vector database with JuiceFS
It’s also common to build Retrieval-Augmented Generation (RAG) applications in Colab. This often involves saving the embedding data generated from various materials into a vector database.
LlamaIndex uses OpenAI's text-embedding model to vectorize the input data by default. If you don't want to regenerate the embedding data every time, you need to save the data to a vector database. For example, use the open-source Chroma vector database, because it saves data on the local disk by default. In Colab, you need to pay attention to the save location of the database to prevent data loss caused by runtime disconnecting.
Here, I have a set of Colab notebook code that allows you to save embeddings generated by LlamaIndex to the Chroma database. This Chroma database will be completely saved to JuiceFS:
# Install the JuiceFS client.
!curl -sSL https://d.juicefs.com/install | sh -

# Mount the JuiceFS file system.
!juicefs mount rediss://:[email protected]/1 myjfs -d

# Install packages required for LlamaIndex and Chroma.
!pip install llama-index chromadb kaleido python-multipart pypdf cohere

# Read OpenAI API key from Colab environment variables.
from google.colab import userdata
import openai

openai.api_key = userdata.get('OPENAI_API_KEY')
Place the files that need to be converted into embeddings in the myjfs/data/ directory, then execute the following code to generate embeddings and save them to Chroma. Thanks to JuiceFS' cloud-based shared access feature, you can simultaneously mount JuiceFS locally and put the required materials in the corresponding directory.
import chromadb
from llama_index import VectorStoreIndex, SimpleDirectoryReader
from llama_index.vector_stores import ChromaVectorStore
from llama_index.storage.storage_context import StorageContext

# Load some documents.
documents = SimpleDirectoryReader("./myjfs/data").load_data()

# Initialize the client, setting a path to save data.
db = chromadb.PersistentClient(path="./myjfs/chroma_db")

# Create a collection.
chroma_collection = db.get_or_create_collection("great_ceo")

# Assign Chroma as the vector_store to the context.
vector_store = ChromaVectorStore(chroma_collection=chroma_collection)
storage_context = StorageContext.from_defaults(vector_store=vector_store)

# Create your index.
index = VectorStoreIndex.from_documents(
    documents, storage_context=storage_context,
    embed_model_name="text-embedding-3-small",
)
When using, let Chroma read data from JuiceFS.
import chromadb
from llama_index import VectorStoreIndex, SimpleDirectoryReader
from llama_index.vector_stores import ChromaVectorStore
from llama_index.storage.storage_context import StorageContext

# Initialize the client, setting a path to save data.
db = chromadb.PersistentClient(path="./myjfs/chroma_db")

# Create a collection.
chroma_collection = db.get_or_create_collection("great_ceo")

# Assign Chroma as the vector_store to the context.
vector_store = ChromaVectorStore(chroma_collection=chroma_collection)
storage_context = StorageContext.from_defaults(vector_store=vector_store)

# Load the index from the vector database.
index = VectorStoreIndex.from_vector_store(
    vector_store, storage_context=storage_context
)
Test using your own index as a knowledge base to talk to GPT:
# Create a query engine and query.
query_engine = index.as_query_engine()
response = query_engine.query("What is this book about?")
print(response)
In this way, every time you enter a new Colab runtime, you can simply mount JuiceFS to directly access the vector data that has already been created. In fact, not only in Colab, but also in any other place where you need to access this vector data, you can mount and use JuiceFS.
Conclusion
This article introduced how to use JuiceFS in Google Colab to persistently store data. Through examples, it shared how to prepare metadata engines and object storage for JuiceFS to maximize its performance, as well as the installation and mounting methods in Colab. Finally, with the examples of Fooocus and Chroma, it illustrated how to use JuiceFS for better data storage and reuse in practical applications.
I hope this article is helpful to you. If you have any questions or would like to learn more, feel free to join JuiceFS discussions on GitHub and the community on Slack.


